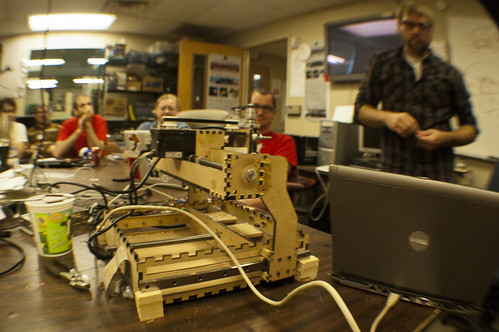
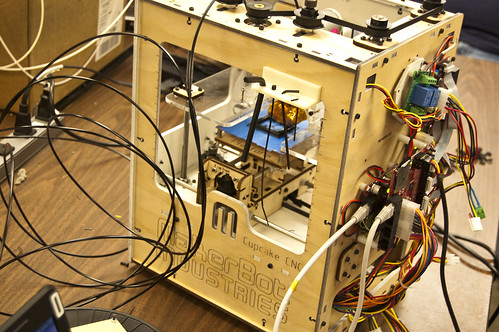
Categories
Uncategorized

A MakerBot Adventure

Drew's MakerBot
Drew’s MakerBot

We had a great demo at the Milwaukee Makerspace last week when Drew demoed his MakerBot Cupcake, and if you don’t know by now, the MakerBot is an affordable 3D printer that squirts out hot plastic based on 3D design files you feed it. If you’re not much of a 3D designer, you can browse Thingiverse for some good stuff.

Holder
Holder in 3DTin

Our old pal Pehr was also there, and he brought his MakerBot too, and when we were talking about 3D design software he said “Just go to 3DTin.com” and then we did…

The interface was a bit confusing at first, though admittedly I’ve never been able to get very far with 3D software. I did manage to design this thing I’ve called a holder.

Holder
Exporting Holder from 3DTin

Once I was done with the design, I was able to export it as an .stl file to my desktop. (There are other export options as well.)

3DTin itself is a simple to use 3D design application that runs completely in a browser. You can use it for free, or for $4.99 you can pay for the “premium” version, which gives you a few more features and hides the ads. I can see playing with this a bit more, or even having the kids give it a try. Meanwhile, I still need to dig into tools like Sketchup, or maybe Blender.

Holder
Holder in ReplicatorG

After exporting an .stl file, I loaded it into ReplicatorG to take a look at it. Once in ReplicatorG you can scale, rotate, and move the object as desired. Once I had it centered and scaled properly, I saved the file to an SD card and handed it to Drew to stick into the MakerBot. (As I understand it, you can also just print directly to the MakerBot via USB cable.)

Holder (raw)
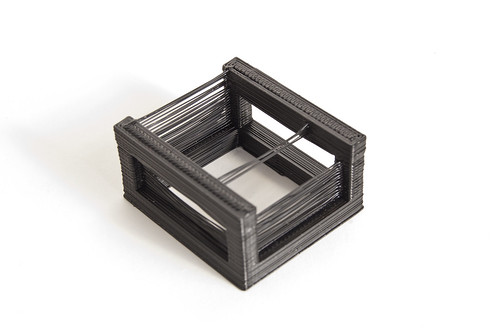
Holder (fresh from the MakerBot)

Once the holder was complete, it looked like this. You can see the strands still in place left from the printing process. These are from the print head moving between the two sides.
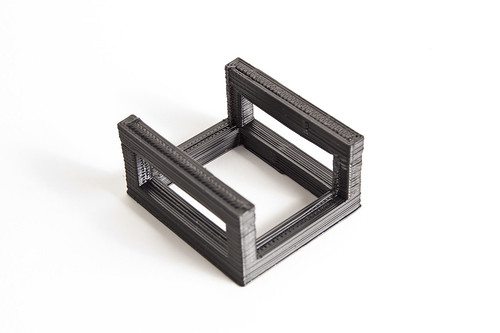
Holder (clean)
Holder (cleaned up)

Here’s what the holder looked like after I trimmed off the strands with an X-ACTO knife. This is obviously a simple object, but so far the process of designing it and printing it was well under an hour.
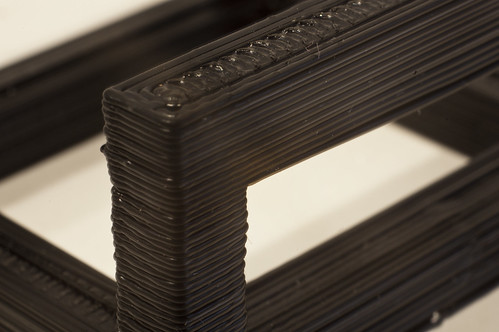
Holder (close-up)
Holder (close-up)

Here’s a close up showing the strands from printing. Commercial 3D printer have much higher resolution, so you don’t really see these lines in the objects they create. Supposedly the MakerBot can be tweaked to run slower for better resolution, but for many purposes, this is still good, and pretty darn impressive.

I’ve got some idea for other things I’d like to design, but for now, you can grab this Holder from 3DTin, and while I had no clue what it would be good for when I designed it, it does seem to work to hold an iPhone in landscape mode, or even as a business card holder.

Big thanks to Drew for the demo and the help in getting started on the MakerBot. I can’t wait to get some serious time with it at the Makerspace.

Oh, it sounds like we’ll also have some good 3D printer action at BarCampMilwaukee6 if you want to come and check it out.

Categories
Uncategorized

Squeegee Making

Squeegee (in progress)

So two years ago I managed to acquire this long piece of rubber that would be perfect to make screen printing squeegees out of, but, you know, I’ve been busy making buttons and drawing on eggs, so I never got around to making the squeegees.

OK, the real reason I didn’t make the squeegees is because I couldn’t figure out a way to do it and actually have them look good and function well. That’s where Milwaukee Makerspace comes in…

I first started by asking some questions about cutting grooves into wood. That led to learning about dado blades (which are quite expensive!) and eventually about routers, and router tables, and how to use them (properly!) to cut grooves.

So last night I cut my first groove, slid the piece of rubber into it, and I’m this much closer to my first squeegee.

Squeegee (in progress)

I still need to drill some holes and get some t-bolts in place, but I’m on my way to having a collection of different sized squeegees.

When I worked at a screen printing shop, we had about 30 of them in various sizes. We’d pick one that matched the size of the artwork. It’s also handy to have a bunch of squeegees around, since there’s a 4-color screen printing machine at the Makerspace, and you’re gonna need one for each color.

(Oh, I also posted about this over at the newly launched Milwaukee Makerspace web site. I may post there from time to time as raster.)

Also worth noting, I celebrated this small victory by riding Mr. Overbeck’s scooter around the parking lot at high speeds, and then listening to the craziest noisebox I’ve ever heard courtesy of Mr. Bastyr.

Categories
Uncategorized

Shapeoko at Milwaukee Makerspace

Shapeoko at Milwaukee Makerspace

You may have heard me talk about the Shapeoko, a DIY CNC Mill you can (well, should be able to) build for around $300. Edward Ford, the guy behind the project, just wrapped up a Kickstarter campaign to fund the project. And just to be clear, he’s been working on this project for many years, it’s not like he just had an idea a few months back and launched a campaign. (2004 is when he first attempted to build a CNC Mill.)

Edward was kind enough to make the drive up to the Milwaukee Makerspace and talk about Shapeoko with us. It was great to hear about the project, and I think he may have even gotten a few new ideas while he was here. :)

The goal of Shapeoko isn’t to build a business around selling these things, but to create a project that is fully open source, with easy to acquire materials. Typically when you find web sites describing a DIY CNC machine, they involved getting parts from ebay, or from scrap, or other unreliable sources. Edward wants you to be able to get all the parts you need easily, and not have to scrounge around and have a friend who happens to own a mill to make you parts.

Edward’s demo was great, because he wasn’t afraid to talk about all his failures. He admits he’s not an engineer, and he’s learned a lot over the past 7 years about designing and building things. A lot of his description of the project included “So I tried X, and that didn’t really work, then I tried Y…” type things. Experimentation, a bit of guessing, and a lot of testing.

We also learned a bit about running a Kickstarter campaign, and some of the gotchas involved with that. Like refunds, and how you can end up losing money if you issue one, and what happens when there are insufficient funds. Great tips for anyone interested in Kickstarter.

So now that the Kickstarter campaign is done, and instead of the $1,500 he was hoping for, he’s got about 7 times that much, he’s been ordering parts, and is working on a new design, correcting any of the problems that previous designs have had.

For more on the project, check out the web site at shapeoko.com, as well as the blog, Twitter, and the forum.

Categories
Uncategorized

Makerspace / Frolics / Parade

Old Milwaukee Makerspace

The Milwaukee Makerspace, led by David Overbeck, took part in Milwaukee’s South Shore Frolics Parade on July 16th, 2011. in 2010 I joined David in watching the parade, and it was great… I mean, it’s commonly known as Milwaukee’s Best Parade, so it was with great pleasure I was able to join David this year in the parade. The Makerspace crew made it all happen.

Giant Arduino

The Milwaukee Makerspace members joined together to do a “Group Build” where everyone pitches in to do something big… and by big, I’m taking about a 9 foot tall “Old Milwaukee Makerspace” beer can, and a giant double-Arduino (and jet) powered vehicle. We were also joined by Grave Digger and Little Pink Trike, which you might know from the Power Racing Series where they’ve done pretty well.

We had a few “issues” getting everything working in time, and getting everything to hold together, but I’m proud to say we completed 99.8% of the parade route without issue, and I think we delighted the crowd.

Everyone had a good time, and I get the feeling this isn’t the last parade the Makerspace will take part in… I mean, there’s another parade in just a few months… :)

Categories
Uncategorized

Terrible Photos

Arduino Uno

Here’s a terrible photo of an Arduino Uno…

Diavolino

And here’s a terrible photo of a Diavolino…

Seeeduino

And here’s a terrible photo of a Seeeduino…

These are three terrible photos! I mean, they aren’t terrible terrible, but they’re not great. I could spend a few minutes with each one explaining what I don’t like about them.

We needed a good high resolution photo of an Arduino Uno for a project at the Milwaukee Makerspace, and I said I would quickly snap a photo and get it online, so I did.

I feel like 80% of the quality of these shots are due to the equipment. I used a Nikon D3x with a Nikon 28-70mm f2.8 lens. That’s a great combo. I also used our Elinchrom studio strobes, which are also very nice. I shot tethered to a 21″ Apple iMac, which showed the images on a large colorful screen as they were captured.

Honestly, with all of that stuff in place, anyone familiar with a DSLR and lighting could get a pretty decent shot.

When I use words like “terrible” and “decent” they are, of course, subjective. There’s a whole scale for applying those words. One photographer’s “terrible” is another photographer’s “awesome!”

Besides, these are more “technical” photos than “beautiful” photos. There’s not much style to them. But these also fall under the category of Product Photography, which is worth discussing…

Photography is an interesting thing, because there are so many different disciplines, and so many different subjects. I know some guys who only shoot beautiful women between the age of 18 and 25, outdoors, on sunny days. (Or so it seems.) Other people I know shoot landscapes and nothing but landscapes. Well, HDR landscapes actually. That’s all they do… and that’s all fine, but it’s not product photography.

None of the three photos above would be good examples of product photography, and I’ll explain why:

  1. The items are used.
    If you’re shooting a product, it should be brand new, fresh out of the box, never used. Used items are not the same as clean items. Do you know why? It’s because…

  2. The items are dirty.
    Once an item gets used, it gets dirty. It gets worn down. It gets fingerprints, and smudges, and dirt, and scrapes, and doesn’t look very nice. Yes, you can clean things, and we often joke about the fact that 75% of product photography involves cleaning things, while 15% involves taking pictures. The other 10%? That’s for cleaning it again.

There’s also a number of tricks when shooting products, as opposed to portraits, or landscapes, or beautiful women. Don’t get me wrong, each thing has its own tricks, but they are often different tricks. Actually, they mostly have to do with reflecting light, or blocking light, or basically controlling light, in different ways.

But if you aren’t shooting products for a client, but you are shooting things for your own purpose, like documenting projects, you might find it helpful to learn more about product photography.

And when I say learn, feel free to learn in your own way. If you can assist a product photographer, that would be good, but if you can’t, then study good photos, figure out what you like about them. Learn to control light. I’m not ashamed to say that some of the photos of things that I’ve taken that I really liked, I ended up shooting 30 different versions, all with slightly different lighting. That’s just how I do it. Take a shot, move a light. Take a shot, move a reflector. Take a shot, place a black board directly overhead instead of a white board. Take another shot. At some point after you think you have enough shots, stop. Review them later on a large colorful screen and pick the best one.

Trial and error is still an effective way of learning something… In fact, it may be the only way to learn something.