Categories
Uncategorized

(Additional) Nerdy Derby Cars

Great White

There’s a great post over on the Milwaukee Makerspace site about Milwaukee’s First Nerdy Derby, including some sweet video, but I’m mainly going to talk about my own cars here. :)

I spent a lot of time before BarCampMilwaukee7 getting ready for the event, but I also found a bit of time to fabricate a bunch of parts for people to build cars with, so I was down to the wire when it was time for me to make more cars. I already had Poundin’ Sand, my fully laser-cut car, but I wasn’t content to just have one car. (I had heard Jim R. from the Makerspace had five cars. He didn’t race that many, as I think one or two of them exploded during testing.)

My second car was titled “Great White” and was a 3D print of Mr. Jaws. I ended up kicking out some quick axle mounts in OpenSCAD and just hot gluing them to the bottom of Mr. Jaws. They probably weren’t on straight, but I didn’t take the time to care. In the category of 3D printed cars… I still came in second! Ed managed to build an amazing 3D printed car, and the worst (best?) part is, he pretty much had the same idea as I did, but he managed to succeed. (Print time and print failure were the two biggest concerns for both of us.) I ended up using stock wheels instead of the 3D printed wheels I made a few weeks earlier, which seems silly as I could have gone for a full-on 3D printed car… oh well.

RasterMobile!

My third car was the RasterMobile! which actually consisted of a block of wood from a real Pinewood Derby kit, turned sideways, with two holes drilled all the way through, and 5/16″ threaded rod with inline skate wheels attached. I had skate bearings that seemed to turn well, I had some weight and mass, and it was painted black with RasterWeb! stickers on it. What could go wrong!?

So how did my cars do? I didn’t expect much out of Great White, as it was really light, and the wheels were probably not completely straight. It rolled down the track, so that’s all I can report on that one. I still think it looked cool and was a neat idea. The RasterMobile! didn’t do as well as I expected. I thought it would fly down the track, and I suppose it did, but the mass of it probably slowed things down too much at the bottom. I did get a some satisfaction that Gary saw the skate wheels, ran to his car and ripped apart his inline skates just to try to beat me with my own idea. :) Oh, the RasterMobile! also had an accident where it jumped out of its lane, so that certainly didn’t help things.

So which car did the best? Surprisingly it was Poundin’ Sand that performed the best out of my three cars. I wasn’t sure the laser-cut wheels would be up to the task, and I questioned whether not gluing the 3 layers that comprised each wheel together was a good idea or not, but it did alright!

Poundin' Sand

There’s been talk of doing another race in the future, so I may not be done building tiny cars…

Categories
Uncategorized

Fixing the Fixture

Adapter

I (somewhat) jokingly posted something the other day about how my wife asked me to 3D print something, and was totally serious this time and not sarcastic about it. To be fair, she’s heard me say “I’ll just 3D print one!” about 100 times this summer, and was probably sick of it, but when you live in the future, it’s pretty damn exciting.

Or story begins back in 2009 when we moved into our current house. The light above the front door was just a bare bulb, with nothing around it. I’m assuming there was a glass ball at one point, and it must have broke, or been stolen, or dematerialized. No matter, we can fix it.

3D Printed Part

While at Home Depot the wife found a cheapie plastic majigger that would fit over the light bulb, so we bought it. This is also when she suggested I could “make it work” and thus, I agreed.

I ended up using OpenSCAD to design a simple ring that would press-fit the new piece, and have the needed holes to fix the fixture… and adapter, if you will.

It fits!

It worked! As you may notice, there are no mounting holes. I often don’t bother making holes in the objects I print because I’ve got a drill press, and it makes much more precise holes than the RepRaster 5000 can. (And just to be clear, the clear piece is not what I printed. I printed the black piece. Got it?)

Holes for screws

Here’s the piece after I drilled the holes and secure it into the fixture with two small bolts. Sadly the small bolts are a little long, and stick out the top, but hey, it’s still an improvement.

Fixed!

So now on the front of the house is this lovely cheapie plastic majigger instead of just a bare light bulb. Home Improvements FTW!

This is one more thing where I really don’t know how I could have done this as elegantly without a 3D printer. Using open source software I designed the needed adapter and then printed it out using open source hardware, and the total cost of materials (ABS plastic) was probably less than 50 cents. As I said… living in the future and all that.

Categories
Uncategorized

3D Printed Guns for Everyone!

Glock (from Thingiverse)

The media is up in arms about Have Blue’s “3D printed gun” (which he brought to the Milwaukee 3D Printing Meetup last month, by the way…)

And yeah, I put “3D printed gun” in quotes because it’s just one part of a gun. But you’ll see headlines like Hobbyist builds working assault rifle using 3D printer, Functioning 3D-printed rifle you can make at home, The world’s first 3D-printed gun is a terrifying thing, and A Working Assault Rifle Made With a 3-D Printer.

Those are all great headlines, and if you read the articles, they might explain things a bit more, but the short version is, Have Blue printed a part of a gun. He didn’t print an entire gun, and he didn’t print ammunition. The next headline might be “Guy with tools makes a gun” because the only new thing here is the 3D printed part. People have been making guns at home with machine tools for years, and as I understand it, it’s legal in the United States.

Saying he printed a working gun is akin to saying I printed a house because my RepRap made a coat hook, and I just, you know, assembled all the other parts around it to complete the house.

So before you think I’m some gun-toting lunatic building weapons in my basement, well… I’m not. (I do have a few Art Robots I’m working on, but the headline “Man builds working Art Robot with 3D Printer” is not very exciting.)

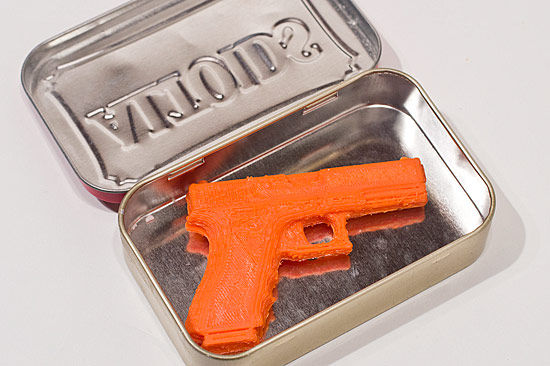
Anyway, I figured that everyone needed a gun, so I grabbed this Glock from Thingiverse. I printed it out in 30 seconds. Well, in an hour, but the time lapse below is 30 seconds long.

So here’s a nice photo showing my 3D printed gun. It’s orange because I’m running low on black filament and haven’t got any nice silver filament yet.

3D Printed Gun

I wanted my 3D printed gun to be a little smaller so it would fit in a mint tin. Oh, did I mention it’s not fully functional yet? Yeah, I should have mentioned that…

I’ve been thinking a lot about guns lately, and if you can forgive me this (slightly) humorous post, I’ll expand upon my gun-related thoughts in a future post.

Categories
Uncategorized

MKE3DP – 3D Printer Fans Unite!

MKE3DP

As you may know, I finished my RepRap recently. But here’s the thing, you never really finish a RepRap. It’s a beast in need of endless tweaking. So yeah, it’s a never-ending project (if you want it to be) and I’m okay with that. I mean, once you get to the point that it works, you can start using it to upgrade itself. How many tools can do that!?

Of course you can actually make useful things, functional things, or just pretty things. There’s a lot a 3D Printer can do. I’ve only been at it for less than a year and I’ve still got a lot to learn.

So anyway, yeah, I’m really enjoying this 3D Printing stuff… so I figured, why not share it with others? So join us for the first Milwaukee 3D Printing Meetup! We’ll be meeting on Sunday, July 1st, 2012 at 1:00pm. We won’t be at our space because we’ve partnered with our friends at UWM for this one! Show up at UWM’s Kenilworth Square East Building, 3rd Floor; Room 368 on 1925 E. Kenilworth Place.

If you’ve got a 3D Printer, bring it, or just show up and learn about them. If things go well and there’s interest, maybe we’ll turn it into a regularly scheduled meeting.

(More info? It’s also on the Milwaukee Makerspace site and you can RSVP on Facebook if you want to see who else will be there.)

Categories
Uncategorized

Hot Shoe Audio Mount

Since I’ve got the RepRap I can start on some projects I’ve been meaning to tackle, one of which is printing some camera accessories.

Hot Shoe Audio Mount

Thingiverse is full of weird combos of objects smashed together, such as the Lepus Colberus (The Colberabbit), but you can also combine individual objects in other ways.

I grabbed this 1/4-20 Thumb Screw and this Nikon DIY GPS Holder and combined them into a new thing.

Hot Shoe Audio Mount

The nice thing about the “Nikon DIY GPS Holder” I printed was that I can see it being a generic part I can modify in the future. I can easily import the STL file into Google Sketchup and built on top of it. (I did find this camera mount accessory, but the assembly was a little more complex than I wanted to deal with.) It did take a little bit of work with a file to get the part to fit the hot shoe on my Nikon, but that’s probably a good thing. I got it to fit just as snug as I wanted after minimal filing and sanding.

Hot Shoe Audio Mount

I’m still calling this one a prototype. I ended up drilling out the hole for the bolt, and I cut the head off the bolt to be able to make it all fit together. It works, but I can see some improvements for next time. (I’m also expecting better quality from the RepRap as I get better at calibrating and operating it.)

Hot Shoe Audio Mount

Here’s the mount on the hot shoe of my camera. I haven’t done a ton of video shooting with the Nikon D3200 yet, but I know that most DSLR microphones are not very good, and secondary audio is pretty standard, so by mounting the Zoom H2 on the camera I can get better audio, and I can also monitor the audio, which you can’t do with the Nikon D3200. (The Nikon D800 does allow you to monitor audio from the camera, but we still haven’t received ours.)

So besides two nuts and a bold, there’s probably 10 cents worth of plastic. I think this shows the power of 3D printing in making things you need. I wouldn’t have been able to make this out of wood or metal very easily, but a 3D printer and a hardware store made this a pretty trivial project.