Categories
Uncategorized

Stipple the Hoan

StippleGen2 from our friends at Evil Mad Scientist Laboratories is a great little application for creating line art from graphic images. The docs on their wiki will give you a good overview of what it does.

When I first got my Egg-Bot I used an application called “Voronoi Stippler” to play around with stippling, but sadly the code for the application was taken offline. StippleGen2 takes the place of Voronoi Stippler quite well!

Hoan Bridge Graphic
Original Hoan Bridge Graphic

I started out with this graphic of the Hoan Bridge, a Milwaukee Landmark, and converted the small color image to a larger grayscale image. (Why the Hoan Bridge? Because someone on Facebook suggested it!)

Hoan TSP
TSP Artwork

Here is the result of generating the TSP art. What is TSP you ask? Basically, it’s a path with a single line. It’s great for generating toolpaths used by things like CNC machines, engravers, routers, lasers, etc. (Find out more about TSP!)

Hoan Stipples
Stipple Artwork

I wasn’t convinced the TSP art would come out great, so I went to the circular stipples. Here’s the final version, which is incredibly hard to see rendered properly at this size, so look below for some zoomed in versions.

Hoan Stipples Zoomed
Stipple Artwork Zoomed In

Hoan Stipples Zoomed More
Stipple Artwork Zoomed In More

Hoan Stipples Zoomed Even More
Stipple Artwork Zoomed In Even More!

As you can see, the circles overlap, which means if we were to etch this with a laser, and use the vector setting (as opposed to raster) it would see each circle as a distinct object, and etch each one. (Etching as raster would most likely just etch it all as one single blob, no individual circles.)

So because each circle will be etched individually, and they overlap, we’ll end up with different heights/layers, as it were, due to some areas of our material being hit with the laser more than once. In other words… texture!

Laser-eched Hoan
Final Laser-etched piece

Here’s our final piece of laser-etched Baltic Birch plywood. Below you can see some zoomed in shots showing the surface. Notice how the circles are so small they essentially looks like dots. (You can click each photo to see the large version on Flickr.)

Laser-eched Hoan
Close-up of stipples

Laser-eched Hoan
Texture in upper-right corner

Laser-eched Hoan
Texture in the letter “N”

Categories
Uncategorized

Poundin’ Sand – Complete!

Poundin' Sand

In my last post about my Nerdy Derby car, all you saw was a bunch of laser cut wood pieces… well, here’s the final car.

Poundin' Sand

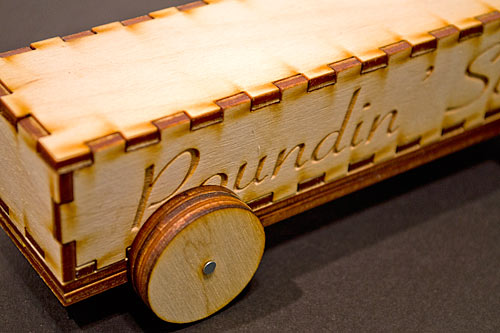
It’s almost dimensionally the same as a standard Pinewood Derby car. The body is constructed out of panels that were laser cut rather than a block of wood. Because it’s hollow inside, I filled it with sand. Why not lead? Well, someone else is already doing a car out of lead. I also though about marbles or something else that would roll around inside. I also thought about making one with acrylic and filling it with water.

Poundin' Sand - Wheel

The bottom has two pieces of wood attached so I’d have something to pound the nail into to attach the wheels. I glued the two piece together and then drilled a hole between them. (The wood is just 3mm thick, so layering made sense.)

Poundin' Sand

I spaced the wheels the same for the front and back, so there really is no front or back… it’s the same either way. You’ll also notice I did a terrible job of placing the lettering. I just added it to the side panels without thinking about how the wheels would get in the way.

Poundin' Sand - Wheel

The wheels are also 3mm wood, and I’ve sandwiched three of them together to make each wheel 9mm wide. I was going to glue the layers together but I figured I’d just put them on and allow them to spin independently (if possible.)

If this car wins nothing besides the “laser cut wood filled with sand” category, I’m fine with that. I learned quite a bit in the process of building this, and if I build another car, I have some experience to build on. (I also managed to cut a big pile of wheels and have nails to fit them, so we can have supplies for people to make cars on the spot.)

Update: Files are now on Thingiverse.

Categories
Uncategorized

Nerdy Derby – Poundin’ Sand

Poundin' Sand

If you saw my last post about the Nerdy Derby we are planning, you probably figured at some point you’d see a car. Well, here’s my progress so far.

I cut the pieces from 3mm Baltic Birch plywood using the 60 watt laser cutter at Milwaukee Makerspace. Even the wheels are laser cut. I have no idea how well it will work, but I’m all for experimentation.

I’ve heard at least one person claim they will be building a car body completely out of lead, but I figured I already have plenty of sand around my house, so I plan to fill my car with sand, hence the name “Poundin’ Sand” (some of the runners-up included “Carl Sandburg”, “Sandoval”, “Sandy Bottom”, and “Adam Sandler”, but since “pound sand” sometimes means to engage in a futile activity, I thought it was fitting.

Besides, I’ve already awarded all the style points to Frankie for his belly tanker even though he’s not done yet, come on, just look at it!

Besides the glue to hold it together, the nails to hold the wheels on, and the sand, the rest of my car is 100% laser cut wood. I’m also planning another car that is (nearly) 100% 3D printed plastic. I’ve got some work to do on that yet, though the wheels should be done this week.

(Update: See the completed car.)

Categories
Uncategorized

Scrabble Coasters

Laser-etched coasters

I finally finished these Scrabble coasters I’ve been working on forever. There were so many issues with this project, I’m calling these beta and plan to completely redo them. This is all fine though, as I spent some time this weekend explaining to the kids that screwing up and doing things wrong is all part of learning. Fail faster and all that. I’m pretty sure that the next version of these coasters will not have all the problems that this version had.

Laser-cut coasters

So what were the problems? Well, for one thing, I’ve really got to remember to sand the wood first! Yeah, like, before I etch it. Not a huge deal, but I think they’d look better if I had sanded first. As for the backing, I first thought about using cork, but decided against it but then I had to use cork to cover up the mistake on the back of using the wrong wood stain. The cork was not easy to cut, and there are some rough edges. I used a lot of X-ACTO blades in the process, but I think this cork may have been aged a bit too long. As for the wood stain, the wrong stain nearly torpedoed this project. Lesson learned? Test the stain on scrap wood. Besides all that, I think they turned out pretty good.

Oh, while I was using the laser cutter at Milwaukee Makerspace Shane commented that the letters looked a little rough. I had to explain that I didn’t just type up the letters in CorelDraw, I actually scanned real Scrabble tiles, as I wanted these to be authentic replicas, only much larger. I probably didn’t get the color quite right, but again, I’d like to redo the whole project. A deeper/darker etch may be in order next time, and I’ve got another idea for the backing/feet.

Glass on coaster

But do they work? Yes! Surprisingly enough, the glass did not tip over or go flying off the coaster, though honestly I think gravity had a lot more to do with it than my skills at making things. Still, I’ll count it as a success. :)

Categories
Uncategorized

iPhone Tripod Mount

iPhone Tripod Mount

Since the camera on the iPhone 4S is so good, more than one person has thought about mounting the iPhone on a tripod.

In fact, some guys did a Kickstarter campaign and got over $137,417 for the idea! And a bunch of other people designed things you could make on your 3D Printer to do the job.

The Glif

The problem with the Glif and most of these other phone holders is that they are designed to work with an uncased iPhone, and I tend to leave mine in the case all the time. I use an OtterBox case (It’s this one.) It’s grippy and rubbery, and since I wanted a tripod mount that would work with the case, I made my own. (Here’s a post that mentions an early version.)

iPhone Tripod Mount

This mount would probably work with almost any phone that uses a rubbery case, since it uses the grip of the rubber to its advantage to stay in place. You just gently tighten the wing nuts to hold the phone in place. There are nuts under the top piece of wood to prevent you from over-tightening.

iPhone Tripod Mount

Yeah, it’s basically two pieces of wood, two bolts, a few washers, nuts, and wing nuts. I may consider printing some knobs like I did here to replace the wing nuts. (And yeah, you’ll notice it’s the same screw method I used for my DIY Mouthpiece Puller.)

iPhone Tripod Mount

The bottom piece of wood has two small pilot holes to accommodate the two buttons on the side of the iPhone, so the buttons do not get depressed when in the mount.

iPhone Tripod Mount

The other tricky thing is how I mount the tripod plate to the bottom. I ended up getting a nut coupler, and then drilling a hole into the bottom piece of wood, and pretty much hammering in the nut coupler. It was too long so I had to hack saw it off to be flush with the bottom. Not pretty, but it does work.

Now that I’ve got this done, I should probably go back and do those test shots comparing the iPhone 4S camera to other cameras. :)