Categories
Uncategorized

The Screwdriver

Screwdriver vinyl

My pal John McGeen posted a challenge for February. The challenge was to design a screwdriver. He also said we should “Push the boundaries of what is possible”, and while I’m normally a hammer guy, I figured I’d try a screwdriver.

While John was busy making a real screwdriver I thought about the challenge, and at first I thought about designing a 3D model of a screwdriver, and then I thought about making a nice screwdriver shaped sign using a large piece of wood, and ultimately being overloaded with projects in February I ended up doing something different.

Craftsman Screwdrivers

I started this project by thinking about screwdrivers. The first screwdrivers I ever used when I was a kid belonged to my dad. He had nice Craftsman tools. I remember him telling me that Craftsman had a lifetime warranty on their tools, and if you ever broke one, they would replace it. I still have a few Craftsman screwdrivers, but over the years I seem to have collected many other brands. None of them are probably the same quality of the old Craftsman tools, and none of them hold a memory for me like the Craftsman do.

I found a photo of some Craftsman screwdrivers and used them as a basis for tracing the outline I wanted for my silhouette.

Screwdriver with text

Once I had my screwdriver shape drawn out in Inkscape I added the word CRAFT using the typeface Adobe Naskh Medium. I wanted a contrast from the original CRAFTSMAN type which was a simple sans-serif typeface. I also flipped the screwdriver horizontally so the handle was on the left.

CRAFT

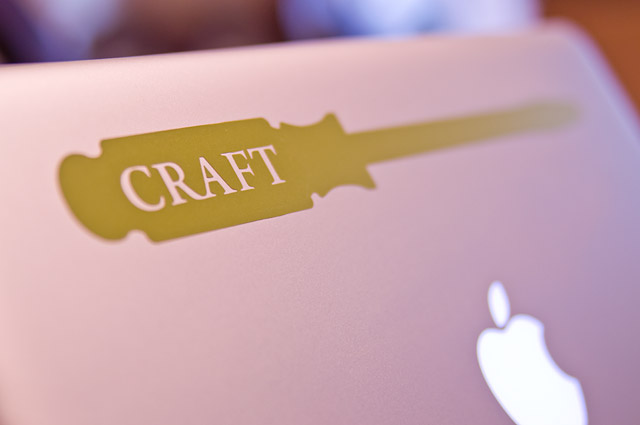
Detail of the handle and the CRAFT text. I also colored my illustration green because I planned to use green vinyl, again as a contrast to the red and blue of the original Craftsman screwdrivers.

Screwdriver

After the text was added I changed it to outlines and then exported it as a DXF file to load into the Silhouette Studio software to be cut.

Screwdriver Silhouette

In Silhouette Studio I scaled it to an appropriate size for my laptop screen, which ended up being 242mm long (or 9.5″ for you non-Metric folks.)

Screwdriver vinyl

The vinyl was then cut and weeded. I also cut a small piece of transfer paper to attach to the vinyl to hold the islands from the text in place.

Screwdriver vinyl

Yes, it’s finally time to replace the Imperator Furiosa skeleton arm. It had a good run of more than six months before the change. (It took a Simple Green scrubbing to get the lid clean before I applied the screwdriver vinyl.)

Screwdriver vinyl

Here’s the 13″ MacBook Pro with the screwdriver vinyl applied. Overall I’m pleased with how it turned out and it feels good to have some new artwork on the old laptop.

I hope this is enough of a screwdriver for John’s new site GrindstoneMKE. I’m expecting that a bunch of different screwdrivers are going to show up there in the coming days. (I’m not sure if anyone besides me will have a vinyl screwdriver though!)

Screwdriver vinyl

Screwdriver vinyl

Categories
Uncategorized

The Lights are…

Annoying...

I love @internetofshit on Twitter (and reddit) and things like Stupid Shit No One Needs & Terrible Ideas Hackathon, not just because they are hilarious, but because they reveal some truths about technology some may ignore.

As much as I love technology, I hate technology. In many ways, it makes our lives better… but in plenty ways, it makes our lives worse.

The Internet of Shitty Things is here. Have all of your best home appliances ruined by putting the internet in them!

Back in 2011 (or maybe 2010?) I ventured into the “Internet of Things” world a bit, and I’ve played with ideas since then, and watched as companies imagined everything connected to the Internet, typically with no thought to security.

Whether or not Cate’s tweet is true, it points out the fact that as we add technology to things we risk making them overly complicated and prone to failure. Turning on a light shouldn’t require installing a damn app or syncing anything. We live in a tactile world, and in my work (designing and building educational museum exhibits) we don’t want to turn everything into a touchscreen interface, for good reason.

Light Switches

Check out a few of these light switch mods on Thingiverse, including Frankenstein Light Switch Plate, Arcade Button Light Switch, and LEGO Light Switch Cover. These concepts all demonstrate that the light switch can be re-imagined as a fun activity, and not relegated to some app running on a digital network.

In other news, I recently tried an Oculus Rift, and while watching a corporate video inside of a virtual world was <sarcasm>completely amazing</sarcasm> I was surprised how comfortable the goggles were, and the first idea I had for them was an application that would allow me to wear them while in lying in bed reading, which I do a lot of while suffering from insomnia. Either a great use case or a great idea for the Stupid Hackathon.

Well that’s enough incoherent rambling for one day, I need to go read the specs on a TTL laser…

Categories
Uncategorized

The Woodworker’s Gym

Woodworker's Gym

There’s a new space in town… The Woodworker’s Gym, a workshop full of tools that can be used by anyone willing to pay (and take the required safety classes.) Their web site describes it like so: We are like a health club for woodworkers… But instead of treadmills, we have table saws. This is close to the description I heard for Bucketworks back in 2006. It’s also applied to makerspaces on occasion.

The prices at The Woodworker’s Gym are pretty high compared to a place like Milwaukee Makerspace, which may not have as much space for wood working, or tools quite as nice and new, but offers many other things. I’m sure there’s an audience of people who only want to do wood working, in the traditional ways, and have no interest in laser cutting or CNC routers or things completely unrelated to wood working like welding and 3D printing and forging and ceramics, etc.

I’m wondering if more spaces like this will start to appear. Niche-spaces that only deal in one specific technology. Maybe they already do, but I’ve met so many makers/hackers who suffer from a form of ADD which causes them to want to learn ALL THE THINGS, and can’t contain their desire to learn to one single subject.

Perhaps that’s part of the appeal to a niche-space like The Woodworker’s Gym. You’re going there to work with wood. You’re not going to get distracted and accidentally build a tiny electric race car or an army of Daleks. Hmmm, maybe they’re on to something!

The thing is, that crazy cross-pollination is part of what makes a makerspace a great thing. You go in wanting to make paper rolls for a player piano and you end up teaching people how to make jewelry and resin casting while you learn how to work with fiberglass and build a robot dog.

A recent JSOnline article has more info on the place. (Right now the hours seem pretty limited, but I look forward to seeing how it grows over time. Hopefully I can get a tour at some point.)

Categories
Uncategorized

Teensy LC BOB v1.2

Teensy LC BOB v1.2

Update: If you’d like one of these boards, there’s a newer version of this board, and you can purchase it on Tindie.

Woohoo! My new boards came in from OSH Park. The Teensy LC BOB v1.2 looks good! It’s purple, it has labels, it has places to put screw terminals and holes for mounting… There’s even a version number now.

Teensy LC on Perma-Proto Board

If you saw my previous post, I mentioned how I was doing things, which looked a bit like the photo above. There’s nothing wrong with this, but I wanted it a bit cleaner, hence the Teensy LC BOB PCB.

Teensy LC BOB v1.1

Here’s a photo of one of the v1.1 boards in an interactive museum exhibit. I had to drill the holes a bit larger to get it mounted, which is the reason the new version is v1.2.

I’m still not totally sure about the pin I labeled “17v” as it could be mistaken as “17 volts” but it’s really “pin 17 at Vin voltage”. This means the thing labeled “17v” will be whatever your input voltage is… and if you plan on using Neopixels, it should probably be 5 volts. I’ll assume users can read about the Teensy LC and figure it out.

OSH Park

And hey, you can order this PCB now! Get it from OSH Park. It’s shared publicly on the site. There doesn’t seem to be a way to set a license on OSH Park, but I’d consider it Open Source Hardware. If I had known how to add the OSHW logo, I would have. (Of course the Teensy itself is not open-source, but hey, not everything can be. It is a great piece of hardware, though!)

Note: The needed screw terminals are 2.54mm pitch, so these or these will work.

Categories
Uncategorized

Fritzing + OSH Park = PCB!

Teensy BOB v1.0

I recently created my first “real” printed circuit board. By “real” I mean one that I sent out to get fabricated, not one I did at home by etching it myself. The board is for a Teensy LC, and breaks out most of the pins to screw terminals. (Pictured above is version 1.0, which has been revised due to a few spacing issues and the mounting holes being too small. You can see I had to drill them a bit larger.)

Teensy Proto

The Teensy LC BOB (BreakOut Board) came about due to my use of the Teensy for a few museum projects that were using the controller as an input device for a computer. I had been putting the boards onto Adafruit Perma-Proto Breadboards which are great to work with, but after building a few of these that were very similar to each other, I thought I could just design my own PCB to get the job done. (The board I designed probably cost about $2.15 more than the Adafruit boards, but it’s also designed to be exactly what I need.)

Breadboard in Fritzing

I started by designing what I needed in Fritzing using the breadboard view. I added in the screw terminals I wanted, and wired it all up. At this point spacing doesn’t matter too much, as it’s just to get all the components and connections in place.

PCB in Fritzing

Once all the pieces are in place and connected up I switched to PCB view where you get to see what the actual printed circuit board will look like. Here the positioning and spacing is just like the real world. This step probably tool the most amount of time, and I found the tools a bit lacking compared to something like Inkscape or Illustrator for precise positioning. Part of this could be due to my still learning how it all works. There’s some good info here on designing PCBs in Fritzing. (Eventually I’d like to do custom shapes.)

Export Gerber

After I was happy with the PCB layout I exported it using Export > for Production > Extended Gerber (RS-274X) from the file menu.

Gerber Files

It will output a whole bunch of files to the folder specified. Once I had this folder I made a ZIP file from it, and named it Teensy-BOB.zip and uploaded it to OSH Park.

OSH Park

OSH Park’s web site will check your files and show you previews during the upload process. (Hopefully you can figure out what you’re looking at!) As I mentioned, the first version had a few issues, so I corrected those and put in a new order. For the new version I added the name of the board and the version number. Once I get these back and test them I’ll share the project so anyone can order some if needed. (At least one person at Milwaukee Makerspace was interested.)

I should note that the Teensy 3.x board could also be put on one of these, though the pin labeling is a little different. I’ll probably create another version that is specific to the Teensy 3.x for a future project I’m doing for Maker Faire Milwaukee this year.

Update: OSH Park has some docs on using Fritzing.

Update: Download the TeensyBOB Fritzing file!