Categories
Uncategorized

Adafruit NeoTrellis M4 808 Drum Machine

A while back (umm, last year?) old pal Kirby gave me an Adafruit NeoTrellis M4 with Enclosure and Buttons Kit Pack which I believe he got in an Adabox. At the time I was like, “Hey, this is neat!” and put it aside because I was busy with work. Well, I finally found it when I was cleaning the office and decided to dig a little deeper and discovered the demo code it shipped with was already running a minimal drum machine! They had some samples loaded up and it was a super-basic tracker. Fun!

The provided samples were not that great so I grabbed a kick, tom, snare, and hi-hat from the classic Roland TR-808 which, well, you probably know. As for the Adafruit NeoTrellis, it’s is a fun little drum machine! A bit challenging, and definitely minimal, but worth spending some time with. The audio is running out of the NeoTrellis and through a Bastl Dude and filmed/recorded to an iPhone.

Note: I found this guide to Trellis M4 Beat Sequencers which should prove extremely useful! It’s way more capable than I imagined, which shouldn’t be surprising since it’s from Adafruit.

Categories
Uncategorized

Fritzing + OSH Park = PCB!

Teensy BOB v1.0

I recently created my first “real” printed circuit board. By “real” I mean one that I sent out to get fabricated, not one I did at home by etching it myself. The board is for a Teensy LC, and breaks out most of the pins to screw terminals. (Pictured above is version 1.0, which has been revised due to a few spacing issues and the mounting holes being too small. You can see I had to drill them a bit larger.)

Teensy Proto

The Teensy LC BOB (BreakOut Board) came about due to my use of the Teensy for a few museum projects that were using the controller as an input device for a computer. I had been putting the boards onto Adafruit Perma-Proto Breadboards which are great to work with, but after building a few of these that were very similar to each other, I thought I could just design my own PCB to get the job done. (The board I designed probably cost about $2.15 more than the Adafruit boards, but it’s also designed to be exactly what I need.)

Breadboard in Fritzing

I started by designing what I needed in Fritzing using the breadboard view. I added in the screw terminals I wanted, and wired it all up. At this point spacing doesn’t matter too much, as it’s just to get all the components and connections in place.

PCB in Fritzing

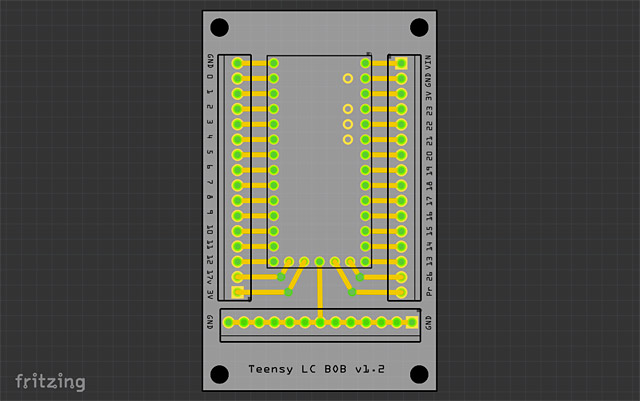
Once all the pieces are in place and connected up I switched to PCB view where you get to see what the actual printed circuit board will look like. Here the positioning and spacing is just like the real world. This step probably tool the most amount of time, and I found the tools a bit lacking compared to something like Inkscape or Illustrator for precise positioning. Part of this could be due to my still learning how it all works. There’s some good info here on designing PCBs in Fritzing. (Eventually I’d like to do custom shapes.)

Export Gerber

After I was happy with the PCB layout I exported it using Export > for Production > Extended Gerber (RS-274X) from the file menu.

Gerber Files

It will output a whole bunch of files to the folder specified. Once I had this folder I made a ZIP file from it, and named it Teensy-BOB.zip and uploaded it to OSH Park.

OSH Park

OSH Park’s web site will check your files and show you previews during the upload process. (Hopefully you can figure out what you’re looking at!) As I mentioned, the first version had a few issues, so I corrected those and put in a new order. For the new version I added the name of the board and the version number. Once I get these back and test them I’ll share the project so anyone can order some if needed. (At least one person at Milwaukee Makerspace was interested.)

I should note that the Teensy 3.x board could also be put on one of these, though the pin labeling is a little different. I’ll probably create another version that is specific to the Teensy 3.x for a future project I’m doing for Maker Faire Milwaukee this year.

Update: OSH Park has some docs on using Fritzing.

Update: Download the TeensyBOB Fritzing file!

Categories
Uncategorized

#TeamArduinoCC

Arduino.cc

In accordance with a request from organizations and people I respect, here’s a photo take on 2015-04-19 showing the packaging from an Arduino UNO I purchased from Adafruit Industries (in the United States of America) on 2010-10-19 showing the text “Manufactured under license from Arduino by SMART PROJECTS S.r.l.”.

Adafruit / Arduino.cc

Here is the order information from that purchase. For more info, see the Hackaday post Your Arduino Packaging Could Sway a Court Case and the Adafruit post Please post old Arduino packaging that says “Manufactured under license from Arduino” #TeamArduinoCC.

Categories
Uncategorized

Remix ~ Improve ~ Share

CinemaPi

I was alerted to the fact that someone created a new design based on one of my designs. The Laser Cut Case CinemaPi is based on a design I created called Raspberry Pi Case (with Camera) which you might remember from this post. (Oh, if you want more info on the Cinema Pi, see the notes here.)

But wait! It doesn’t end there…

Remixes

My case is actually derived from Stacking Pi Case by CongoJoe. And CongoJoe? Not even the original creator, as he based his work on a design from Adafruit called the Adafruit Pi Box.

And Adafruit? They created the case and it’s a product they still sell, and they’ll tell you how to put it together. (And yes, they do have a newer, cheaper version if you just want a Pi case.)

Adafruit is just plain awesome, of course. They know that it’s not just about selling products, but about sharing information, teaching, spreading knowledge, and inspiring people. They get it.

This… this is the kind of world I want to live in.

Categories
Uncategorized

CheerLight 2012

CheerLCD

Here’s my CheerLight 2012 device, which I call the CheerLCD! And what is CheerLights you say?

CheerLights is an ioBridge Labs project that allows people’s lights all across the world to synchronize, stay linked based on social networking trends. It’s a way to connect physical things with social networking experiences and spread cheer at the same time.

Much like last year, I’ve opted for a small desktop display—a USB-powered computer peripheral—rather than some giant string of multicolored lights…

CheerLCD

With the combined power of 3D printing, affordable electronics, and the duct tape of programming languages that is Perl, we’ve developed a device that informs you of what color the CheerLights around the globe are, not only with color, but with words!

(Though we’ve not yet done extensive testing, the text should be legible even by those suffering from color blindness. Accessibility, FTW!)

CheerLCD

The CheerLCD consists of a USB + Serial Backpack Kit and LCD Display from our friends at Adafruit Industries. But you can’t just have a display without some sort of thingy to display the display properly… enter the 3D Printer!

CheerTree

The CheerTree was designed specifically to hold the LCD Display. I utilized Inkscape for the design of the front plate, and then brought that shape into OpenSCAD to add the base and create an STL file for printing. (It ended up warping a bit but that just adds to the charm and aesthetic of the overall device.)

I know what you’re saying, “This is all well and good… but we need to see the CheerLCD in action!” As you wish, my friends… as you wish.

There’s some code over on github/CheerLCD, and some files on Thingiverse for the CheerTree.

Enjoy the Holiday Cheer!