Categories
Uncategorized

GoPro Time Lapse with MPEG Streamclip

This is the method I use for creating 1280×720 (aka, 720p) time lapse video files from a GoPro camera using MPEG Streamclip.

Go Pro stills compiled into video

I use the time lapse setting on the GoPro, which creates images that are 2592 pixels wide by 1944 pixels high, though we care less about the pixel width and height, and more about the aspect ratio, which is all wrong for a proper video. (In fact, you can use this method for any still images you wish to finish as a video file.)

I start by compiling all the stills into a video file, and I use QuickTime Player 7 for that. There are other tools, but that’s what I’m currently using, and no the most recent version of QuickTime Player is hobbled crap that won’t work. (Hey Apple, how about fixing that?)

OK, we have our video file, but it’s practically square! Terrible! So let’s fix that…

1280 wide image

To choose the best crop I usually do a screen grab of the image area, and then open that in Photoshop (or whatever) and size it to 1280 wide. The height should be about 960 (depending on how accurate your screen shot is.) Time for Math! 960 – 720 = 240, so we need to crop 240 pixels from the height. You can easily just skip this step and plug 120 into the top and bottom crop, but this step will let you easily make some other decision, like 140 and 100. As long as your top and bottom crop add up to 240, you’re good.

Cropping to 720 height

Sometimes I like to make a marquee that’s 1280 x 720 to get a better idea of the crop… Feel free to skip this step if you don’t need the precision I require in every single thing I do.
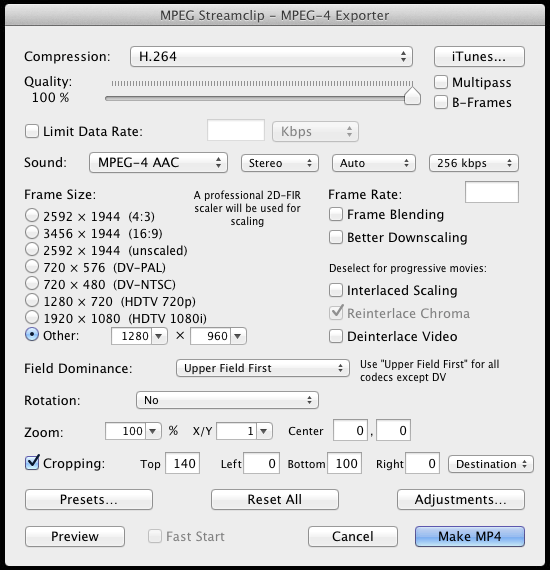
MPEG Streamclip settings, with crop

OK! Here’s the export window in MPEG Streamclip, where you can see I’ve set the size of the video to “Other” and plugged in the 1280 x 960 values. I then put the 140 and 100 values in the top and bottom crop boxes, respectively. All the other settings are what I typically use for MPEG Streamclip. (The one thing I tend to change which isn’t show here is the ‘Limit Data Rate’ value. But that’s a post for another time. Oh, I didn’t do it here, but you can disable the audio track as well.)

Final 1280x720 Video File

Here’s our final video output at 1280 pixels wide by 720 pixels high. Now, since we started with a video that was 2592 pixels wide by 1944 pixels high, we could actually get all fancy and just select a portion of the video to output at the final resolution. This involved a lot more math, but it’s a possibility, so I’ll leave it up to you to explore.

Now go make some time lapse videos!

Categories
Uncategorized

Printing Violations (Part III)

3D Printed Cookie Cutters

You loved Printing Violations, and you tolerated Printing Violations (Part II), so we’re back again with another episode of Printing Violations, this time looking more closely at the health issues surrounding 3D printed cookie cutters.

Licensing issues are one thing, but there is a safety concern with 3D printed cookie cutters. Here’s a look at some of the issues. (All assume you are using a home 3D printer like a MakerBot, RepRap, Printrbot, etc.)

Is ABS or PLA plastic filament food-safe?
The answers range from “probably not” to “maybe” in most cases. If you use natural filament it will be free of coloring agents, which is a step in the right direction, but unless you are specifically buying “food-safe filament” don’t expect it to be food-safe. (Keep in mind that “food-safe” is something that will be determined by local health departments, and will vary depending on where you live.)

Then there’s the printer itself, and the environment it runs in. My printer lives in a basement where I do other crazy things like run a drill press, spray glue and paint, and generally make a mess. Would you want your cookie cutter manufactured in such an environment? What has the filament come into contact with before it goes into the machine, and what else has been introduced into the extruder as far as foreign materials? If you’ve ever read up on what it takes to make food in your home and sell it commercially, you’ll have some idea of the restrictions involved. (Wait, we aren’t selling food, right? We’ll get to that, be patient!)

Can 3D printed items be treated to be safe(er?)
If you’ve ever looked at a 3D printed object, you may notice the ridges. Since it’s built up layer upon layer, there are spaces into which food could get stuck. Of course you can try to clean your 3D printed cookie cutter, but don’t put it in the dishwasher! For PLA prints, the heat will either melt it, or deform it, or do some other nasty thing to it. ABS may be better, but you will still need to heat it enough to sterilize it, and hope you can get the crevices clean. It’s been suggested that acetone vapor finishing might be helpful. Helpful enough? Not sure.

Of course you could use your printer to make a mold and then make a food-safe cutter out of another material, but that’s not really a 3D printed cookie cutter. You could also try to coat your printed piece with a food-safe coating, but that’s a lot more work.

So why does all this matter? Because right now, there are people printing cookie cutters and selling them, and there are also people 3D printing cookie cutters, making cookies with them, and selling the cookies.

(In the interest of full disclosure, I should mention that I love cookies. OK, with that out of the way…)

As mentioned, selling food you make yourself is regulated in most areas, and if you want to start up a business baking in your kitchen and selling the goods, you’re in for a lot of work. I know, I know, it’s all in the name of safety for the public, but there’s a crap-ton of regulations and rules you’ll need to follow. Many places require you to have a kitchen physically separated from your home. As usual, I am not a lawyer, I’ve just done a bit of research. From a maker perspective, we just want to make things! From a public health perspective, let’s try not to make anyone sick, okay?

And yes, I have indeed used 3D printed cookie cutters to make cookies (at least twice) and then gave those cookies to people to eat. No one died yet (that I know of.) I didn’t attempt to re-use the cutters though, so they were a one-time use item, which is probably safer than trying to clean them.

Advice: If you’re going to 3D print cookie cutters, use them only once!

Let’s say you create custom 3D printed cookie cutters and sell them on Etsy or some other site, you should probably include a disclaimer that they should be used only once, since cleaning them is an issue. (Safer yet, tell people they are NOT food-safe, and let them decide if they want to use them. Again, I am no lawyer! Consult your own lawyer!)

Now, as for 3D printing cookie cutters, and then using them to make cookies and sell the cookies, well… This may be worse, since you’re selling actual food that has been created using materials that are questionable as far as being food-safe. Once again, I am no lawyer, but you may need one after selling those cookies.

In conclusion, be safe, people. Many folks are fine with the idea that a piece of ABS plastic touches cookie dough for a second or two before it’s baked at 450 degrees for 10 minutes, and others are convinced it’s insane to do such a thing. As with everything, there’s probably some middle ground.

Thanks for reading this, and keep making cookies!

(Big thanks to all the G+ers who helped me out with this. See the thread for more info.)

Categories
Uncategorized

Liberating the 3D Printed Gun

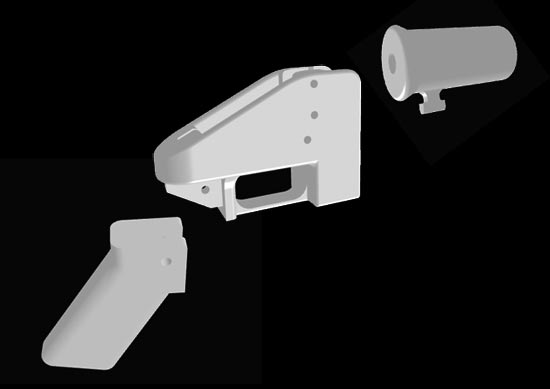
The Liberator

Yes, yes, we now have 3D printed guns, and our world has changed because of it, right? Right.

I’ve written about 3D printed guns before, and I’ve talked about 3D printed guns before, and now they are (somewhat) possible. But don’t be frightened, as there is little new here.

Andy Greenburg at Forbes has been leading the pack on the story of Cody Wilson and Defense Distributed and their attempt (and success?) at 3D printing a gun. And OH NOES! Now other people are printing guns! And some of them are even improving them, but this should be no surprise. Hackers and makers see something that needs improving, and they improve it. When I saw the files for the Liberator the first thing I thought was that it needed work. After I talked to someone who is well versed in 3D printing and gunsmithing, they agreed.

I want to toss out this quote from HaveBlue again:

The one point I try to make (and that they generally fail to grasp) is that if it eventually becomes possible to download a file from a website, feed it to a printer, and have a fully operable handgun a few hours later, the technology will have already impacted our lives in far more incredible ways.

So has our world changed? Yes, I think it has… As I mentioned recently in Your 3D Printed Future, people have created open-source designs for mechanical finger prosthetics. Yeah, that’s pretty amazing. We’re not talking about medical companies charging thousands of dollars for mechanical finger prosthetics, we’re talking about a couple of really awesome people working together on this, and creating something you can 3D print yourself with a sub-$1000 3D printer.

What else is there? Well, bioprinting is progressing nicely. Boprinting sheets of skin for skin grafting procedures, bioprinting a replacement bladder, bioprinting replacement for missing bone for a human skull, and even bioprinting part of a face!

(The joke is that you’ll be able to print out a replacement hand for the one that gets blown off by your 3D printed gun. It’s only half of a joke, because it’s pretty close to being true.)

Now, back to the gun issue. I highly recommend the Hackaday post: The first 3d printed gun has been fired, and I don’t care. Right now the Liberator is little more than a zip gun, which is a simple (single shot) gun that anyone with access to a local hardware store could build. But don’t worry, you’ll be safe:

In late 2000, British police encountered a four shot .22 LR zip gun disguised as a mobile phone, where different keys on the keypad fire different barrels. Because of this discovery, mobile phones are now x-rayed by airport screeners worldwide.

Sigh… more security theater. Just what we need. Do we need regulation on 3D printers? No, just like we don’t need regulation on lathes and mills and hardware stores. So here’s the deal. I have the file for the Liberator, and I’ve held a Liberator, and I’m not a bad person, and I hope to never, ever shoot another person in my life. Why? Because that’s not the type of person I am, and that’s not the kind of world I want to live in.

As for the Liberator, it’s a crappy gun, and if you want a good gun for cheap, there are dozens of ways to get one, both legally, and illegally. And if you want to make one, there are also better ways to go about it than 3D printing one. If the novelty of a cheap, crappy, plastic gun intrigues you, go ahead and print one. Try not to blow your hand off in the process. Guns are dangerous, and even a well made gun can malfunction.

3D printing is all the rage right now, and the media loves hype because it means more attention, more page views, and more dollars. So yeah, go 3D print something, maybe a gun, maybe some mechanical finger prosthetics. Just follow this one simple rule: BE EXCELLENT TO EACH OTHER.

Be Excellent to Each Other.

Categories
Uncategorized

MaKey MaKey Apple Piano [code]

Makey Makey Apple Piano

I’m one of those people who say “I’ll publish that code later!” and then I get busy with other projects and never publish the code, so here’s me publishing the code.

So back in January I built the MaKey MaKey Apple Piano for one of Art Milwaukee‘s events that the Milwaukee Makerspace was involved in. And yeah, here’s the code!

MakeyPlayer

I’ve provided the Processing sketch and related data files, as well as full applications (for multiple platforms) for those who don’t want to mess around with compiling sketches, and just want to download and run an application for their MaKey MaKey.

Could it use improvements? Of course it could! Feel free to make it better, and if you do, please share your changes with others.

Categories
Uncategorized

A Coat Hook

Coat Hook

I recently (temporarily) changed offices at work, and with the new office came a new door, and this door has no coat hook! Because I couldn’t drill a hole in the door or mar the surface in any way, I needed an “over the door” style coat hook. Ah yes, the classic coat hook. Adrian Bowyer made one back in 2008, so I decided it was time to make my own.

OpenSCAD Coat Hook

I took a quick measurement of the door to determine how wide it was. I then fired up OpenSCAD and made a bunch of “cubes” of various shapes and sizes, some rotated 90 degrees, but all in all, a pretty simple OpenSCAD model. One thing I did do was add in the “door” based on the measurement I took, so I could see how the coat hook would fit around it.

Plate Coat Hook

After compiling it in OpenSCAD, I exported the STL file, and at this point I usually use Gary Hodgson’s STL Viewer to take a quick look at the file and make sure it’s oriented correctly.

G-code Coat Hook

After viewing the STL file, I use Slic3r to generate the G-code, but hey, let’s check out the G-code while we’re at it! Joe Walnes wrote a great web-based G-code viewer you can use online, or download and run locally. If you want a somewhat improved version, Jeremy Herrman’s got a viewer and some code for you.

Working Coat Hook

Well, after all that generating files, and viewing files, I printed the file. It worked out well! Here’s a terrible photo of it preventing my shirt from falling on the floor. Success! The magic of a home 3D printer pays off again.