Categories
Uncategorized

GoPro Hero3 Frame

GoPro Hero3 Frame

I like the acrylic housing that comes with the GoPro Hero3, but I tend to run some pretty long time lapses, and the battery doesn’t last long enough, so I made a lightweight frame, and it’s over on Thingiverse.

GoPro Hero3 Frame

I’m (slowly) getting better at OpenSCAD, thanks to projects like this. I’m sure I’ll get even better in 2013.

GoPro Hero3 Frame

I’ve got plenty of long USB cables and USB power supplies, as well as a Minty Boost from Adafruit to provide power for shooting hours and days at a time.

Here’s a quick time-lapse test I shot before I had the frame. I ended up balancing the GoPro on a book on top of two water bottles, which was silly, and just one more reason for this thing.

GoPro Hero3 Frame

The frame has a bit of flex to it so you can easily wrap it around the camera. I may play around with some thicker housings, but for now, it does the job.

I ended up printing about 6 versions before I got one that was good. I should probably do more paper prototyping, but with how easy it is to 3D print things, sometimes you just hit “print” and hope for the best. If it doesn’t work out, you tweak things and try again. It’s just the way it works.

(Note: I guess GoPro also sells a frame for the Hero3. Go buy it from them if you want a really nice one and have $40.00 to spend. If you just want this cheap plastic one, print it yourself.)

Categories
Uncategorized

Printing Violations (Part II)

Cookie Cutters

Back when I wrote my Printing Violations? post I brought up the issue of licensing, and while I am a believer of open culture and sharing, I’m still torn on the topic of artists who take the creative work of others (even if the “others” are huge corporations) and use it to make money.

When I saw the post Maker Mom Builds Cookie-Cutter Empire With 3-D Printers my first thought was about the rights and licensing issues. (I was then pleasantly surprised to see the comments addressing the issue right away.)

Cookie Cutters

Don’t get me wrong, I’m not suggesting that Athey is not an artist, she’s a really good artist, and has some impressive and very well executed designs. This is important, I think. I mean, anyone can download an image of a video game character or a Dalek and quickly make it into something, but her work is well beyond that. Still, is it right for her to be using things others have created to make money? Her web site at warpzoneprints.com says:

Now I’ve somehow turned what started as a hobby into a full-time job!

I spend a lot of time thinking of myself as a terrible artist, and I’ve made plenty of badly drawn robots, but I’d feel much better about myself selling a badly drawn robot that is my own creation than a well drawn robot that someone else created. (I’m going with the belief that Athey has not properly licensed the characters she is using.)

Of course there’s the issue of licensing… It’s no secret that I use a lot of art from OpenClipArt.org to make things. The license of all art on OpenClipArt is Public Domain Dedication which states:

You can copy, modify, distribute and perform the work, even for commercial purposes, all without asking permission.

So yeah, I’ve not sold anything I’ve made yet using art from OpenClipArt, but at least I’d feel fine doing it. And yeah, I have friends who make good money making things based on successful movies, games, books, etc. Maybe this is just the world we live in now, where everyone is a maker and selling of things, and it’s all just a big mash-up anyway.

I guess I’d break things into a few categories:

A.) Using things others have created to make things for yourself.

B.) Using things others have created to make things to give to family/friends as gifts.

C:) Using things others have created and creating design files that others can use.

D:) Using things others have created to create and sell things.

I’m all for A. and B., and I think C. is pretty much OK. (Think of the many items on Thingiverse) As for D., that’s the one I’m still not sure about, and that’s the one Athey and Warpzone Prints falls under. What do you think?

(I should probably do a post in the future that talks a bit more about my own usage of others work in my own art, as I’m not completely free of that behavior myself.)

Categories
Uncategorized

3D Printer “Accessories”

3D Printing Accessories

So you’ve got a 3D Printer on your Xmas list, or somehow you’ve convinced your company that they need to get one before the end of 2012 because it’s a tool you’ll definitely need in 2013. (And yeah, it probably is!)

So the big question is… what else do you need?

You may not need any of these things, but these are the things I’ve found useful to have around during the past year of 3D printing. Now, keep in mind, I make a lot of functional parts. Some people just make pretty things, and the amount of extra stuff you need for “pretty” things versus “functional” things may vary. (And yes, I focused mainly on tools/items you need for prints, not the actual printer.)

Drill, Drill Bits, Drill Press
I often make parts with holes, or need to make holes in parts. Sometimes you’ll print a part with a hole that needs something inserted into it, either a bolt, or a rod, or a dowel, or screw, or something else round. Running a drill bit through the hole can help smooth things out and get the hole the right size. Sometimes you don’t even need a drill, but just the bit with a pair of pliers, or a vise-grip, or even a vise. Running the bit back and forth (without it turning) can clean up those edges in a hole.

On occasion I need to make the holes after I print something. In this case the drill press often comes in very handy. Sometimes you don’t know you need the holes, or you want more precise (or smaller) holes than you can get from printing. There’s no shame in drilling holes in a piece you printed. It’s just another tool in the process of making.

There’s also reamers and tappers, but I don’t use those, don’t have those, and won’t get into those.

Files, Sandpaper, X-ACTO Knives (and blades!)
Sometimes part just don’t fit right, or sometimes it’s better to make something a little too large and take of the extra. A set of files (flat and rounded) can do the job. The round ones can also come in handy like the drill bits mentioned above. Sandpaper also has its uses, though any of the abrasive tools will leave the surface looking a bit ugly. Ugly is in the eye of the beholder of course, and if it’s a part you don’t see, it probably doesn’t matter. As for the X-ACTO knife (and blades) they can be used to cut away edges, excess plastic, support material, etc. A good knife always comes in useful. I’ve also used a pair of diagonal cutters on occasion. A bit less precise than an X-ACTO knife, but sometimes it’s the right tool.

Acetone and/or Glue
Sometimes you just gotta stick one part to another part. I’ve heard people mention JB Weld, or Super Glue, but for sticking one piece of ABS plastic to another, I just use acetone. It’s messy, stinky, and tricky to work with, but it does a heck of a job. (For PLA I supposed I’d go with Super Glue, YMMV.)

Rubber Bands, Zip Ties, Tape
The rubber bands are often used in conjunction with the acetone, to hold parts together until dry. There are of course other uses for rubber bands. As for zip ties, if you built a Prusa, you’ve already got a bunch of them! Sometimes they’re the right tool for holding things together… and sometimes it’s tape. I prefer gaff tape myself, but masking tape can come in pretty handy.

What Else!?
I’m sure there’s plenty of other bits and pieces and tools and whatnot that I’ve forgotten (a Dremel tool perhaps?) but I figured this was a good list to get started.

Categories
Uncategorized

CheerLight 2012

CheerLCD

Here’s my CheerLight 2012 device, which I call the CheerLCD! And what is CheerLights you say?

CheerLights is an ioBridge Labs project that allows people’s lights all across the world to synchronize, stay linked based on social networking trends. It’s a way to connect physical things with social networking experiences and spread cheer at the same time.

Much like last year, I’ve opted for a small desktop display—a USB-powered computer peripheral—rather than some giant string of multicolored lights…

CheerLCD

With the combined power of 3D printing, affordable electronics, and the duct tape of programming languages that is Perl, we’ve developed a device that informs you of what color the CheerLights around the globe are, not only with color, but with words!

(Though we’ve not yet done extensive testing, the text should be legible even by those suffering from color blindness. Accessibility, FTW!)

CheerLCD

The CheerLCD consists of a USB + Serial Backpack Kit and LCD Display from our friends at Adafruit Industries. But you can’t just have a display without some sort of thingy to display the display properly… enter the 3D Printer!

CheerTree

The CheerTree was designed specifically to hold the LCD Display. I utilized Inkscape for the design of the front plate, and then brought that shape into OpenSCAD to add the base and create an STL file for printing. (It ended up warping a bit but that just adds to the charm and aesthetic of the overall device.)

I know what you’re saying, “This is all well and good… but we need to see the CheerLCD in action!” As you wish, my friends… as you wish.

There’s some code over on github/CheerLCD, and some files on Thingiverse for the CheerTree.

Enjoy the Holiday Cheer!

Categories
Uncategorized

New Slider Ends

New Slider

If you saw my post about a Motorized Camera Slider, this is a bit of an update, but it’s really more about the process than the end product, so if you’re interested in that, read on!

Slider End (Original)

I was originally using the improved camera slider V2 from our pal Marcus, and it worked well enough, but I wanted something different, so I tweaked what he had.

Slider End sliced

Marcus created his original file (I think) with Alibre Design, and since I couldn’t open it, I just worked with the STL file he provided. I loaded that into OpenSCAD and grabbed a slice of it using this method.

Slider End outline

Once I had a line drawing of the original slider end, I could use it to make my own. I imported the DXF File into Inkscape, my standard for 2D (and 2.5D) illustration.

Slider End outline

In reality, the only parts I really used from the original were the approximate size of the piece, and the two holes for the rods. I could have measured things, but loading up a file as a template was easier. I guess I could have got all fancy at this point, but I just kept it simple.

New Slider End

Once I had my SVG done in Inkscape, and exported a DXF file, it was a matter of doing the old linear_extrude method, like I did for my snowflakes, etc. I saved out an STL file and I was ready to print.

Nw Slider End

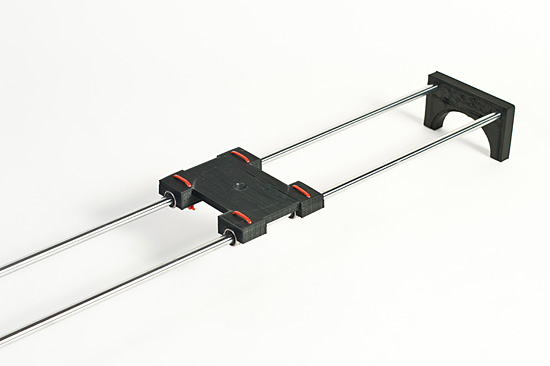
Here’s what the final piece looks like. One of the issues I had with the design Marcus created was that the rods only went part way into the plastic. There were screw holes to tighten down some screws onto the rods to hold things in place, but I never put any in. They might have also helped with the twisting issue this design has, but I may explore the idea of a two-piece design that clamps tight with the plastic. Or not… the nice thing is, it’s easy to experiment.

If I wanted to, I could probably make these ends out of wood, which would require just a drill press, or maybe out of a nice heavy metal, which might require drilling, or maybe milling. Both processes are a little messy, potentially more expensive, and require equipment you might not have. The nice thing about 3D printing these is that I can iterate a design quickly, and at a very low cost. I can even make them mostly hollow to save on time and materials during testing, and then make stronger, more solid versions when desired.

Nw Slider End

You may notice the carriage has some zip ties on it. Those are holding the LM8UU linear bearings in place. My original carriage was way too stiff, and without exact alignment (which you may not get with DIY plastic parts) it didn’t slide without some binding. The bearings were 58 cents each (I got a 10-pack from an ebay seller.) The bearings are a little noisy, so if you plan to shoot video with sound, you might have some issues. (Maybe more expensive bearing would make less noise?) As for the rods, they were about $15 each (pricey compared to the other parts) from VXB.com. There are cheaper alternatives depending on length, size, quality, etc. I went with 8mm because those are standard RepRap sizes.

At some point I may play with carriage designs as well. I actually did an early version that used felt instead of linear bearings (another trick from the RepRap world) which makes things cheaper and quieter, which may be desirable in some cases. And of course, I need to revisit the whole “motorized” part of this thing.

Until next time!