Hey there! It’s time for another LinkDump post. Yeah, a link dump! They are (typically) blog posts that link to other things on the old Internet Web, and often have little or no commentary. Sometimes I’ll just post links to things I’ve read or looked at or need to check out in the future, or just want to share.
I’ll admit, when he invited me, and told me it was at Miami Dade College (which I had been to before) I assumed it would be indoors. When he told me it was 84 degrees there a few weeks before the Faire, I hoped it would be indoors. I got there and found out it was all outdoors. When people asked me how Miami was, I say “Hot!” (I’m from the Midwest, I don’t handle heat well.)
Besides that darn heat, Maker Faire Miami was pretty awesome. Every Faire in every city has a different flavor, and while I know a little about the Maker community in Miami, it was great to see more of it. Most of my time there was spent assisting where I could, and a lot of that involved helping with the Power Racing Series.
This was the first year for Power Racing in Miami, and the Orlando Crew pretty much took care of everything. We had a few issues with water, and power, and magic smoke, but in the end things worked out pretty good, especially for a first attempt.
Orlando (well, MakerFX Makerspace) also brought along their “Print a Shirt” station, where you can pay $5 to screen print your own t-shirt. (Or $10 if you buy one already printed.) Now that’s how you incentivize making!
As usual, Florida favorites included Hedgeclipper and the work from Moonlighter Makerspace. They had a giant tent filled with awesome things.
One of the more interesting exhibits I came across was this little CNC lathe made for engraving drumsticks. I was interested in it because it looked like the little CNC machine I built from a kit a few years ago. Indeed, I talked to the Maker and that’s what it was, a heavily modified version of the same kit. We talked a bit about the Grbl firmware and I gave him a few tips on saving the settings. (Check out a video of it in action.)
I met a lot of great people in Miami. I talked with John Edgar Park and I think we bonded a little over our love of documenting and sharing work. I met Abby K. (VEX iCutie) who was super enthusiastic about what she made, and spent time explaining her robot to me. I also got to meet Esteffanie (YouTube, Instagram) who gave an inspiring talk about making and failing, and continuing to try new things.
Overall, Maker Faire Miami was a great event, and I’m really glad I got to be involved with it. If you’re in the Miami area, check it out next year, as I’m sure it will only get better with age!
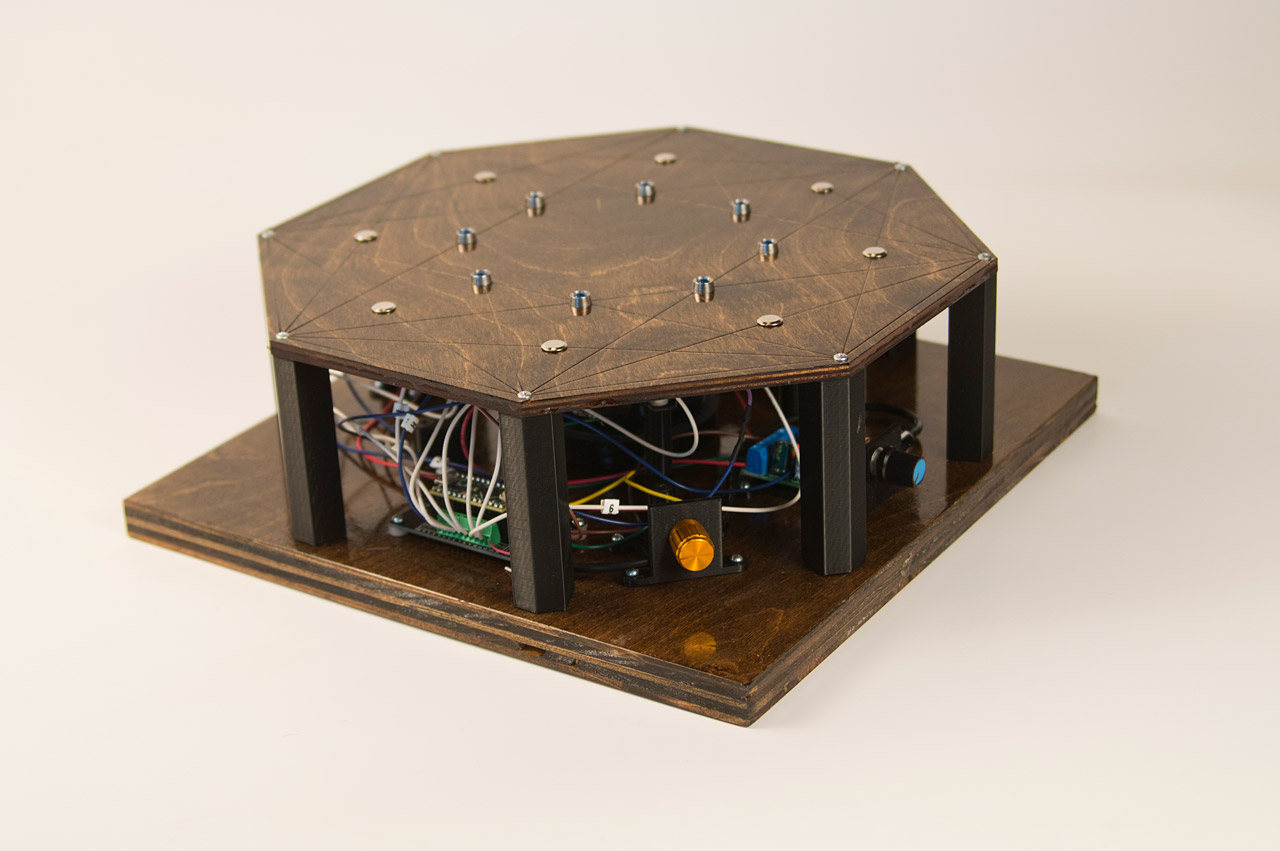
For this year’s WMSE Art & Music event, I created a new board I call OctoNoise. It’s an eight note piano featuring capacitive touch pads, LEDs, a Teensy LC microcontroller, and some fine woodworking. This is somewhat similar to last year’s piece.
You may know me for my work with decagons, but I also work with octagons, and this pattern is known as a 16 cell and it worked well for my design which utilizes 8 touch pads and 8 LEDs.
I’m not an amazing woodworker, but after laser cutting wood I can typically sand it, stain it, and add some polyurethane. At least it looks (somewhat) nice. I didn’t alter the bottom piece, and I just left it as a square, the way I received it from WMSE. My original design for this piece (over a year ago) was a bit different, but I wanted this to match the style of last year’s WMSE piece (and I was a bit rushed getting this done.)
The OctoNoise features and on/off switch, which is handy because it runs on batteries. I can’t tell you how many times I’ve made electronic things for myself and not included and on/off switch. It’s nice to have one! When you turn it on the touch pads calibrate for about 5 seconds. There’s a startup sound that happens during calibration. (I added a note about that on the back of the piece.)
There’s a “somewhat” hidden control knob on the side that ajusts the delay between notes. The way the code is written, it plays one note at a time, but you can alter that to very quickly (or slowly) oscillate between multiple notes. You can get some interesting variances in sound by turning the knob.
Note that it is difficult to turn the knob while also touching the pads to make sound. This is by design, as it’s also difficult (if not damn near impossible without using various parts of your body) to play all the notes at once. This was done to encourage collaboration and playfulness.
Here’s a side view. The height was determined by the speaker that was chosen. Once again we’ve put the electronics on display as part of the piece rather than hide them inside an enclosure. They are mean to be celebrated! (Each wire has a label showing what it connects to, if needed.)
Here’s the Teensy LC, which runs the code. The board has built-in capacitive touch pins, which make writing the code fairly easy. The notes used are C5, D5, E5, F5, G5, A5, B5, C6. This is real piano, and you can play actual songs. I based the code on a project I did for Brown Dog Gadgets a while back. You can check out their Touch Piano on Github.
This device also contains a built-in amp with a volume control. Again, a sometimes rare feature in the things I build. Often amps require 12 volts and that’s not always fun to deal with, but I’ve found some that work on variable voltages from 3 to 12 volts, so running them at the same voltage as a microcontroller becomes very easy.
Besides all the wood and electronics, there are some 3D printed parts that pull it all together. The on/off switch, delay control, amp, and battery holder all have their own 3D printed part that they attach to and then easily attach to the wood with some #4 screws. Once again, things are left “open” to celebrate rather than hide the electronics.
The other 3D printed pieces are the custom standoffs that raise the top piece above the bottom piece to (partially) enclose the electronics. I created a 2D profile from the original artwork used to laser etch & cut the piece to create the correct angle. I then extruded that design to make the tall standoffs and printed 8 of them.
Oh, one thing I forgot to mention. I liked this piece so much, I made another one so I could keep one for myself. As the old saying goes “If you’re gonna make one, make two!” So I did.
Finally, here are some videos, including one showing me playing both of them at once, which might never happen again!
Here’s a longer video I made in 2021. (Jump to 03:00 if you don’t want to hear me ramble and just want some sound.)
Part of the process of [re]building my new RepRap 3D Printer involved disassembly of my old RepRap 3D Printer. It felt strange at first taking it apart, probably because of all the hours I spent putting it together, but it also felt sort of exhilarating.
Wow! I forgot how many nuts and bolts went into building a Prusa Mendel. The BOM calls for nearly 90 M8 nuts. The good news is, I can reuse all of these components. I don’t think I’ll have to buy any M8 nuts or washers for quite some time, and the threaded rod should come in useful in the future.
Here are all the components I reclaimed. I disposed of all the printed plastic parts, though I will admit that inspecting them before disposal gave me a few ideas for how parts should be designed.
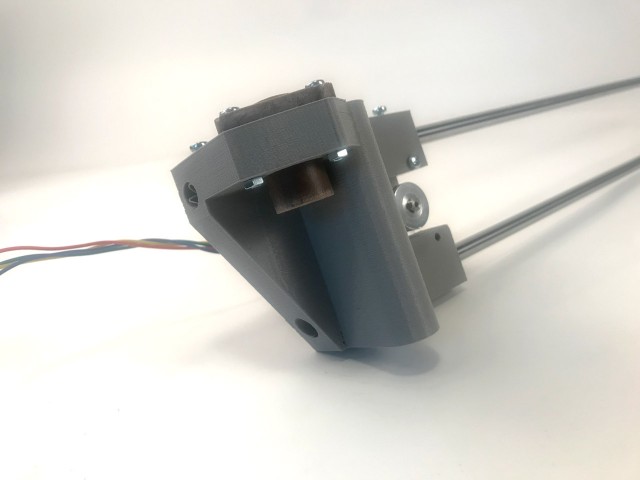
I’ve put a lot of time into the x-axis left side recently. It’s one of the more complex pieces and I really don’t know if I’m doing it right but I can’t wait to find out if it works. Since I’m starting with some existing parts, I need to design it to fit those parts. (I originally thought about using other existing designs that are available, but it would have meant purchasing the exact parts to fit, so here we are.)
Here’s my model. I’ve hidden the motor, rods, star nut thing, bearings, etc. This is just the part I printed. It seems to do all the things I need/want it to do, but it’s not on the machine yet, so who knows?
Here’s the print, with the pieces attached. Seems to look okay, that’s a good sign, right?
One of the interesting things about this project is that when I started designing my own pieces I also started to pay more attention to other designs out there, and that’s caused me to think about the decisions people made. Often decisions are made based on print orientation of FDM printers, or amount of material, etc.
I also learned that Cura has a feature called “Support Blocker”, which allows you to set areas where support will not apply. (Here’s an explanation, since I can’t find official docs on it.)
I also got some 12mm igus drylin slide bearings for the y axis, and printed a holder for them that allows them to be put under pressure for a solid fit. Things are moving along now!