Here’s a fun sonic experiment. The RD-6 has outputs for each sound (well, some are shared) so I ran a splitter from the bass drum output and the clean signal goes to one input on the Dude Mixer and the other goes to the Monotron Delay and then out from there into the Dude Mixer. The third input into the Dude is the standard output from the RD-6 which is all the rest of the drums. (Minus the bass drum because when you output a specific sound it subtracts it from the main output.)
So that’s one channel for plain bass drum, one channel for bass drum through the delay (and the Monotron itself) and one channel for all the other drums/sounds.
Then it’s just a matter of twisting those knobs and coming up with crazy sounds! And that we did… at least we think so. Check it out!
I’m kind of in love with the Teenage Engineering Pocket Operators. I first saw one a few years ago. One of the guys I worked with at the time had one on his desk and I picked it up, pressed a few buttons and was like “Meh, I don’t get it.” Honestly it seemed like a toy, and kind of difficult to use. Both are true, and false.
The Pocket Operators are serious little machines capable of producing some amazing sounds. Part synthesizer, part sequencer, with the ability to sync with each other and with other devices, they’re just a ton of fun. I’ve only been playing around for a few weeks, but I’m hooked. And yes, they do look like “tricked out calculators” as Dana describes them.
They are pretty minimal as far as the user interface, which keeps them pretty cheap. There are 23 buttons, 23 LEDs, and two potentiometers, and a little one-color LCD screen which does not light up (so using them in the dark can be a little difficult). Through these inputs and outputs you can program sequences, adjust all sorts of parameters, create and replay patterns, and tweak the hell out of it.
I grabbed the PO-12 Rhythm model (which is “drums”) last month and had so much fun with it that after a few days I grabbed a PO-14 Sub (which is “bass”) to go along with it. They all operate somewhat the same so (to a certain degree) once you learn to use one, you can use others.
At first I was a little disappointed in the PO-14 Sub, I think because the PO-12 Rhythm was so awesome, but it just took a little more time to discover the awesomeness of the Sub, which also has a mini-drum sequencer built into it. Teaming them up together is also pretty cool.
Also, these things are super-portable, run on AAA batteries that should last a year or two, and work great with headphones. I’ve got a bit of a synth setup happening in my home office, but being able to grab a Pocket Operator and going outside or sitting on the couch at 5am and just building up some beats is extremely satisfying.
While I used the term “building up some beats” I should say that this is actually programming. Back when I used to build museum exhibits one of the components I designed for an exhibit was a step sequencer that kids could “program” and then “run” to hear the results. We had educational information about how programming a sequencer was like programming a computer – basically telling a machine what to do. I think when we talk about kids (or adults!) learning programming, we often just jump into computers and careers and don’t look at the bigger picture.
If you are unaware, long ago I was in a number of bands, and not quite as long ago, I was recording music. I enjoyed both of those experiences greatly, and getting back into making music (if you can call this that) has really got me excited about creating again, and sort of got me past a creative block I’ve been stuck in. So, I’m actually willing to say making noise with these things has improved my mental health.
There are so many YouTube videos (and just a few blog posts) about Pocket Operators, so I’ll share a few favorites below. Again, these devices are awesome! I mean, I don’t know that I’ll get all of them but, what? Oh wait… did I just order another one!?!?
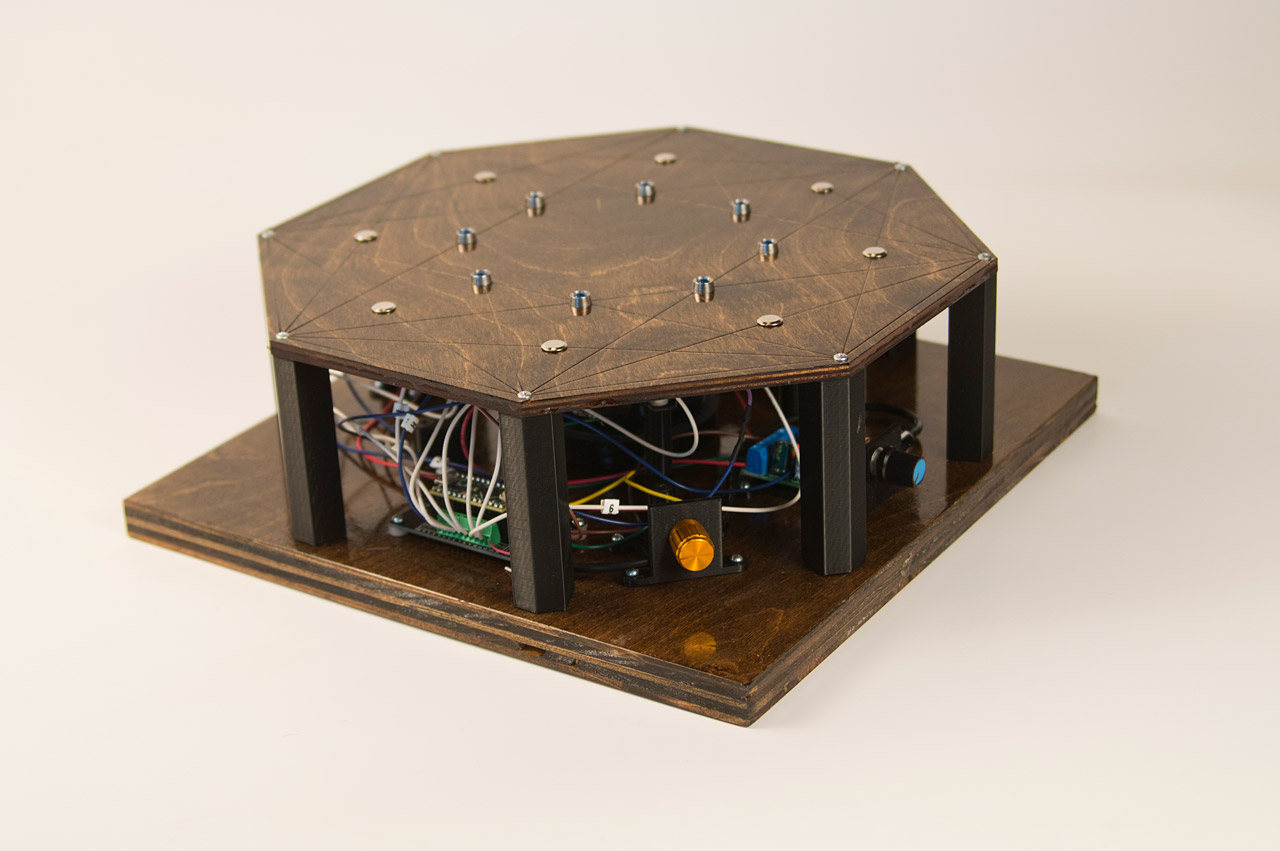
For this year’s WMSE Art & Music event, I created a new board I call OctoNoise. It’s an eight note piano featuring capacitive touch pads, LEDs, a Teensy LC microcontroller, and some fine woodworking. This is somewhat similar to last year’s piece.
You may know me for my work with decagons, but I also work with octagons, and this pattern is known as a 16 cell and it worked well for my design which utilizes 8 touch pads and 8 LEDs.
I’m not an amazing woodworker, but after laser cutting wood I can typically sand it, stain it, and add some polyurethane. At least it looks (somewhat) nice. I didn’t alter the bottom piece, and I just left it as a square, the way I received it from WMSE. My original design for this piece (over a year ago) was a bit different, but I wanted this to match the style of last year’s WMSE piece (and I was a bit rushed getting this done.)
The OctoNoise features and on/off switch, which is handy because it runs on batteries. I can’t tell you how many times I’ve made electronic things for myself and not included and on/off switch. It’s nice to have one! When you turn it on the touch pads calibrate for about 5 seconds. There’s a startup sound that happens during calibration. (I added a note about that on the back of the piece.)
There’s a “somewhat” hidden control knob on the side that ajusts the delay between notes. The way the code is written, it plays one note at a time, but you can alter that to very quickly (or slowly) oscillate between multiple notes. You can get some interesting variances in sound by turning the knob.
Note that it is difficult to turn the knob while also touching the pads to make sound. This is by design, as it’s also difficult (if not damn near impossible without using various parts of your body) to play all the notes at once. This was done to encourage collaboration and playfulness.
Here’s a side view. The height was determined by the speaker that was chosen. Once again we’ve put the electronics on display as part of the piece rather than hide them inside an enclosure. They are mean to be celebrated! (Each wire has a label showing what it connects to, if needed.)
Here’s the Teensy LC, which runs the code. The board has built-in capacitive touch pins, which make writing the code fairly easy. The notes used are C5, D5, E5, F5, G5, A5, B5, C6. This is real piano, and you can play actual songs. I based the code on a project I did for Brown Dog Gadgets a while back. You can check out their Touch Piano on Github.
This device also contains a built-in amp with a volume control. Again, a sometimes rare feature in the things I build. Often amps require 12 volts and that’s not always fun to deal with, but I’ve found some that work on variable voltages from 3 to 12 volts, so running them at the same voltage as a microcontroller becomes very easy.
Besides all the wood and electronics, there are some 3D printed parts that pull it all together. The on/off switch, delay control, amp, and battery holder all have their own 3D printed part that they attach to and then easily attach to the wood with some #4 screws. Once again, things are left “open” to celebrate rather than hide the electronics.
The other 3D printed pieces are the custom standoffs that raise the top piece above the bottom piece to (partially) enclose the electronics. I created a 2D profile from the original artwork used to laser etch & cut the piece to create the correct angle. I then extruded that design to make the tall standoffs and printed 8 of them.
Oh, one thing I forgot to mention. I liked this piece so much, I made another one so I could keep one for myself. As the old saying goes “If you’re gonna make one, make two!” So I did.
Finally, here are some videos, including one showing me playing both of them at once, which might never happen again!
Here’s a longer video I made in 2021. (Jump to 03:00 if you don’t want to hear me ramble and just want some sound.)
I came across a treasure in one of the (many) boxes of “old things” in the basement. What you see is a Radio Shack project box with a speaker and a switch on it. Yeah, it’s a noisemaker, and I built it in the mid-1980s.
Fun fact, I used to do electronics in high school, and while I’m not sure this was a project we did in class, I’m guessing I may have built it around the time I was in school. It was probably around 1985 or so, if I had to guess. (I think I took two years of electronics classes.)
The speaker has a “grill” that appears to be made from a metal screen, maybe from an old scrap window screen? I do know it would have been built with whatever stuff was around the house. I think I used Elmer’s glue to attach the screen to the speaker. It seems to have held up! The lettering for the “ON” label was most likely done using Liquid Paper and there’s a bit of clear Scotch Tape covering it as a protective layer. This also held up well!
There’s a hole in the case. I’m not sure why. If I had to guess, I probably burned it with my soldering iron. I should say “Solder Gun” because at home we had one of these, and I don’t know if it belonged to my dad and I used it, or he bought it for me, but I do remember it wasn’t easy to solder with. At the time I didn’t realize this wasn’t the preferred tool for delicate electronics work…
It looks like the soldering joints on the speaker held up fine… not so much for the masking tape, which dried up and lost its “stick”. I guess I just taped the speaker down, and used the tape as an insulator for the speaker contacts. (I did not know about hot glue yet.)
Let’s pop this sucker open! Solid core wire and a 9 volt battery connector are visible. There’s also a piece of paper that I assumed was to insulate the metal battery housing from the electronics. And then…
I took out the piece of paper and… oh my gawd, I actually documented this thing. There’s a circuit diagram and a Bill of Materials! This explains so much about my life, and honestly, I’m sort of proud of teenage me. Good Job, Petey!
And no, it’s not a proper schematic, but it’s approximately how I document most of my work/projects nowadays, using circuit diagrams, like you might create with Fritzing.
Finally! We’ve got a perf board inside with a few components soldered onto it, and rudimentary strain relief by running the wires through the mounting holes of the perf board. Well done, Petey!
Let’s flip it over and… oh my gawd, the soldering! Sheesh! Now I am embarrassed! But this does lead me to believe I did this project at home, since that’s where I was using a giant soldering gun and giant solder not quite suitable for delicate electronics. Oh well, at least my soldering skills have improved since the late-1980s!
Oh, in case you’re wondering how it works, look at the diagram for a clue. You touched the metal bolt sticking through the enclosure and the top metal piece of the enclosure, and you completed the circuit, and could get weird tones based on how much you touched and how hard you pressed. I was really hoping to include a video but sadly, it did not work after 30 years of sitting in a box. Drat!
(And yes, I’m really tempted to build a new version of this to see what it sounds like!)
Now that summer is over and the cold months have arrived we no longer sleep with fans running, but that means we sleep without the sound of fan running, and who can sleep with all that quiet?
My partner asked if I could make something that sounded like a fan, which if you know me, is right up my alley. I grabbed a Raspberry Pi Zero and got to work. I found an audio clip of an oscillating fan (wow, there are tons of fan videos on YouTube!) and dropped it onto an SD card with Raspbian and mpg123 and had something working.
The Raspberry Pi Zero has no built-in audio output so in the past I’ve tried using a USB audio dongle, but the one I tested failed miserably in The Sonic Titan so I decided to go a different route. I used a 1080P HDMI Male VGA Audio Video Converter Adapter Cable for PC Laptop PS3 Xbox I got from eBay and then sent the audio out via HDMI so it would go to the adapter. I also needed a Mini HDMI adapter for that to plug into. It works fine, and I’ve not seen the same audio problems I did with the USB dongle.
As you can see from the photo I used a custom enclosure designed by SparkFun and modified with a stabby knife. ;)
I also used a set of powered speakers, and a dual USB power supply from Monoprice. This was hacked together rather quickly, but it all works quite well. We just plug it in before bedtime and within 30 seconds we’ve got our noise. (It also helps drown out the sound of my cat trying to wake us up at 6am.)
The thing I find most amusing about this project is that even though the Raspberry Pi Zero is a “$5 computer” it comes out to almost $30 when I add in the power supply, SD card, speakers, and HDMI audio adapter. Still, I think it’s a better option than running a full desktop computer or laptop with white noise all night. (Which apparently some people do. I’ve also heard that an old phone or tablet is a good option.)
The thing I like most about “Sleepy Noise Machine” is that is was something I could easily slap together with existing parts I had around the house. I mean, you can buy a white noise machine, but why bother when you can make your own?