Categories
Uncategorized

Makerspace / Frolics / Parade

Old Milwaukee Makerspace

The Milwaukee Makerspace, led by David Overbeck, took part in Milwaukee’s South Shore Frolics Parade on July 16th, 2011. in 2010 I joined David in watching the parade, and it was great… I mean, it’s commonly known as Milwaukee’s Best Parade, so it was with great pleasure I was able to join David this year in the parade. The Makerspace crew made it all happen.

Giant Arduino

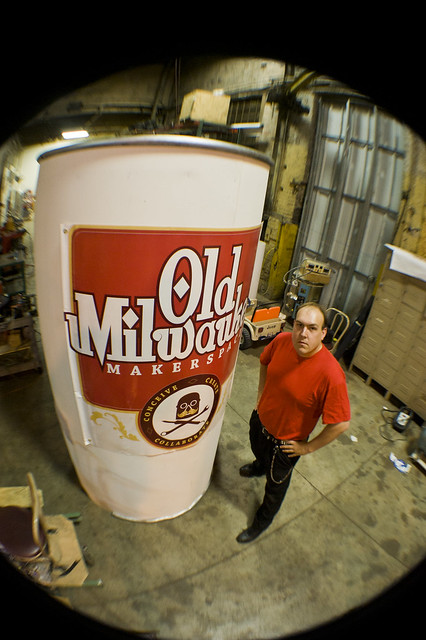
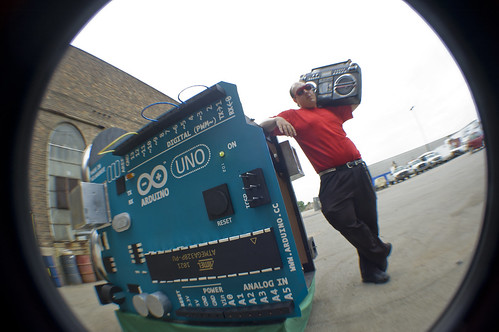
The Milwaukee Makerspace members joined together to do a “Group Build” where everyone pitches in to do something big… and by big, I’m taking about a 9 foot tall “Old Milwaukee Makerspace” beer can, and a giant double-Arduino (and jet) powered vehicle. We were also joined by Grave Digger and Little Pink Trike, which you might know from the Power Racing Series where they’ve done pretty well.

We had a few “issues” getting everything working in time, and getting everything to hold together, but I’m proud to say we completed 99.8% of the parade route without issue, and I think we delighted the crowd.

Everyone had a good time, and I get the feeling this isn’t the last parade the Makerspace will take part in… I mean, there’s another parade in just a few months… :)

Categories
Uncategorized

Terrible Photos

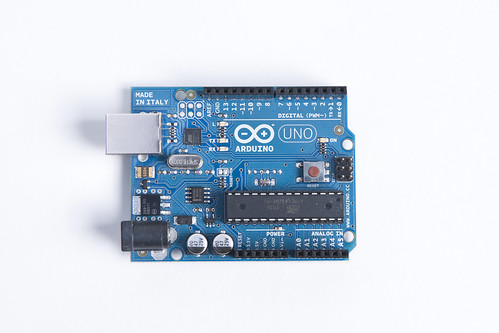
Arduino Uno

Here’s a terrible photo of an Arduino Uno…

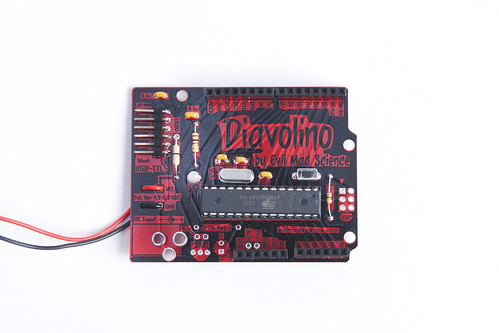
Diavolino

And here’s a terrible photo of a Diavolino…

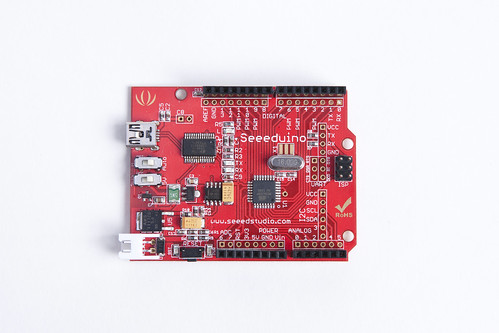
Seeeduino

And here’s a terrible photo of a Seeeduino…

These are three terrible photos! I mean, they aren’t terrible terrible, but they’re not great. I could spend a few minutes with each one explaining what I don’t like about them.

We needed a good high resolution photo of an Arduino Uno for a project at the Milwaukee Makerspace, and I said I would quickly snap a photo and get it online, so I did.

I feel like 80% of the quality of these shots are due to the equipment. I used a Nikon D3x with a Nikon 28-70mm f2.8 lens. That’s a great combo. I also used our Elinchrom studio strobes, which are also very nice. I shot tethered to a 21″ Apple iMac, which showed the images on a large colorful screen as they were captured.

Honestly, with all of that stuff in place, anyone familiar with a DSLR and lighting could get a pretty decent shot.

When I use words like “terrible” and “decent” they are, of course, subjective. There’s a whole scale for applying those words. One photographer’s “terrible” is another photographer’s “awesome!”

Besides, these are more “technical” photos than “beautiful” photos. There’s not much style to them. But these also fall under the category of Product Photography, which is worth discussing…

Photography is an interesting thing, because there are so many different disciplines, and so many different subjects. I know some guys who only shoot beautiful women between the age of 18 and 25, outdoors, on sunny days. (Or so it seems.) Other people I know shoot landscapes and nothing but landscapes. Well, HDR landscapes actually. That’s all they do… and that’s all fine, but it’s not product photography.

None of the three photos above would be good examples of product photography, and I’ll explain why:

  1. The items are used.
    If you’re shooting a product, it should be brand new, fresh out of the box, never used. Used items are not the same as clean items. Do you know why? It’s because…

  2. The items are dirty.
    Once an item gets used, it gets dirty. It gets worn down. It gets fingerprints, and smudges, and dirt, and scrapes, and doesn’t look very nice. Yes, you can clean things, and we often joke about the fact that 75% of product photography involves cleaning things, while 15% involves taking pictures. The other 10%? That’s for cleaning it again.

There’s also a number of tricks when shooting products, as opposed to portraits, or landscapes, or beautiful women. Don’t get me wrong, each thing has its own tricks, but they are often different tricks. Actually, they mostly have to do with reflecting light, or blocking light, or basically controlling light, in different ways.

But if you aren’t shooting products for a client, but you are shooting things for your own purpose, like documenting projects, you might find it helpful to learn more about product photography.

And when I say learn, feel free to learn in your own way. If you can assist a product photographer, that would be good, but if you can’t, then study good photos, figure out what you like about them. Learn to control light. I’m not ashamed to say that some of the photos of things that I’ve taken that I really liked, I ended up shooting 30 different versions, all with slightly different lighting. That’s just how I do it. Take a shot, move a light. Take a shot, move a reflector. Take a shot, place a black board directly overhead instead of a white board. Take another shot. At some point after you think you have enough shots, stop. Review them later on a large colorful screen and pick the best one.

Trial and error is still an effective way of learning something… In fact, it may be the only way to learn something.

Categories
Uncategorized

An (Easy) Button

Make

Those guys over at Make (who seem to be my new BFF) mentioned another button I made, which was inspired by Matt’s AWESOME Button post on Make, which in turn inspired Patrick from Milwaukee Makerspace to build a footswitch-style button, which got mentioned on Hackaday, which is where I saw the link to Flip’s 1-Key-Keyboard Project.

It’s getting a little circular in here…

So on the Zen Button post, Flip commented on his 1-Key-Keyboard Project, and noted that it had the same “dead-simple functionality” but was a much lower cost.

Make

The “dead-simple” part was also in the post’s description of my button, but I think that “dead-simple” had more to do with the parts and the build than the function, and here’s why I think that matters.

If you go back to the original AWESOME Button post, you’ll see a few people (including me!) wondered if you could use an Arduino instead of a Teensy. Why? Because the Arduino is cheap, and easy, and lots of people already have one.

But the Teensy is also cheap, and fairly easy, maybe just a wee bit more difficult, but still fairly easy, and you just plug the dang thing in via a USB cable and hey, what could be easier!?

But with ease of use comes a price. If you look at Flip’s 1-Key-Keyboard Project, it’s probably what he considered “dead simple” but to me, I see a list of parts including either a ATTiny45-20PU, or ATTiny85-20PU, or ATTiny85, or ATTiny45… and then there’s a few resistors, diodes, capacitors, some prototype-board, and a programmer that works with the Atmel AVRs.

Flip has done a great job writing up the project. I mean, I assume he has, but it’s way over my head. All the comments lead me to believe it’s pretty awesome. If you’re comfortable with everything he talks about, and it all makes sense, then that’s awesome too. Either way, I’m definitely glad Flip shared his project.

For those of us not ready to get that deep into AVR development, things like the Teensy or the Atmega 32u4 are simple enough to use that even beginners can get pretty far. Just in blog post comments and some emails I was able to help a few folks get their Teensys up and running.

Remember, everyone starts out as a beginner… but that’s not to suggest that you eventually need to get to the level where you’ll be using an AVR programmer with bare chips if using an Arduino or some other board does what you want with less hassle. Easy really is one of the main reasons the Arduino platform became so popular.

So if you ever see your project on Hackaday, try not to be discouraged by the commenters who are quick to point out how they would have done it better, faster, cheaper, and with 10 times the capabilities of what yours does, because while they were busy leaving discouraging comments, you were busy making something. :)

Cheers!

NOTE: Need a button? Now you can buy one! Visit our store or Etsy.

Categories
Uncategorized

Make A Sketch

Make A Sketch

The Make A Sketch features an Arduino-based microcontroller and a Processing application that work together to function like an old Etch A Sketch, letting you draw images using just two knobs. It’s a blend of old-school analog art with the modern digital world.

At least, that’s the fancy copy I wrote to explain it… But really, that’s what it is.

Back in May 2011 I did something we called Processing Month (as inspired by Vormplus) and I started out publishing some simple Processing sketches, and about halfway through May, with Gallery Night looming, I decided to try something a bit more challenging, and the Make A Sketch is the result.

Along the way I ended up drilling acrylic, breaking acrylic, drilling more acrylic, learning about Posterous, writing some Perl code, rewriting some Perl code, destroying an Apple Cinema Display, and finally putting it all together into a complete piece.

I used the RED ONE we have at Z2 to shoot this little video explaining it all… There’s also some time lapse footage from Gallery Night, and a selection of drawings from that night.

Oh, I also ended up building a Project page, and a page for the Make A Sketch, as well as permanent static pages for many of my other projects, such as Time Lapse Bot. These pages will serve as the home for each of my projects, and will point to all the associated blog posts, and other related info.

Categories
Uncategorized

The Future of Open Source (Part II)

Open Source

In our first piece, The Future of Open Source, I talked a bit about hardware, and touched on community, as well as mentioned a few specific companies. This time I’ll talk about specific pieces of hardware.

Let’s start with the Arduino. The Arduino is probably the most successful piece of open hardware. There’s an estimate of 300,000 Arduinos “in the wild” as it were, and if that does not count “official” Arduinos, I can see that number easily being double.

Recently Phillip Torrone published an article titled: Why the Arduino Won and Why It’s Here to Stay:

While it’s nice that Arduino is open source, and commercial use is allowed if you make a clone, it’s not the biggest reason, which is why it’s down near the end of the list. However, that isn’t to say it doesn’t matter at all. Specialized derivatives can be made without paying someone or asking anyone. It’s open source hardware so a company or school can use it without any per-seat licensing. There’s no risk that it will be discontinued and the software gone forever. If you want a new feature, you can spend the time and get it added. When thousands of people have a small stake in something, or ownership, they care more. Does anyone even debate if open source software is a good idea any more?

I think part of the reason the Arduino (and its clones) have flourished is due to the community built around it. Thanks goes out to the people who are really into doing things with Arduinos, and sharing their work with others, and helping out on the forums, and teaching classes, and basically connecting with others and evangelizing the Arduino platform.

The first Arduino I purchased was the “official” Arduino Uno, which I acquired from Adafruit Industries. I remember finding out about Adafruit from the web site ladyada.net, run by Limor Fried (Lady Ada) who runs Adafruit. The fact that she had shared so many project details online led me to her business, and I became a customer. My Uno is what I consider my “top of the line” Arduino, and I feel pretty confident that it will work with any shield I get, not have any weird quirks to work around, and that buying it supported the Arduino project. Chances are when a new “official” version of the Arduino comes out, I’ll but that one as well.

I do have other Arduinos, like the Boarduino, also purchased from Adafruit. I wanted another Arduino, at a lower cost, that I could dedicate to a project. It fit the bill, and supporting Adafruit was something I felt good about doing. I’ve also got a Diavolino, from the folks at Evil Mad Scientist Laboratories. As I mentioned in my blog post, The Diavolino comes in at about $13—less than half the cost of an Uno—though there are some compromises with the Diavolino. If these compromises don’t affect you, it’s a nice little Arduino board. And as for the folks at Evil Mad Scientist Laboratories, they’re pretty awesome, just like Adafruit, and I feel good supporting them.

Now we move away from the US and over to China. I’ve got two “Seeeduinos” from Seeed Studio. I know some people would prefer not to buy from China, and if these were cheap knock-off products from a questionable company, I’d agree, but Seeed Studio seems to be a pretty well respected member of the open hardware community. They were a sponsor of Maker Faire, they helped with the radiation detection project after Japan’s Fukushima incident, and they actually develop a number of innovative products. If all they did was make a cheaper Arduino, I probably wouldn’t be as supportive of their efforts. As it is, I think they provide some friendly competition for others in the Arduino space, and do plenty of other things to be a good citizen of the open hardware community.

I’ve already mentioned the Evil Mad Scientist Laboratories gang, and their Diavolino, but I’ll also talk about the Egg-Bot. I bought the Egg-Bot kit because I think it’s awesome. Here’s the description of it: “The Eggbot is an open-source art robot that can draw on spherical or egg-shaped objects.” See? Awesome! (I’m sort of a fan of art robots.) Now, the Egg-Bot is awesome, but it’s an open & shared kind of awesome. Every time I demo it, I explain to people that it’s an open source device, and you can download the software for free, and you can download the plans to build your own for free. I’ve see a SphereBot, a Completely printable Eggbot, a Fischer Technik Eggbot, and an EggBot Makerbot Attachment over on Thingiverse, as well as many Egg-Bot design files. (Heck, you could even make an Egg-Bot out of LEGOs.)

The point of all this is, the Evil Mad Scientist guys aren’t out to crush anyone who tries to make an Egg-Bot… they encourage it. They’ve grown a community of users who help each other out, sharing what they’ve learned along the way. This helps make people fans of Evil Mad Scientist Laboratories, and the Egg-Bot, and be more willing to support their future endeavors.

But hardware, just like software, and life itself, is often a compromise, consisting of grey areas, like the Teensy. While I used a Teensy for The Button, and it was perfect for it, I still hope to move to an open source alternative if possible. I covered most of this in my Teensy vs. Atmega32u4 Breakout Board+ post. I’ll get my hands on an Atmega32u4 Breakout Board+ and see how it stacks up against the Teensy for future projects.

So where does that leave us, and the future of open source? Personally, I see open hardware as a choice sort of like buying food. You can choose to support companies you know, like, and trust, and you can even go to the local farmer’s market and talk to the people who make the food. I hate to use the word “sustainability” (only because I think it gets overused) but I think it fits. A sustainable future through open source. Works for me…