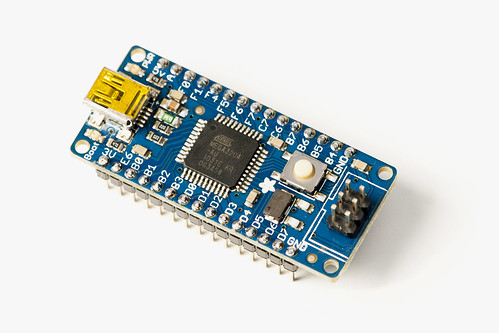
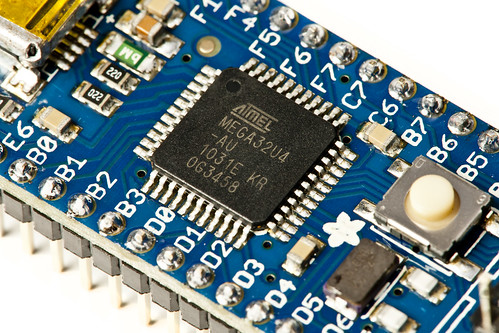
I’ve talked about Adafruit’s Atmega32u4 Breakout Board+ before, first in my post Teensy vs. Atmega32u4 Breakout Board+ and then in the post The Future of Open Source (Part II), so I figured I should actually get a Atmega32u4 Breakout Board+. (Also, I’m just going to call it the Atmega32u4 from now on.)
Now as far as AVR development, I’m a guy who doesn’t like to stray too far from the Arduino world, partly because I find it fun and comfortable, and it does most of what I’ve needed so far. That said, I did end up dabbling with the Teensy for The Button.
Don’t get me wrong, the Teensy is awesome for what it does, and what it is, but occasionally my open source bias takes hold and it bothers me (just a little bit) that the Teensy is not open source. Of course, Adafruit’s Atmega32u4 is open source, which gives it a few more points in it’s favor. Price-wise, the Teensy is $16.00 and the Atmega32u4 is $20.00. Consider it the “open source tax” if you will. (Or buy 100 of them and they’re only $16.00 each then!) (Update: Actually, the Teensy with pins is $19.00 and the Atmega32u4 Breakout Board+ with pins is $20.00, which is even closer in price. You can buy the Teensy without pins at $16.00 but you can’t buy the Atmega32u4 Breakout Board+ without pins.)
So with an Atmega32u4 in hand, and from the perspective of someone who used a Teensy successfully, here’s my review.
You’ll want to start with the Atmega32u4 product page. Without that, I’d still be watching a pulsating LED and swearing.
Read the section titled “Why not use a Teensy” and decide if you really want to use the Atmega32u4 instead. Done? Good. If you still want to use the Atmega32u4, continue reading!
The next section I’d call your attention to is the Using Teensyduino section. As I said, I’m an Arduino guy, so I wanted to give Teensyduino a try. Teensyduino is a software add-on for the Arduino IDE. It adds the ability to build and run sketches on the Teensy. If you don’t want to install avrdude or deal with command line stuff, this is another option. I’m not against using avrdude, but I wanted to try to parallel my Teensy experience, so Teensyduino was part of the toolchain.
I had already installed Teensyduino for use with the Teensy, so the section on that topic was where I jumped in. I walked through the changes, from editing boards.txt to restarting the Arduino IDE. It didn’t work.
But wait! There’s a line that says “Download the Arduino IDE from arduino.cc – as of this tutorial, IDE v21 works best – its not the latest one so scroll down to find it.” And yes, I’m running IDE v22. I’m not sure if that’s what broke things, but rather than download version v21 and try the edits again, I just grabbed the “ready to go” dmg that Adafruit supplied. Since I already had the Arduino IDE in my applications folder, I just renamed it to “ArduinoAtmega32u4” and ran it. It worked!
So the software installation/configuration part was a bit more difficult for the Atmega32u4 than for the Teensy, at first, but not much of an issue in the end.

So here’s a simple blink sketch, slightly modified from one that worked with the Teensy. The one issue with the Atmega32u4 is that you need to press the reset button on the board before you upload a sketch. Each time. Adafruit mentions this, so it’s not a surprise, but you just need to remember to do it. If you use a Teensy or an Arduino all the time, you might forget.

So the next test was to make the Atmega32u4 emulate a USB keyboard, just like the Teensy can do. You’ll need to change the menu options, but besides that, it worked well. At this point, with everything working, the differences between the Teensy and the Atmega32u4 seem pretty minimal. Granted, I’m not doing anything complex here, but it’s good to know that I could easily swap out the Teensy for the Atmega32u4 in some situations.
Here’s the code I used, which prints a space, similar to what the Teensy does for The Photo Booth:
void setup() {
  Serial.begin(9600);
  delay(4000);
}

void loop() {
  // Your computer will receive these characters from a USB keyboard.
  Keyboard.print(" ");

  // typing too rapidly can overwhelm a PC
  delay(2000);
}
So now that I’ve got an Atmega32u4, and know what it can do, the only thing left is to let the hacking begin! :)