Categories
Uncategorized

The Detonator

The Detonator

It’s The Detonator! What is The Detonator you ask? Well, for Maker Faire Milwaukee we build a fire poofer, which is a device that shoots flames into the air. Workmate John McGeen started the poofer build and we finished it up at Milwaukee Makerpace. Along the way we experimented with a torch, candles, and grill igniters, until Dan the Blacksmith finally added a pilot line and some steel wool.

Fire Poofer

The Detonator went through a few revisions, but I’ll walk through the construction of it for this blog post. We brainstormed a few different ideas to trigger the poofer, but in the end I went with something simple than I knew would work reliably for the entire weekend. (And it did!)

Laser Cut Parts

I started by using MakerCase to design a box I could laser cut. I used 3mm black acrylic because I have a lot of it, and I made the box the size that worked with the acrylic I had. The image shows the acrylic (gray parts) and one piece of 1/4″ wood (which is tan in the image.) The wood piece went on the inside, right under the top acrylic with the hole for the button.

The Detonator Guts

Since I wanted The Detonator to withstand being pressed, slammed, and pounded on by hundreds of people over the course of two days, I also built a wooden box that fit inside the acrylic box. This added strength and weight to it.

Vinyl

I didn’t just want a plain black box, so I added some bright yellow vinyl to it. I cut the vinyl with a Silhouette Cameo. The image above shows how I determined wrapping the vinyl around the edges.

The Detonator - Vinyl

Here are the vinyl pieces I cut. I added cut outlines around the pieces so I’d be able to line it up correctly. It worked pretty well. (I didn’t take time to measure or mark things, but that would be a recommendation.)

The Detonator - Illustration

Above is my final “pretty” illustration of The Detonator. Below is a very black photo of The Detonator. I’m fairly pleased with how it turned out, especially since it was a rush job to build it.

The Detonator

The Detonator Connectors

There are four connector posts, but only two got used in the end. I originally had just the two in the center, but ended up splitting them and adding extra posts so I could split power between 12 volts (well, 18 volts, sort of) for the solenoid, and 4.5 volts for the grill igniters. We ended up ditching the grill igniters, so in the end I only needed one pair of connectors. Oh well!

The Detonator Guts

Here’s the inside! There’s a Pololu A-Star 32U4 Micro mounted on an Adafruit Perma-Proto Half-sized Breadboard PCB with some screw terminal connectors, which is connected to a relay board. The board I used had four relays, but since we didn’t use the grill igniters I could have used a two relay board. (Also, relay boards are super-cheap on ebay.) There’s also a relay controlling a beeper that beeps a countdown. (See the video below.)

Overall The Detonator was a quick build. and there’s a few things that could have been a bit more polished. For instance, I cracked the acrylic a bit when I drilled more holes for the connection posts. In an ideal world I would have laser cut a new piece, but I didn’t have time. I also could have made the code a bit simpler after removal of the batteries for the grill igniters, but hey… The Detonator turned out good for a quick fire poofer controller!

Categories
Uncategorized

mms xeyes

X11_ssh_tunnelling by Tene~commonswiki

When I first started using *nix-based operating systems I played with xeyes, which is a “follow the mouse X demo” and a very simple program. (Really, it’s not fancy, but 25 years ago, it was sort of neat.)

A few days before Maker Faire Milwaukee Vishal and I were brainstorming ideas for something done in Processing to show with a projector, and I suggested xeyes because it was silly and simple and we hadn’t slept much.

I figured there was a Processing version out there, and our old pal Alex has one at Tinkerlog. I grabbed it and started hacking. Someone mentioned putting the old Milwaukee Makerspace logo in place and putting the eyes on it. (It may have been me, I honestly don’t remember, again… not much sleep.)

Then Lexie showed up and I ran the demo and she suggested there should be a fly for the cursor. In my tired state I thought this was a great idea, and then checked on how cursors work in Processing (yes, you can use an image) and then I found a fly on OpenClipArt.org and added it.

mms-xeyes

Now we had something that let you move the mouse around and the fly would move and the eyes would follow it. I sent Vishal the code and he had a trackpad he thought about using with it… But then he said it would be cool if it just moved around on its own. I didn’t have time to write the code, so Vishal asked if I had a Teensy on me, and since I always do, I gave it to him. He then wrote code to make the Teensy act as a mouse and randomly move around the screen.

We hacked this all together pretty quickly, and it was fun, and not super-impressive, but we liked it. Oh, I also made a Processing.js version you can try. (It’s an early test version before I added the fly.)

mms-xeyes-rpi

A few days after Maker Faire I got an email from Bryan Cera about running Processing on the Raspberry Pi, which we had been discussing. He got it working, so I finally circled back around to give it a try. Well, it worked, and I got this mms-xeyes thing running as a full-on application.

This is pretty awesome. I mean, the cursor is a little weird, and disappears when you do not move the mouse (but reappears when you do move it) but overall it does work, and I’m pretty pleased with it. I’ve got a few ideas that involve Raspberry Pi computers running Processing sketches, so yeah… overall, this is good.

Categories
Uncategorized

Maker Faire Milwaukee

Maker Faire Milwaukee

While I’ve been posting a lot lately about plastic and other odd things, pretty much all of my time these days has been filled with planning Maker Faire Milwaukee.

If you’re not familiar with what a Maker Faire is, here’s a quick description from the history page of makerfaire.com

Part science fair, part county fair, and part something entirely new, Maker Faire is an all-ages gathering of tech enthusiasts, crafters, educators, tinkerers, hobbyists, engineers, science clubs, authors, artists, students, and commercial exhibitors. All of these “makers” come to Maker Faire to show what they have made and to share what they have learned.

What I love about Maker Faires (I’ve attended about eight of them in various cities the past few years) is that the people who share their work (or play) are passionate about what they do, and they love sharing it with others. I find this inspiring, and I usually leave excited about what I saw, and eager to learn new skills and make new things.

I’m planning to do a talk about The Power Racing Series, and help out showing off tiny electric vehicles built for under $500, but most of my time will probably be spent working with the folks from Betty Brinn Children’s Museum and Milwaukee Makerspace just making sure everything runs smoothly. (The two organizations are co-hosting the event, and I’m an employee and member of them both, respectively.)

I hope to see you at Maker Faire. If you’ve got kids, it may inspire them, and if you’re a kid at heart, you’ll love it too. (Don’t get me wrong, adults are welcome too!) And, Maker Faire Milwaukee is FREE to attend, thanks to our great sponsors! (And yes, there are still sponsorship opportunities, so get in touch with me if interested!)

If you want a preview of what you’ll see, check out some of the blog posts I’ve been writing.

(Oh, Maker Faire Milwaukee takes place at State Fair Park on September 26th & 27th, 2015, and Harvest Faire is also happening at that time, and also free, so really, there’s something for everyone… Come on down!)

Categories
Uncategorized

Laser Pointer Switch

Laser Pointer Switch

I modeled a laser pointer switch which you can use with your cheap laser pointer to turn it on and do stupid things like throw it in the air while doing long exposure photography. (Actually, that’s not a bad idea! Or is it?)

Laser Pointer Switch

OK, these are really part of the Laser Maze we’ll be running at Maker Faire Milwaukee this year. The last thing I did for Laser Maze was the mounts, but Vishal is still doing most of the hard work on this project. (Thanks, Vishal!)

Laser Pointer Switch

If you want one, you can grab it from Thingiverse or Youmagine. And remember kids, laser are dangerous, don’t just go pointing those things around!

Laser Pointer Switch

Categories
Uncategorized

Laser Maze Mounts

My plan for Maker Faire Milwaukee’s 2015 Laser Maze got a little sidetracked, but that’s okay, because Vishal ended up writing some of the code I needed for another project and then I decided to just have him take over the some of the build.

Laser Holder

I did get a few more things done in recent weeks, like making these mounts to hold the lasers in place. Adam provided us with these clamp devices meant to hold a flashlight on your bike, but the lasers are a smaller diameter and tended to shift around, which isn’t great when you need to align lasers…

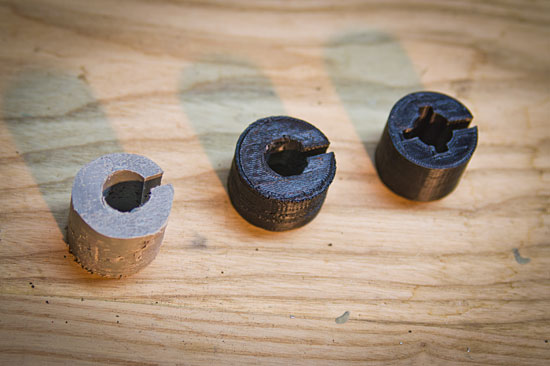
In our first attempt to make something that would go into the flashlight mounts and adapt to the size of the lasers, we ran down to the basement shop at the museum and used a hole saw in the drill press to cut a piece of plastic, and then we drilled another hole, and cut out a piece using the band saw. This was a neat idea, but did not work.

Laser Holder

The hand-fashioned one just wasn’t quite the right size. We didn’t have the exact hole saw or drill bit sizes needed, and the plastic just didn’t flex enough to allow for tightening. I ended up pulling out the calipers to get exact measurements and re-create what we tried to do with 3D printing.

Laser Holder

The 3D printed version sort of worked, but it was tough to slide the laser into place. I could have just kept trying to get the perfect fit, but instead of trying to emulate the limitations of using a drill and saw, I modified the design to have less surface area where the laser was sliding in, and also allow for more flex, and more strength, due to the way 3D printing works.

Laser Holder

These pieces don’t have a lot of infill, and they don’t need them. The shape of the interior section provides extra strength because of the nature of how it’s structured.

Laser Holder

These mount should work well, and the bike flashlight part saves me the trouble of creating an entire mounting system, or modifying previous mount work.

We’ve got less than 90 days until Maker Faire Milwaukee so hopefully we can get a test set-up running within the next 30 days or so.