Categories
Uncategorized

STL to SVG

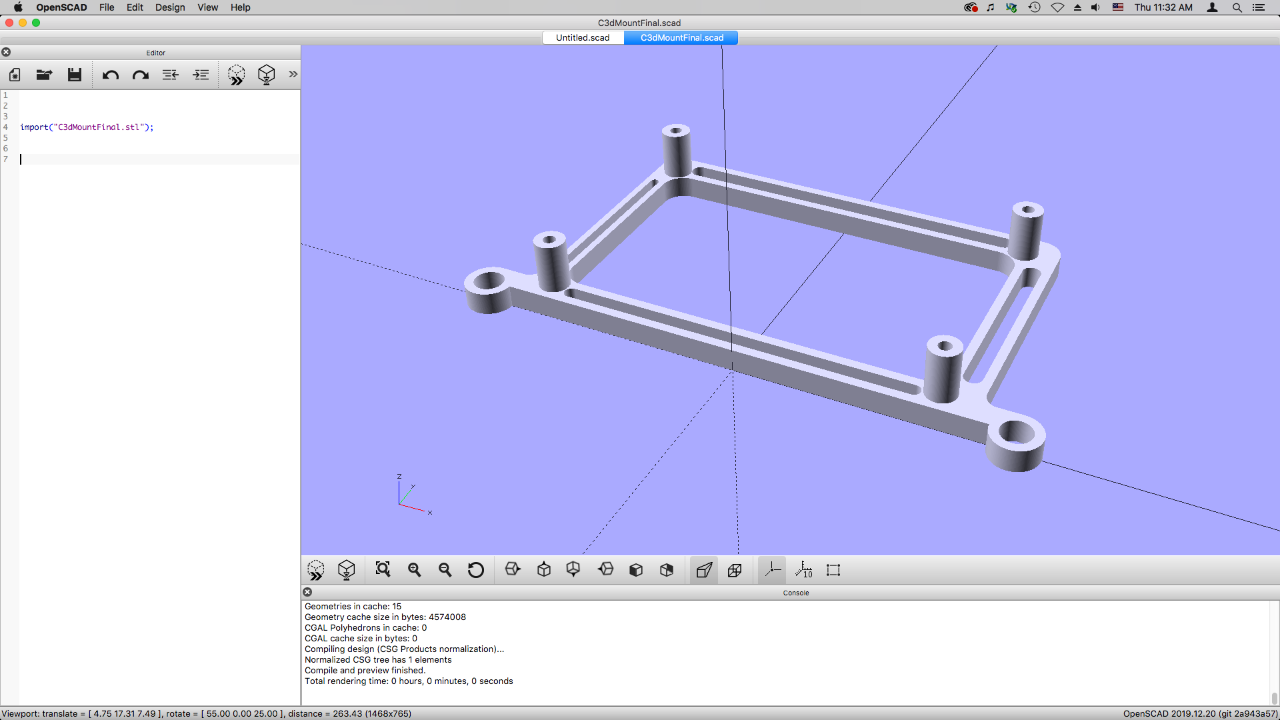
Sometimes I need a 2D vector version of something that is a 3D model. Here’s how I do it. First, if there is an STL file, I load that into OpenSCAD.

For this model I wanted a top view so I could use the hole pattern to laser cut a mounting plate.

I select Show Axes because I’m gonna need that later…

The axes will show the center of the canvas, and luckily our model is centered…

Change the view from Perspective to Orthogonal

If you don’t know the difference between perspective view and orthogonal view, do some research I guess. (I probably learned about them in 7th grade drafting class.) Otherwise, switch between the views and it should make sense…

Okay, next I view the object from the front. Looks good!

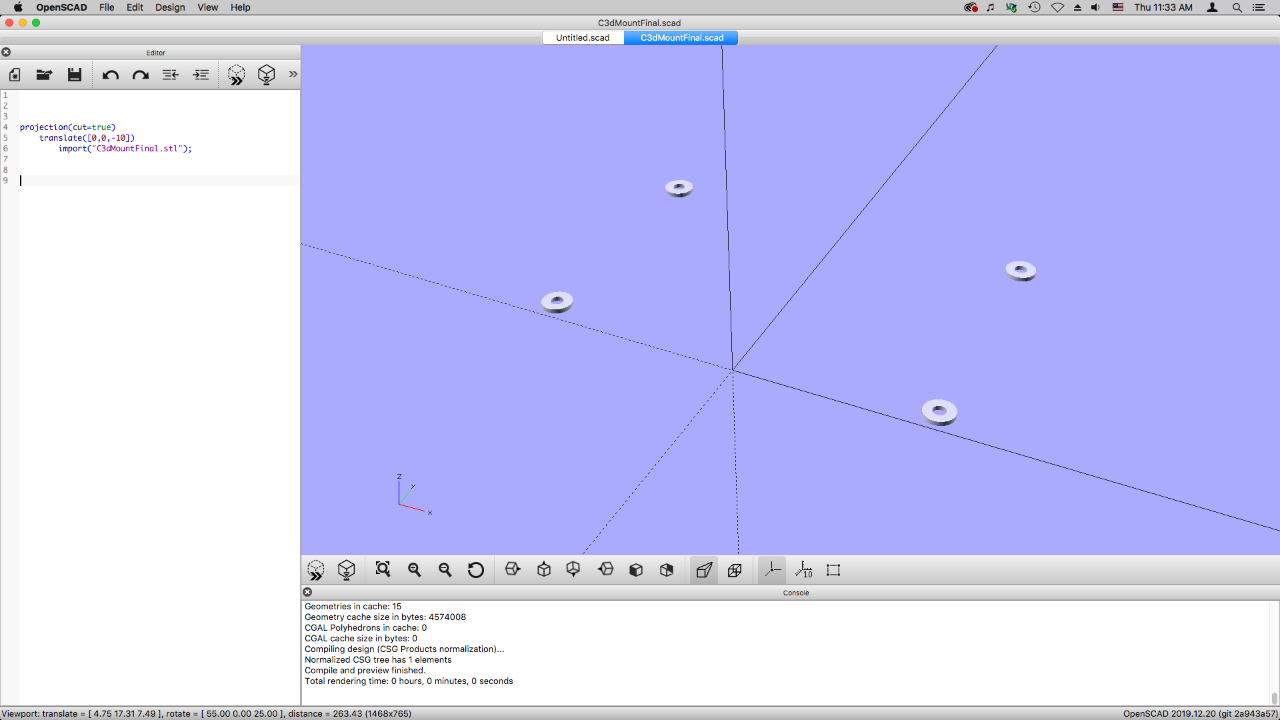
I then add the translate command so that I can move the object in 3D space, and I lower it down, in this case 10mm, because the center line is where it will be cut.

The line projection(cut=true) then cuts a slice at the zero point in the Z axis… But we’re not done yet.

(Oh, if you choose cut=false you’ll just get the whole object, not a slice at a specific cross section of it.)

Here we can see what it looks like at an angle, which might make a bit more sense…

Let’s switch from orthogonal back to perspective view… Not required, but I’ll do it anyway.

Back to the top view… and now with the projection you can see the slice we took from the 3D model.

The next step is important… we need to Render the file! You can’t export the SVG file until you render your model.

The model will change… in this case you can see the shapes are now green with red outlines.

And now we can Export as SVG. (You could also use DXF if you need to, though that’s a garbage format I tend to avoid.)

Here’s the SVG open in Inkscape. Brilliant! I can now add to it, and my hole pattern is spaced properly for the mount I want to make. Excellent.

See Also: 3D (STL) to 2D (SVG)

Categories
Uncategorized

Imperator Furiosa’s Skeleton Arm

Imperator Furiosa

By now I have to assume you’ve seen Mad Max: Fury Road, and you’ve probably said to yourself “Damn, Imperator Furiosa is pretty badass!” and then you remember that sweet skeleton arm on the door of the war rig and thought “I want one of those!” (Okay, maybe it’s just me…)

Imperator Furiosa's Skeleton Arm

Well, since I was unable to attain a high resolution image of the door of the war rig, I made do with a low-res version I found on the Internet, because that’s where you find pictures of things…

Imperator Furiosa's Skeleton Arm

Anyway, I traced the arm in Inkscape and made a nice vector image suitable for vinyl cutting. It’s about 18 inches long, so if you’ve got a Silhouette Cameo like we have at Milwaukee Makerspace you can use the 12″x24″ cutting mat, or just cut without a mat. The DXF file below should import into Silhouette Studio easily.

Or maybe you want to use a laser cutter or some other CNC machine to make an arm. There’s a vector PDF file, and the original SVG file you can easily edit.

Some people assume I drive an orange Honda Element, but really it’s a Honda War Rig. Special model, they only made a handful of them. (My old car was a V8 Interceptor. It was totaled in an accident.)

Honda War Rig

Honda War Rig (Close-up)

Maybe you don’t drive a Honda War Rig. Well, you can still get in on the fun with your Mad MacBook Pro. Just size the vinyl appropriately and stick it on the lid. Can you handle the “BADASS OS X Word Documents and Excel Spreadsheet” editing that’s about to happen!? I don’t think you can!

Mad MacBook Pro

Download the files and have a good time.

Categories
Uncategorized

Vector to Raster and back…

Encoding Discs

While Inkscape is a great and powerful open source vector editing application, sometimes it can’t do it all. Since I primarily use it for creating files for laser cutters, vinyl cutters, the Egg-Bot, etc. I need to have lines. No fills, no objects sitting on top of other objects, no crazy intersections of paths, just lines.

I’ve found that on occasion it’s actually easier to export a raster image, re-import it, and trace it to get the needed vector file. I’ve done this for many files from OpenClipArt.org because they weren’t created with CNC uses in mind, but that’s what I use them for.

Back when I wrote my rotary encoding post I mentioned a perl script that could create encoding disks. It’s simple to use, and outputs an SVG file that I can open in Inkscape. Sadly, it’s not exactly what I need, but it’s pretty close, and easy to fix.

Encoding Disc

Here’s the disk that was created, which uses some neat SVG capabilities to generate it, but makes it quite difficult to edit using Inkscape. You can’t ungroup it, or break it apart, or use union or difference commands on it.

Encoding Disc

I’ve placed a smaller disk on top of it, Right now it’s gray (just so you can see it) but I’m going to fill it with white and give it no stroke. (Normally I would place one object on top of the other and use the difference command to cut a hole in the larger object. In this case, that can’t be done.)

Export at PNG

Once that’s done it looks like I want it to look, but it’s not all lines. It’s really overlapping objects. As long as it looks like I want it to look, I can export it as a bitmapped file. (A PNG file, to be precise.)

Import PNG

Here’s the PNG file. It’s raster, not vector, and again, it looks just like I want it to look. Excellent! Let’s go back to Inkscape and import the PNG file.

Trace Bitmap

Once imported I can use the Trace Bitmap command to easily change this black and white image into a vector file. (Yes, make sure it’s just pure black and white, so it can easily separate the two colors and create the needed path.)

Outline

After the bitmap has been traced I’ve got nice vector lines, shown here in outline mode, and it’s ready to be cut with a CNC machine. (Oh, I’ll probably add a center mounting hole, as the encoding disk eventually does need to attach to something.)