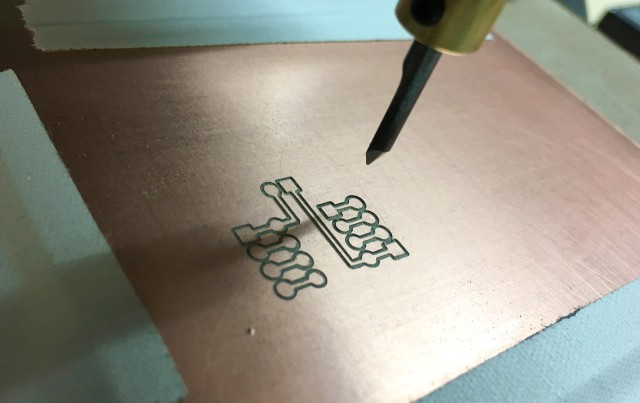
Categories
Uncategorized

Troubleshoot & Debug

USB Fail

Checking on the meaning of the word “troubleshoot” shows it to be defined as “trace and correct faults in a mechanical or electronic system” and the word “debug” describes “the process of identifying and removing errors from computer hardware or software”.

I use both of these words, a lot, and I hope I’ve used them enough in class to plant the idea into student’s heads that both of these words are really about problem solving, which is probably the most important thing you can learn in my class. If you’re dealing with physical things or electronic things, they are not always going to work, and figure out why they don’t work, and getting them to work is what it’s all about.

I recently had a student who had written some very simple code. It checked the distance of an object using an ultrasonic sensor, and when the right conditions were met, it turned a servo. This is dead simple, but for a student not well versed in writing code, can be a challenge. The student could not get it to work reliably. It worked for maybe 10 to 30 seconds, then froze up. I ended up wondering if there was a conflict between two code libraries, did some searches, determined there might be, found a way to write code without using a library, had the student test it, and the results were the same. I then duplicated the student’s circuit, ran the exact same code, and it worked fine for me. I then swapped servos with the student, then ultrasonic sensors, then Arduino, then… Then I just took the entire setup from the student, Arduino, USB cable, breadboard, wiring, sensor, servo, and tried it on my computer and it failed. Failed! Did not work. Eventually I discovered the student had a bad USB cable. Yes… a bad USB cable, that “sort of sometimes” worked. Sometimes. It worked reliably enough to upload code, but the student kept getting errors when trying to open the Serial Monitor (which should have been a clue) and had to attempt multiple times to open it.

Eventually, as you eliminate more variables, you narrow things down. Sometimes it’s just luck. Sometimes it’s knowing where to look, and not getting stuck thinking it’s one thing when it’s totally another. I took the bad USB cable, cut the end off, and tossed it in the junk bin, and gave the student a new cable. Everything worked fine then.

Whether it’s troubleshooting, debugging, or just “solving problems” it can take time, and you have to be willing to put in the time. It can be frustrating, but at the end you usually walk away with more knowledge about how to solve problems in the future. I can bet that if something like this happens again the student will remember that one bad USB cable that set back their progress for a few hours.

(I’ve also been working on rescuing a failed Windows computer this week, so I need all the strength I can muster to deal with the dumpster fire of an operating system that is Windows 7. I remain convinced that everyone who says they hate computers says so because they are forced to use Windows.)

Categories
Uncategorized

T35TP4TT3RN

T35TP4TT3RN

T35TP4TT3RN (aka TEST PATTERN) is a piece I created for Maker Faire Milwaukee in 2016. It consists of a Raspberry Pi single board computer connected to an old Sony broadcast monitor. (I got the monitor from another member of Milwaukee Makerspace who was getting rid of old equipment.)

T35TP4TT3RN

As I often do, I wanted to contrast old hardware with modern hardware. I ended up using a Raspberry Pi Model B which has composite video out via an RCA jack. I used an RCA to BNC adapter to connect to the monitor. The display is a whopping 640×480 pixels.

T35TP4TT3RN

I used the Raspberry Pi Slideshow technique and with most installations, I tried to do a good amount of testing beforehand, letting it run for days at a time. I came across an issue where the system would freeze, and it would get stuck on an image. I contemplated switching to display of a video, but really wanted to avoid that, so I set a cron job to reboot the Pi every 30 minutes. I figured that if someone saw the screen during reboot it would be an extra BTS sort of treat. (The Pi boots very fast.)

T35TP4TT3RN

I did end up altering the monitor a bit. I removed the case and broke out a bit of the battery compartment so I could slide the Pi and extra cable into the battery slots. Since I’ll probably never own the batteries for this unit, hacking it seemed like a no-loss situation.

Here’s a collection of a few of the test patterns that were displayed.

T35TP4TT3RN

T35TP4TT3RN

T35TP4TT3RN

T35TP4TT3RN

T35TP4TT3RN

Categories
Uncategorized

Arduino – Random Colors

Colors

One of my PCOMP students wants to randomly select a set of RGB values from a predetermined list. It’s the sort of things where I know the concept is easy but the execution is a bit more difficult only because I’ve done it in other languages/environments, but not in an Arduino sketch.

The nice thing about programming is that once you know how to do something using one language, the concepts transfer over to other languages, and it becomes mostly a matter of figuring out the syntax and method to make it all work.

Here’s an example sketch that allows you to have a list (array) of RGB values and then randomly select one and return it, split the r, g, b into their own integer variables, and then print them to the serial monitor. (The final version will use analogWrite to control RGB LEDs.)

// RandomColor.ino

void setup() {
  Serial.begin(9600);
  randomSeed(analogRead(A0));
}

void loop() {
  char* rgb = returnColors();
  int r, g, b;
  if (sscanf(rgb, "%d,%d,%d", &r, &g, &b) == 3) {
    Serial.print(r);
    Serial.print(", ");
    Serial.print(g);
    Serial.print(", ");
    Serial.println(b);
  }
  delay(500);
}

char* returnColors() {
  char* myColors[6];
  myColors[0] = "128,0,0";
  myColors[1] = "0,128,0";
  myColors[2] = "0,0,128";
  myColors[3] = "255,0,0";
  myColors[4] = "0,255,0";
  myColors[5] = "0,0,255";
  int colorIndex = random(0,6);
  char* result = myColors[colorIndex];
  return (result);
}

Obviously the list can be much larger than just six elements, but this is example code to be expanded upon.

You can also grab this code from github.

Update: Royce has his own version you can check out. He suggests it should be more efficient because the textual RGB values are converted to binary at compile time rather than runtime.

Categories
Uncategorized

Seeed Studio Fusion PCB Service

Teensy BOB 1.4

The folks at Seeed Studio got in touch with me about their Fusion PCB Service and asked if I wanted to try it out. I’ve ordered stuff from Seeed Studio over the last five years or so, and I’ve never been disappointed with their products, and since they offered a coupon to save on an order, I decided to give it a try.

PCB Options

My previous PCB was the Teensy LC BOB v1.3. I ended up making a very small revision and released v1.4, which is the board I used for this Fusion PCB order. I’ve ordered these from OSH Park and they turned out good, so I wanted to compare ordering from Seeed Studio.

I should mention that I am not an Electrical Engineer, but a maker & hacker who learns things by trial and error. I’ve managed to get lucky with the PCBs I’ve ordered and part of that success has probably been due to the sensible defaults that OSH Park uses. By comparison, when uploading my Gerber files to the Fusion PCB service, I was a little overwhelmed. (See image above.) The choices… so many choices! While I didn’t know exactly what every option was, it was easy to choose them and see how it affected the price. Many options caused the price to go up by 2 or 3 or 10 times the amount. This made it easy to decide what not to choose. The one choice that is nice are the colors. OSH Park boards are purple, but you can get Fusion boards in green, red, yellow, blue, white, or black, which is great.

The one tricky form value you need to deal with is Dimensions. By default it is set to 70mm by 70mm, which comes out to $9.90 for 10 PCBs (though they seem to be changing that to 100mm by 100mm for $9.90, slightly better pricing.) You need to input the dimensions of your PCB as they are not detected by the Gerber files you upload. It’s a bit confusing… I guess for small PCBs you can panelize them. I should learn how to do that as it seems you can save money / get more PCBs by doing it.

The $9.90 is the base price for 10 PCBs, but adding more PCBs affects the total cost, but not by much for small boards. I could get 100 of my ATtinyNoisy boards for $18.32. That’s 10 times the number of boards for just twice the price! For the Teensy LC BOB v1.4 it’s $9.90 for 10 and $49.69 for 100. Economies of scale, yo.

Gerber View

One of the things that was missing when I ordered my PCBs was the preview of the board when I uploaded it. Well, either I missed it, or it’s a new feature that was recently added. Here’s what the Gerber preview looks like for my PCB in Fusion.

Teensy BOB 1.4

Teensy BOB 1.4

The boards turned out great. They look amazingly well done, and checking the 20 boards I received they all looked identical.

I actually placed two orders, for the first one I chose the fast shipping option, and the boards were completed within just a few days and shipped from Shenzhen, China to Milwaukee, Wisconsin in two days. Wow. That was for DHL shipping at about $20. Not bad at all.

The second order I chose the cheap shipping option, which was just $10. The boards were completed on November 18th (two days more than the first order) and were shipped, but as of December 4th (16 days later) I still have not received them. They were sent via Singapore Post and should be delivered to Rosemead, California, and then transferred to the USPS for delivery to me. I’m hoping they show up soon. (Update: They showed up on December 15, 2016.)

Teensy BOB 1.4

In summary, I was extremely pleased with the quality of the PCBs I got from the Fusion PCB Service from Seeed Studios. There are a lot of nice options when ordering, and volume pricing can make a lot of boards really cheap. The shipping costs and options are something to consider. With OSH Park the free shipping is nice, but of course you do end up waiting a while for the boards to be produced. OSH Park does have something called ‘Super Swift Service’ which adds $89 to your total. Oh, Fusion also has an “expedited” service that makes your boards in 24 hours, and that’s a $199 charge.

If I get to the point where I need a lot of PCBs for a project, or plan to sell them, Fusion would definitely make sense. If that’s what you need (perhaps for a Learn to Solder kit?) give Fusion a try.

Categories
Uncategorized

ATtinyNoisy

ATtinyNoisy

I needed some small boards to put an ATtiny85 on, so I drew up a simple board in Fritzing and had them made up at OSH Park.

ATtinyNoisy

Here’s the breadboard view in Fritzing. Whenever I need “holes” to solder random components into I just use screw terminals. I’m sure there’s another/better way, but I’ve not found it yet, so I keep doing it this way.

ATtinyNoisy

Once the breadboard view is done, I go to the PCB view and move things around, make all the connections, and then export the files in Gerber format. Once you have a folder of Gerber files, you can ZIP it up and then upload to OSH Park for fabrication. (I covered this process in a previous post.)

MCN Gerber Viewer

I did find this Mac OS X application called MCN Gerber Viewer which allows you to view Gerber files. You can view the different “layers” and turn them on and off to check your board before fabrication. OSH Park shows you what your board will look like when you upload it, so you can easily check for issues, but MCN Gerber Viewer is still handy to have around to check files before you upload them.

You can download ATtinyNoisy, which includes the Fritzing file and the Gerber files, or just order it from OSH Park.