

One of my goals with the Little CNC Milling Machine was to make my own PCBs. I’ve typically made my own printed circuit boards at home by etching them with chemicals, but the mill opens new opportunities to etch and drill the boards, so I gave it a shot.
I knew the basics, but did a a quick search for posts that might explain things a bit more. (I should note I planned to use Fritzing, Inkscape, MakerCam, and GrblController, all free/open source software available on multiple platforms.)
The two useful posts I found were: PCB designing and isolation milling using only free Software and Hello World, How to Mill Printed Circuit Boards (PCB).

I wasn’t really planning on documenting this in-depth, but I got a few photos and screenshots, so I’ll share what I can. I had some bits I grabbed from eBay, 0.1mm Carbide PCB Board 60 Degree V-shape Engraving Bits and 0.8mm Carbide PCB Endmill Engraving Bits (a total of 20 bits for under $10) to work with, so that’s what I used. (I may want to try some 45 degree bits and 0.6mm bits next time.)
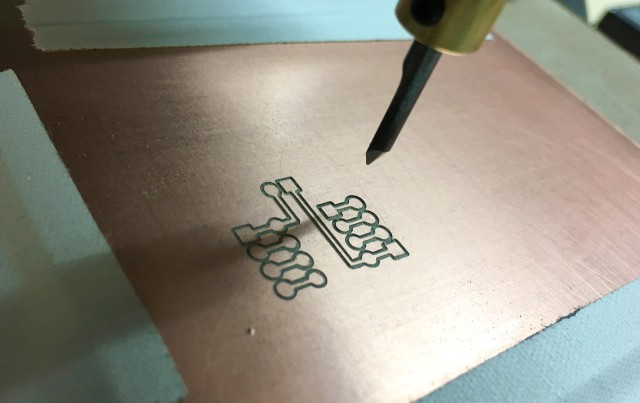
Here’s the “isolation milling” I did with the 60 degree engraving bit. Not bad! You can also see a little mark on the copper board where I homed the machine.
Yeah, I did not have double-sided tape, so I just taped the board down to my spoil board. The board wasn’t completely flat, and bowed slightly in the middle. I’ll use double-sided tape next time, which will also help with cutting the final profile of the board.

I swapped the bit from engraving to drilling and drilled all the holes. It seemed to work well, so… yeah. (Sorry, no photos of drilling!) I then switched back to the engraving bit to (attempt) to cut out the board…

It worked, but I miscalculated how deep it would need to cut, and ended up lowering the z home and re-running the job again. I might want to use a different bit next time. When I thought the board was cut out enough I pulled it off the machine.

The board held up to the light. Oops! Well, the holes didn’t all work. They were close, but not quite all the way through. I ended up using my Tiny Drill Press to finish the holes, and it didn’t work very well as it was difficult to hit the center. Not great.
I also didn’t cut all the way through with the outside profile. Not a big deal for this board, as it would be easy to cut out on the band saw, but more complex boards may not have this luxury. No matter, the amount of board left was paper thin and it came right out. I’ll definitely use a different bit for the final cut next time.

Here’s the final board. It totally worked, but there’s plenty of room for improvement. This probably won’t be the method I use for all my boards. OSH Park does a great job and prototyping PCBs, and Seeed Studio is great for production runs, but I’ll probably mill any new boards I want to test out before sending out to a fab house. Milling also allows me to have a PCB in an hour or so, versus waiting a few weeks.
Of course I’m (sort of) limited to single sided boards, but most of my PCBs are pretty simple, so I’m not concerned yet. Also, once I master the single sided board, I’ll certainly try a two-sided board, I mean… how hard could it be!?


