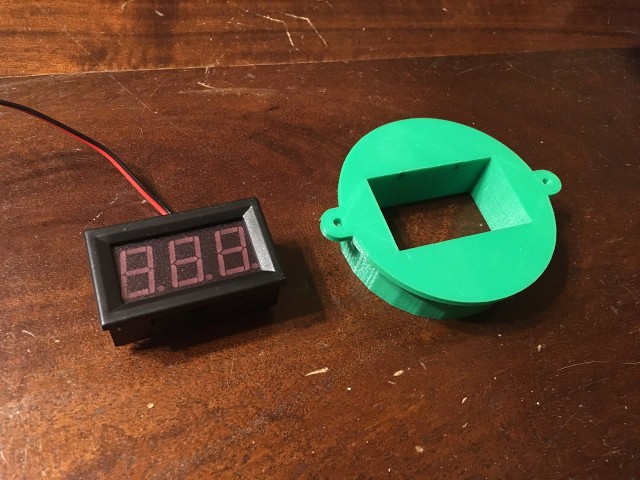
What do you do when you have a square thing and want to mount it in something but don’t have the ability to make a square hole? (Okay, I know it’s a rectangle in this case…) Well, you put the square thing in a round thing and then make a round hole.
With some current projects I’ve been thinking a lot about how things can be done using specific tools, or a limited set of tools. For instance, if you’ve got a 2-1/2″ hole saw you can make a round hole and then drop this into place and hold it down with two screws.
I started to model this mount before I even had the meter. I drew up a rectangle of the dimensions specified on the eBay listing for the item (hoping they were accurate) and I then drew a circle around it to enclose the meter and rounded it up to 2-1/2 inches as that’s a hole saw size you can actually buy.
From there modeling the mount in OpenSCAD was pretty simple. It’s about 25 lines of code, and the panel press fits perfectly. I added two ears to put some #4 screws through to hold it down to the panel.
I’m not totally jazzed about the open back. I supposed I could pour a lot of hot glue in there… Actually, at a minimum I may add some hot glue to the wires to act as strain relief so they don’t get pulled loose. (I supposed modeling some sort of strain relief mechanism into the mount would have been a good idea.)
And of course while this version is expected to mount (nearly) flush with the panel, I could easily make that mounts on top of the panel and just has a small hole drilled through it for the two wires. So… many… options.
I attended the Bay Area Maker Faire (sometimes referred to as “BAMF”) and while I spent most of my time in a booth helping explain what Crazy Circuits were, I did get some time to run around the Faire and see a few things.
I also got to meet people I may not have seen for a few years, or not met at all, and only know through online interactions, so that was awesome. I’d provide a list of folks but I’m sure I’d forget a few!
So here’s some photos and some notes about photos. As mentioned, I did not get to see everything, and being such a crowded event there would be times I’d really want to talk to someone but it would have meant waiting around for other people to finish talking, and I had limited time! Here we go…
I was really excited to see Robot Dance Party in person. I had read about it (him?) years ago, and it was totally unexpected to come across the #RobotDanceParty while walking around the Faire. It’s as simple and silly as you might expect. Here’s more info on the Dancing Robot that Parties.
While everyone was eating paella on Friday night I had to find a restroom and wandered down this back walkway surrounded by these weird and creep robot-type things with uncanny valley faces. It was strange, unsettling, and awesome.
There’s a question those involved in the Power Racing Series ask… What Would Bill French Do? In this case, the answer is, show up Saturday morning with a car that is totally not ready to race, and isn’t even done being built, and solder up a motor controller while someone else works on finishing the actual car build. That’s what Bill French did.
These portable shadow boxes were simple and fun, and reminded me of an activity I’d see in a Children’s Museum.
This spinning fire thing was interesting, and I saw it every time I ran from the booth to the restroom and back again…
I call this “French Cleat All The Things!” and wanted to snap a photo to remind me of a good way to organize a creative space…
I got to meet Paul Stoffregen of PJRC, though since my voice was shot I’m not sure he knew who I was or the fact that I’ve bought hundred of Teensy boards from him. Anyway, he had this super-cool kid-proof synth at the PJRC booth.
I took this photo to show to a few people at Milwaukee Makerspace. Specifically, Bob and the people who made the coin shrinker and other crazy devices. Once again I didn’t get to talk to the makers or spend a lot of time looking at the thing… I had to keep moving!
This was a large skateboard. It was so large someone said you could use a normal skateboard to get from one side to the other. They had cast the wheels using Urethane. I was hoping they had cast the trucks, but they were actually 3D printed by some company. (The guy I talked to didn’t know what company.)
I actually got a little bit of time at the Power Racing Series racetrack and helped marshal a race. This cardboard car was pretty awesome to see. Underneath was basically a Crazy Cart and it drove sideways a lot.
The minion car that was eating a banana and farting bubbles was highly entertaining. I guess the team destroyed the original (nearly stock?) Power Wheels car the first day and had to go buy another one for the second day.
From what I could tell this was a sort of “BattleBot Arena” where you could make a cardboard robot and then see it destroyed by a robot with a rotating saw blade. At least that was my guess after watching it for approximately 60 seconds.
The had vintage computers running vintage video games, and kids loved it. Is that a Commodore 64!?
There were giant light-up inflatables in the Dark Room and you could walk and crawl among them and there were pretty cool.
I also loved these colored squares. Simple yet effect method of working with light in the Dark Room.
The Howtoons table had some great stuff. I believe they’ve moved from just books & comics to a subscription & kit model. If you’ve got a kid-maker this looks like something they would love. (I loved the cardboard ukulele!)
In the tent I was in a group was building a giant Makey Robot using balloons! Luckily I posted a photo of it and my pal Dan from Rochester, New York identified the group as Airigami, and said he saw they at Maker Faire New York.
I got to see Lenore and Windell from Evil Mad Scientist Laboratories. Each of them stopped by to see me (separately, because, you know, someone has to stay at the booth) and then later I got to see them both at the booth for a few brief seconds. While I was taking this photo a guy came up with a friend and shouted “This is the absolute coolest thing here!” in response to seeing the MOnSter 6502. It was indeed beautiful.
I heard you like nightmares so we took an old Chuck E. Cheese robot and ripped its face off and then turned it on to freak you out. You’re welcome!
I got to run around with Karen for a bit at the end of the Faire and we saw as much as we could in a short amount of time. And of course… MegaBots! (Though I totally missed the part where some guy proposed to Jen.)
Robin demonstrating how we all felt at the end of Maker Faire. Exhausted. Thanks to everyone I met and apologies to everyone I did not get to meet! I hope to make it back again in the future!
One of the rites of passage for the Power Racing Series is to use the cheap Harbor Freight wheels on your car. When you can get the whole thing, tire on a rim with a hub and bearings, it’s quite appealing. Also, the tires can be as cheap as $5.00, and that’s before you use a coupon. (I should mention the bearings are crap, and those should probably be replace. Still, you can easily start with them!)
In case you can’t tell from the photo above, they are sort of terrible. Cartastrophe used them their first race and got to experience what it’s like when your car goes one direction and your wheel goes another direction. This is a (somewhat) common occurrence, and it’s always hilarious (when it happens to someone else.)
But! Hacker and Makers and Those Who Scrounge and are Cheap often enjoy the challenge of modifying things to do what they were not supposed to do. Like making wagon wheels handle the lateral forces of sharp turns at 20 miles per hour.
Over the years team have added in gussets, reinforced the rims with steel plates that have been drilled out for the axle and bolts, some teams have 3D printed pieces to strengthen the rims (which actually worked!) and at least one person mentioned how they use a piece of “laser cut steel” and I’m like… wut? Yeah, hackers…
So there are options, and there are always options. I mean, check out the crazy hub story from Tom at Milwaukee Makerspace!
While thinking about an easy and cheap way to strengthen the rims I was wandering around the hardware store and found the flange you see above, which was less than $4.00. Now, it doesn’t quite fit properly. I mean, I’ll need a larger hole for the axle. With a 1″ axle I’m hoping a 1″ pipe flange hole will work, though we may have to file down or drill out the threads. The bolt holes do not match, but drilling out the holes on the rim might be the solution to that, and maybe switching to 1/4″-20 bolts…
There are also PVC flanges that may work. Those might prove easier to drill out, though the iron flanges are still less than $5.00 and can be found locally.
If you’ve got an idea how to easily and cheaply use a COTS part to solve this problem, let us know! It should require minimal modifications, hopefully just drilling and filing, and not involve laser cut steel. ;)
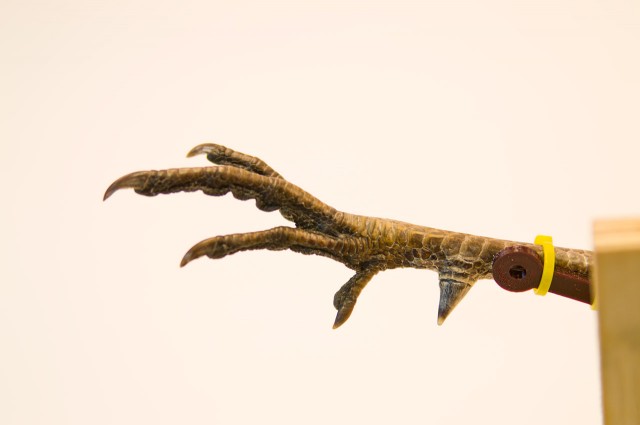
Dr. Prodoehl was telling me about a colleague of hers that collects animal parts, and mentioned a claw from a pheasant, and I (sort of jokingly) said “Hey, I want a pheasant claw!” and then forgot about it until she brought one home for me! She also brought home a baculum, which is a raccoon penis bone, and while I haven’t found a use for that (yet) I did manage to use the pheasant claw. Obviously I built a Claw Machine.
I often find weird little motors at Milwaukee Makerspace and keep them around for projects. This one had a strange gearbox and spring and belt. It also had some weird angles which made it difficult to mount, so I 3D printed a mount that worked well enough with it that I could screw it down into a piece of wood. There might also be some hot glue involved.
I also ended up 3D printing a gear and some arms. Those are the sorts of parts that it makes a lot of sense to laser cut, but I wasn’t around a laser cutter at the time, so I just 3D printed them. I really do enjoy digital fabrication…
There’s a few extra holes in the wood because I seemed to have a hard time finding the right position for the pivot point of the arm. I managed to find one that worked and left all the previous holes as a reminder than you don’t always get things right the first time. There’s also an abundance of nuts on bolts, because spacing is an issue best solved with washers, or nuts, or whatever is lying around.
Speaking of first times, besides wood, I tend to not include natural materials (like, animal parts) into the things I make, so that was interesting. I attached the claw with the simplest of methods… zip ties. Also, this is called “Claw Machine Version 1” because I intend(ed) to make some improvements, but I might never follow through with that idea.
The claw is really interesting to look at. Is this piece some sort of cyborgian statement about the future where animals and machines are combined into some sort of terrifying nightmare? Probably not.
Hey, it’s only been six months since my last post about motor controllers and the Power Racing Series so I guess it’s time for an update! If you missed it, I’m working on a tiny electric vehicle that can serve as a reference for teams of beginners to build their own.
In the last post I talked about a cheap motor controller that required an expensive throttle and alluded to a method of using a cheaper throttle… here is that method.
I started by asking questions on the Power Racing Series Google Group, and people much smarter than myself offered advice, and that’s where I learned about digital potentiometers. I ended up testing my idea with help from this tutorial and eventually got an MCP4131-104E/P-ND digital potentiometer (for less than $1.00) and paired it with an Arduino Nano that was less than $2.50 to create a converter that allows a cheap throttle to be used with a cheap controller.
If at any point you feel like saying “Hey dummy! You should have done it this way!” feel free to leave a comment. Most of my crazy pursuits involve me learning a lot along the way, and this is no exception, so I’ll keep going.
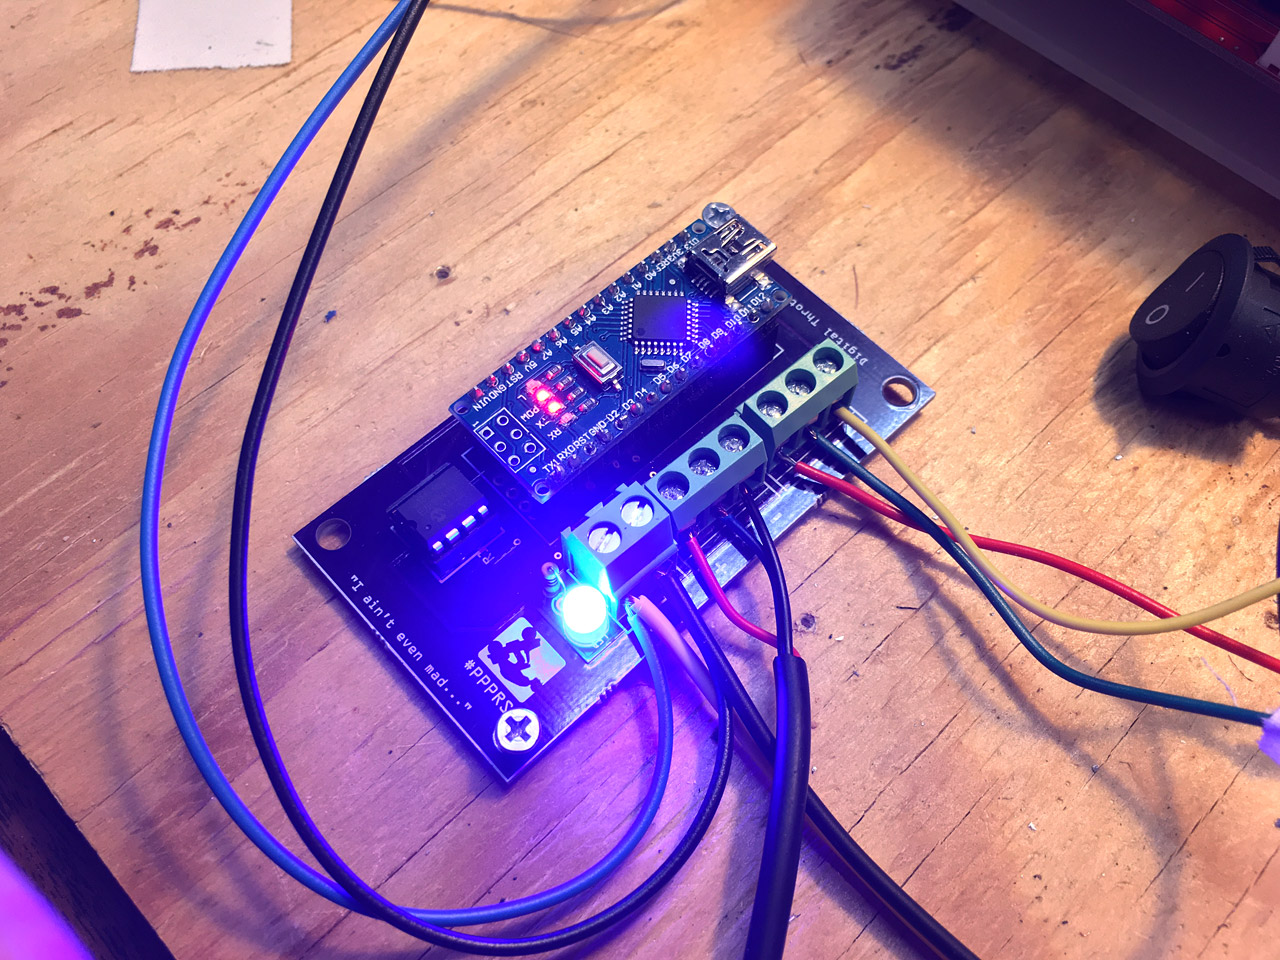
After I had a working prototype on a protoboard I decided to design a PCB because I’ve been working on getting better at PCB design for the last two years now, and it’s sort of fun (and challenging!) This is the most complex board I’ve worked on so far, and of course, mistake were made…
First of all, see those wires coming off the board? There should be screw terminals there, but I was unaware that the holes were the wrong size and the pins of the screw terminals did not fit. Argh… wires will do for now.
Everything wired up and ready to go! Except, it didn’t go… Seems I managed to not quite route everything the right way. Back to the drawing, and tracing all the connections with a meter, and I discovered a connection that shouldn’t be there…
…but that’s what Dremels are for! I was able to cut the trace and get it working. Back to the computer to make a few changes to the PCB. (And yes, I am still using Fritzing. I’ve gotten used to it, and know how it works, so… okay then.)
A few weeks later I got a new version from our friends at OSH Park and this one fixed the issues and worked! I should still get similar screw terminals but hey, it does what it should do, so that’s something.
You might notice some of the analog pins and some ground connections broken out at the front edge of the board. There are for future enhancements. It would be fairly easy to add in “cruise control” (for parades) or a speed limiter, perhaps with a keyed switch, to allow kids to drive the vehicle safely. (Again, people smarter than me.)
Whomp! Here’s my “breadboard” showing everything. Batteries to power the motor, and a buck converter to drop the voltage to 12v for the Arduino and a cooling fan. The throttle connected to the converter and then to the motor controller to control things. We’ve also got a DPDT (double-pole, double-throw) switch in there to allow for forward and reverse to the vehicle, and a kill switch, fuse, and voltage meter. Basically all this will need to be jammed into the vehicle to control it. (Don’t worry, we’ll be using larger batteries, thicker wire, and a larger motor.)
Here’s the controller with a cooling fan mounted to it. I’ll provide files to laser cut or 3D print the mounting pieces, or templates to cut by hand, which is totally doable. (I learned the hard way last year that if not properly cooled the capacitors on these controllers can blow.)
I also added a bright blue LED to the board (you can choose another color) to indicate when it’s receiving power. Another suggestion I got from someone. I’m sure there is still room for improvement (like, you know, diodes) but hey, it works and I look forward to testing it.