I’m filing this month’s report a bit early. I had to mail in my SD card so my medical provide could examine it. (I guess they don’t read my blog.) I put in a card of my own and the first two nights I used my CPAP it reported 19 hours of sleep and 11 hours of sleep. Those don’t seem to show up here, which is good. And no, I did not sleep that many hours.
Overall the numbers for August were pretty good. Not quite as good as May, but better than June or July. (See May through August below.) I am still tired every day, but that’s just life I guess. I learned that my mom is going to do a sleep test as well, which reminded me of how bad things were before I had the CPAP. So even though I don’t get 8 hours of sleep, it used to be much worse. It’s all perspective, I guess. Good Night!
I started playing music around 1987 and quickly formed a band (we were terrible) and then joined another band when that one ended, and on and on, until about 1994 when I was sort of done playing in bands. We had recorded, released music, toured, etc. It was a blast. As I’ve been reminded by The Beastie Boys, one of the greatest things you can do in life is hang out with your friends and make music together. Oh, since this was the 1980s/1990s things were not all computer/digital/fancy. We sometimes went into the studio and had someone record us, and sometimes I’d use a 4-track and engineer it myself. Simple. Did it sound great? Well, good enough!
Life throws a lot at you, and things change, and you change, and I didn’t really play music much again until around 2007 or so… And in 2008 I recorded and released an album as part of the RPM Challenge, which was a challenge for the month of February to record and release an entire album. By this time I had been doing some audio engineering at work and it was a great way to learn more about recording and engineering and using a DAW (Digital Audio Workstation; aka a Computer) to create music. Typically I’d find/create some drum tracks, then record myself playing bass, and then record myself playing guitar. It was handy to be able to plug my bass or guitar into a box, feed it into the computer, and have dozens of different effects pedals in software. It was a lot of fun, and I’m proud of the fact that between 2008 and 2011 I recorded three albums worth of material. Again, some of it terrible, some of it not terrible. The important thing was that I enjoyed doing it, and I learned a lot in the process.
Well, it’s been a while, so it must be time for the Third Wave, as it were. This “wave” sort of started around 2017 I think. I started something called NoiseMaster 3000 which was me convincing myself and at least two other people that we should make all sorts of “sound sculptures” for Maker Faire Milwaukee in 2017. And we did. I built all sorts of noise machines and I had a lot of fun doing it. I even had some of them in a gallery show in 2018.
I then started to get interested in synth stuff, influenced partly by people I knew and was hanging around with at the time, but I also decided I did not want to jump into building a modular synth setup because, well… it seemed like a great way to spend way too much money and get sucked into something way too deep. Well, 2020 was a shit-show in many ways, and I didn’t feel creative at all for so much of it, but as 2021 rolled around and I had a modest budget for music gear, I jumped in (slowly) and got a few things. A Behringer CRAVE and RD-6, and some Pocket Operators. And… I’ve been loving it.
I am (once again) probably making terrible music, but that’s okay, because I am really enjoying it. It has actually really helped me creatively, and helped my mental health more than I could have imagined. So anything I spend on gear is really spent on improving my mental health, and when you put it that way, it’s worth it, right?
So if you want to check out anything I’m doing, see Instagram or YouTube (or even Twitter) where I post some of the (terrible?) music I make. I do plan to get better, but hey, maybe I won’t and that’s okay. I’m just here to learn new things, enjoy myself, and not go insane. So far it’s been working just fine…
I’ve got a Behringer RD-6 Analog Drum Machine and it’s battery powered! I’ve seen a number of video reviews of this machine and the reviewer always seems to say “It’s not battery powered, so you can’t easily take it with you…” But I’m here to tell you that you can take it with you (just like Steve Albini did with his Roland TR-606) and below I’ll show you how.
A battery pack that will hold 6 AA batteries. Each battery is 1.5 volts, so 6 of them is 9 volts. (And no, a standard 9 volt battery won’t work due to the low amperage it can put out.) I had some lying around that were like this but some have connectors on them like these. As long as they have bare wires at the end, you’re good. If they do have a connector on the end you may need to chop it off. (More on that later.)
You’ll need a 2.1mm Barrel Power Jack. I usually buy a pack of them. You only need one, so find one, or buy one, or buy a bunch and have spares. (You won’t need the matching receptacle plugs. At least not for this project.)
Important! All of the barrel jacks I’ve purchased have positive in the center and negative on the outside of the barrel/sleeve. In the world of musical things (well, guitar pedals at least) negative is on the center/tip, and positive is on the outside of the barrel/sleeve.
Here’s the back of the RD-6. You can see the symbol showing negative in the center/tip. Note that it also shows 300 milliamps. A 9 volt battery is 500 milliamps, so it will work for a while, but not long. The power supply Behringer gives you is 670 milliamps, but it’s not a battery, it plugs into a wall socket.
Right so we need to… reverse the polarity! Luckily it’s as simple as switching the wires around. Normally red is positive and black is negative, but we’re switching those. Make red negative and black positive.
Here’s mine. Now, it’s worth noting that I checked all of this with a multimeter. I’d advise you to do the same. Double check your work. If you don’t know what you’re doing, ask someone for help. This probably voids your warranty, and I cannot be held responsible for what you do. On with the show!
Oh, you’ll also need batteries! Any AA batteries will do, but rechargeable are preferred, at least by me. I’m a fan of the Eneloop rechargeable batteries. I’ve got some I bought ten years ago that still work. Grab a charger and 4 batteries and, um… 4 more because you need a total of 6 batteries.
Okay, stick it all together and you get a battery powered drum machine. Boom. Tsk. Boom. Tsk. I haven’t testing how long a set of batteries will last, but I’ll add that to the list of things to do.
Now, it’s not as nice as internal batteries that are built into the case, and if I actually use this on a regular basis I might think about adding in some hook & loop to attach the battery pack to the side. It might be better to use two 3 AA battery packs wires together, since those would have a flat back that could be attached to the RD-6.
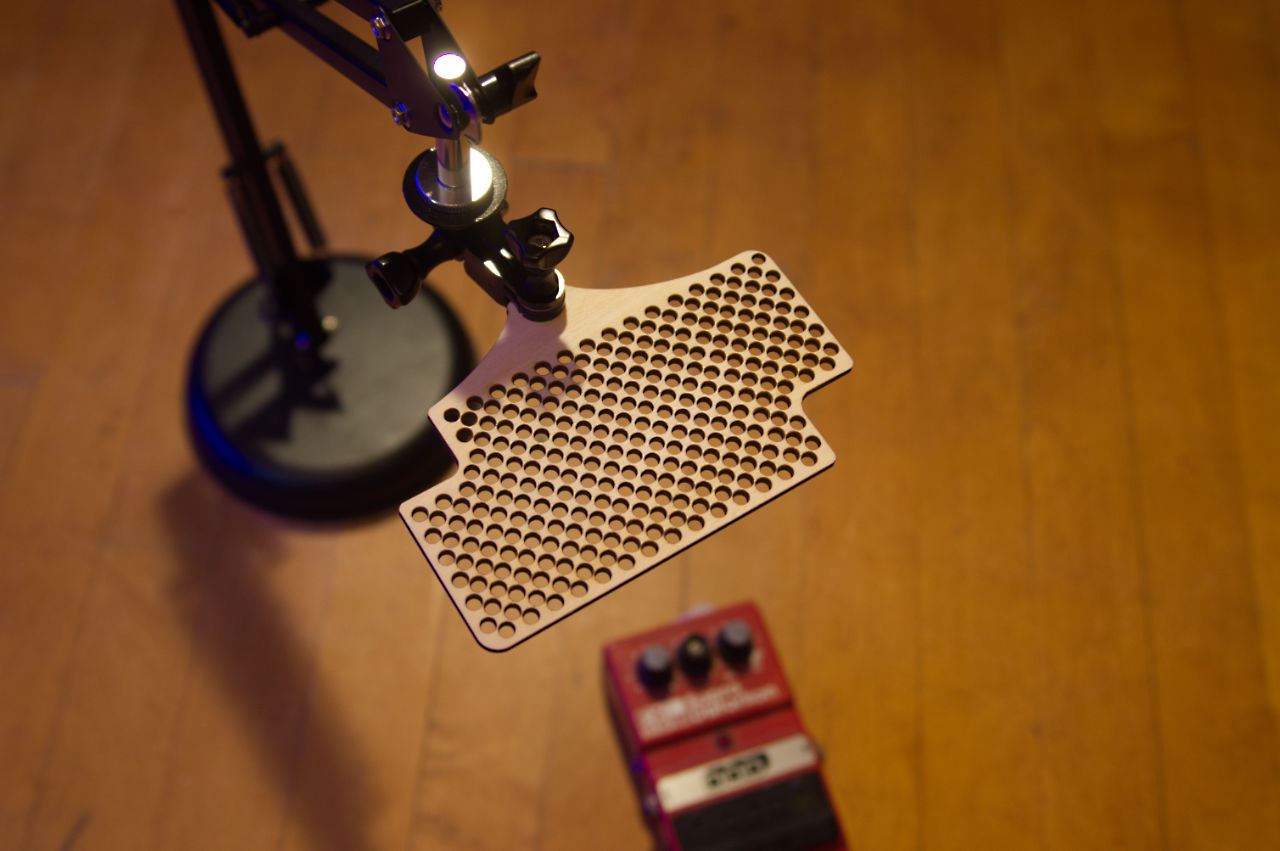
I needed a way to shoot video and photos on my phone while facing straight down at a desk. I grabbed one of these adjustable suspension arms with the thought that I would figure out some way to mount my phone to it… and I did. (Ugh! I got the arm for less than $10 but it’s closer to $20 now.)
As luck would have it I found some GoPro mounts in a dumpster a few weeks ago, including a 1/4-20 mount which screws onto the end of the arm. I then laser cut a piece of 1/8″ Baltic Birch and as luck would also have it it only takes a little bit of sanding to get it to fit into the slot of the GoPro mounts.
I drew up a piece that was approximately the size of my phone, and then put in some notches where the camera is, and made it so I can flip the camera around either way. (I also cut one without the “speed holes” in it.)
I was recently contacted by an artist who really liked The Big Button and wanted to use it for an art installation. After some discussion it turned out they really didn’t need a USB controller but needed something to trigger an audio player. When I asked what they were going to use for an audio player they said they didn’t know, so I suggested building the whole thing to ensure it would all work together. And it did.
The control box (which is the “audio player” in the simplest terms) allows the button to plug into it using a 3.5mm TRS cable. This allows the customer to swap out to a longer or shorter cable if needed. 3.5mm TRS stereo cables are everywhere and pretty cheap. Since we only need three wires there’s no need for a more complex connection. (Though if you need an RJ-45 solution, we’ve got that covered.)
The control box also has a 3.5mm jack for audio out. This is to connect to external powered speakers or a PA system. (Or headphones!) And in the center of the front panel is a Mini USB jack for powering the unit via a Mini USB cable and a 5 volt wall wart.
There’s a hole on the side of the unit for access to the Micro SD card in the audio player. Just in case sounds ever need to be changed, or if the card fails, etc. Without this hole it would be very difficult to get to the card. (Just like the Game Show Buzzer System I covered the hole with tape before shipping.)
Here’s a look inside the unit. There’s an Arduino Nano with the audio player, and the 3.5mm jack and… some wires! And a few wire connectors taped together just to prevent them from rattling. This was a quick build but it came together fairly easily. I did a good amount of testing with this one, and luckily it all went well. (I should really build a permanent testing station again, as it’s becoming of a need lately.)
So hey, if you need some weird electronic device that does something… let me know!