Categories
Uncategorized

Ball Feeder Mechanism

Here’s this week’s progress on the wax ball feeder mechanism. These are actually 2D files that were laser cut, but I sort of like the look of making them 2.5D so you can see the dimensionality.

Oh, to make the 3D render I exported a DXF file from Inkscape, load it into OpenSCAD and then use the linear_extrude function.

And yeah, these files are already outdated as there was one mistake (which I fixed with the bandsaw) and I’ve assembled it and found room for improvement.

You can see some earlier iterations here, here, here, here, here, here, and here. Which is to say, if you want to see minor updates with very little context, follow @raster on The Instagram.

You’ll notice an issue with the balls getting stuck in the chute, so there’s a bit of work to do there. I’ve got a few ideas, just need time to test them.

And don’t worry, at some point this might all make sense, once you see the rest of the thing. Or maybe it won’t… who knows!?

Categories
Uncategorized

Sensor Boxes and Controller Box

Here’s a few photos of a project I recently worked on for Stamm Media and No Small Magic. These are sensor boxes that were used for a tradeshow. I don’t know how much I can say about the tech inside them, but this is what they look like.

I designed, laser cut, and assembled all the boxes. They are partially glued together but the back covers are held on with screws so as to be accessible for adjustment purposes.

This is the final product from last month’s blog post Enclosure Prototyping. Since I finished this piece first I actually added a bit of shellac to it, which makes it just a bit nicer than raw wood. (I ended up making two of these.)

The sensor boxes connect to the control box using Cat5 cable and the RJ45 Adapter Boards I developed last year. This allows for the sensors to be easily placed quite a distance from the control box by just using an existing Cat5 cable instead of needing a custom cable/connector.

Categories
Uncategorized

Laser Cutter Update

If you read my previous posts about my laser cutter, you may have been wondering what the latest progress is on it. Well, here’s an update!

First, some history… Brent bought this laser cutter back in 2012 (I think) then sold it to Jason in 2013. Jason kept it at Milwaukee Makerspace for about a year and a half and then took it home. He used it until he got a Glowforge in 2017 and then I got it from him. It took me at least six months before I really had it operational, but since it’s 2020 now I figured I should offer an update.

It’s been at my house and cutting things since late summer 2018, but it wasn’t really optimal. I am not 100% sure but I think it was all pretty much original parts. It would cut okay, but you had to go slow… really slow. Like, way too slow. I could do 3mm Baltic Birch, but had to go so slow for 6mm that it was basically a fire waiting to happen. The lens looked good to me, but I figured that lenses are cheap, so I started there. I got a Cloudray Lens (Diameter 18mm/Focal Length 50.8mm) and dropped it in place. (And yes, I do clean the mirrors and lens occasionally, and there is air assist running.)

I didn’t see vast improvements from the new lens, so I figured that if this was the original tube from 2012 or so, it was old, and probably needed replacement. I compared what the tube looked like when firing to a bunch of videos online and it did look weak. I got a SPT 35W CO2 Sealed Laser Tube. So in theory I dropped from 40 watts to 35 watts, but replaced an eight year old tube, so… trade off. (I also had a discount code when ordering.)

Along the way I dealt with the ammeter that was not really working. In order to see what the power knob was set to I added a 0.28″ DC Digital Voltmeter LCD wired into the potentiometer. (Hat tip to Don’s Laser Cutter Things) At least I could get an idea of how much power was being output, but I still had to deal with the ammeter that never went above 3 milliamps. I did not trust the ammeter since I was kicking out enough laser power to cut things, so I got a replacement meter, but it still showed almost no output. (More on that later!)

I had read a lot about replacing tubes and I watched a few videos. Honestly sometimes I’m amazed more people don’t electrocute themselves or burn their houses down. Doing research helps! Don’t just watch one video or read one forum post, because you might do things the wrong way. Anyway, I was able to avoid lots of PTFE tape, silicone caulk, and other things because I had a nice high voltage connector on my old tube, which I planned to liberate to use on my new tube.

I chopped it off, wired it to the high voltage line on the new tube, soldered it, and added a lot of heat shrink. (Remember to slide all that heat shrink tubing in place before you solder!)

I test fired the new tube and it burned through 3mm Baltic Birch with no problem. The only problem was that I really hoped the ammeter would work, and it didn’t. But don’t worry, we’re not done yet! One of the things I noticed when connecting the ground wire of the new tube was that there was an extra grounding wire running from the connector block to the chassis.

Look at that! So the ground line should go back to the power supply and run through the ammeter on the way so the current can be measured and displayed by the ammeter. Removing that extra grounding wire got the ammeter working as it should. I can’t say I’m surprised by this. It’s an old Full Spectrum Laser Cutter, and they did a lot of weird things in the early years.

Hey! We now have a functional ammeter, and can use the power knob to set it to run at about 15 milliamps. Neat!

I still have a few other things to do to get this cutter to perform even better, but for now this will definitely help show how much power we’re putting out.

Categories
Uncategorized

Atom is my New Text Editor

I started using BBEdit back in the 1990s and eventually moved to jEdit in the 2000s. Well, it’s 2020 now and since I tend to change text editors every ten years or so, I’m behind schedule! I’m pretty sure that in recent years I checked out Brackets, Sublime Text, and maybe even Atom, but I stuck with jEdit because I knew it, customized the heck out of it, and didn’t see a reason to switch.

For me, a text editor should be open source, run on macOS, Windows, and Linux, be extendable, customizable, and hackable, and… I should like using it. Life is too short to use a text editor you don’t like!

I’m working on a rather large project on GitHub right now, and I had to walk through the process of installing GitHub Desktop, and while I was jumping into the GitHub Desktop experience I figured I would also try out Atom since it integrates well with GitHub and GitHub Desktop.

When dealing with a new text editor it’s hard not to find faults. Part of it is that it’s new, and may do things differently than you are used to with your old text editor, or it may have missing features, or what appears to be missing features because it does things differently. It’s easy to take the stance of “What!? I can’t do X anymore!?” (Where X is some esoteric thing that you used to do.) It’s important to remember to take some time, investigate, dig in, and see what a new text editor offers.

There was a feature in jEdit that was really neat, but I think I used it maybe once or twice a year, and I could have achieved the same end result using another method. In Atom there’s a feature I’d never seen before, but once I understood it, it blew me away, and I was thankful it was there. I might not use it all the time, and yes, I could totally achieve the end result another way, but it’s nice to have new things.

I do miss macros and macro recording and playback in jEdit. Despite all the packages for Atom I’ve yet to find an equivalent. I have already written a really simple Atom package, so it’s good to know that’s an option if I can’t find some of the features I need. (Update: I did find some macro packages, just needed to be on a machine with dev tools to install them.)

Here are the packages I’ve added to my Atom install so far:

I’ve tried a few others, but haven’t added them to the lineup quite yet, but I’ll keep an eye out for new and useful packages. I’m also a fan of the command line integration and ability to customized the look of the editor by using CSS (though I wish there were more/better example files out there showing how to customized everything.)

So yeah, it’s safe to say at this point I’ll keep using Atom as my text editor, even though it will take some time to get used to the find & replace, and I’ve experienced a few crashes, supposedly can’t deal with large files, etc… I mean, the Command Palette is awesome. jEdit had a similar feature (I think?) but I never used it. I think one of the things I like about Atom (and I liked about jEdit) is that they were built by hackers for hackers. People who want to fiddle the bits and change things and make it their own.

The other important thing about a text editor is what you use it for. I will most likely not be using it as an IDE, though I may play around with integrating it into OpenSCAD or the Arduino IDE, I’m not doing large scale software development. I am mainly… working with text. Writing text, manipulating text, writing scripts, editing text files… stuff like that. It’s rare that I need autocomplete (in fact I disabled it) and some of the “coding” features just get in my way. YMMV depending on what you use a text editor for in your own work.

Categories
Uncategorized

DIY DSN with Screenly OSE

DIY DSN Screenly OSE

One of the nice things about doing an annual event year after year is that you can come up with ideas and even if you can’t really execute them in time you’ll hopefully have another chance a year later. So it was for my Do It Yourself Distributed Signage Network. (DIY DSN for short.)

Back in 2017 when one of the volunteers was building out the WiFi network for Maker Faire Milwaukee I came up with the idea of using a bunch of Raspberry Pi computers connected to TVs and other screens to provide real-time updatable digital signs around the venue. I’d used Screenly OSE in the past for MMPIS and other things so it seemed like the perfect solution.

If you’ve never used (or heard of) Screenly Open Source Edition before it’s a piece of software that runs on a Raspberry Pi and allows you to use a web browser to upload content to it (images and videos) and also have it load pages from the Internet.

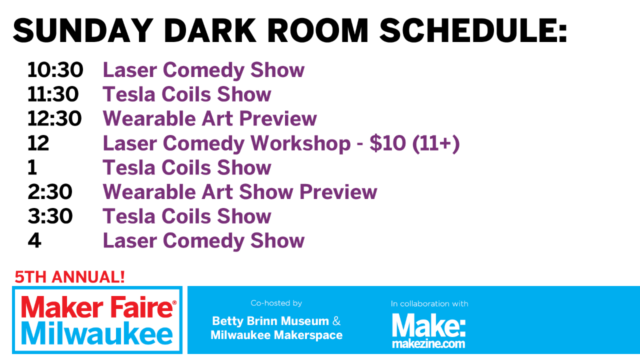
Screenly also allows you to schedule start and stop times for content, so it’s easy to have something display between 9am and 1pm on Saturday, then disappear. For events this means you can have “live” signage for speakers or workshops as they are happening, then disappear and be replaced by a schedule or something else when done.

We managed to scrounge up eight TVs (or computer monitors with HDMI/DVI inputs) of various sizes along with eight Raspberry Pi boards. A few of the Pi boards did not have built-in WiFi so a cheap USB WiFi dongle was used to get them online. Each Pi got added to the WiFi network, got a unique IP address, and then a name so we knew where it was in the venue. Some were in front of stages, or at specific entrances, etc. Then it was a matter of creating targeted content. Most of the content was 1920×1080 graphics. (There’s a whole bunch below!)

Thanking sponsors is a great thing to do… You can schedule slides to show up for X number of seconds as well as during specific days/times or all the time.

You want to show what happens in a specific place on Saturday only on Saturday and not on Sunday? Easy!

You want to show what happens in a specific place on Sunday only on Sunday and not on Saturday? Easy!

If you can design a PowerPoint or Keynote slide, you can probably figured out how to export it to a graphic image file suitable for loading into Screenly.

Yeah, thank those sponsors! You can have a different slide for each sponsorship level, and use logos or text or whatever your sponsorship commitment promises. (Also, let your sponsors know that they’ll also be recognized on digital signage at the event!)

Presenting Sponsor? They can have their own slide! Maybe it’s on the screen for 20 seconds instead of 10 seconds… Easy to do.

We’ve done this twice now, and while it was a bit of a scramble pulling together eight Raspberry Pi boards (and WiFi dongles for some of them), eight screens (TVs 27″ or larger work best), eight TV stands or table or whatever you’ll use to put them in places, eight HDMI cables, eight SD cards, eight power supplies, etc… If it’s for an event you might be able to borrow all the hardware you need, and since the software is open source it’s mainly a matter of learning how to use it and getting familiar with it. I’d recommend getting it up and running before your event starts just so you aren’t jumping in blind trying to figure it out while also running an event. :)