Categories
Uncategorized

Motorized Camera Slider

Motorized Camera Slider

Still very much in progress, but here’s the first iteration of my motorized camera slider. The slider ends are this part, and the carriage is this part. I had to tweak the heck out of the OpenSCAD file for the carriage to get it to fit right. I also learned about silicone spray to get things sliding more smoothly, and the fact that it’s better to leave bearings a little loose if you don’t have precision alignment.

The “motorized” part is pretty simple…actually too simple, and I need to complex it up a bit. It’s a continuous rotation servo with a spool attached and some string wound onto it. It just slowly pulls the camera across the rods. I need to add some controls to allow for setting the speed, and some gearing might also help things move a little better. I’d also like to investigate using a threaded rod as a screw drive, which could also function as a third support.

Ultimately, I want to have a rig that will move the camera slightly, then trigger the camera to snap a photo, then repeat. I’ve got the code for all this, so right now it’s mainly a matter of the mechanical build (needs improvement) and wiring things up without it being too messy. (The guys at the Federal building told me they get concerned when they see wires and batteries.) A nice case might be in order. I might also look for a smaller ball head, as this one is quite large and heavy, which doesn’t help outside on a windy day. There’s a long list of improvements to this, so expect more posts in the future.

See a video of one of the early tests of this thing.

Categories
Uncategorized

iPhone Tripod Mount

iPhone Tripod Mount

Since the camera on the iPhone 4S is so good, more than one person has thought about mounting the iPhone on a tripod.

In fact, some guys did a Kickstarter campaign and got over $137,417 for the idea! And a bunch of other people designed things you could make on your 3D Printer to do the job.

The Glif

The problem with the Glif and most of these other phone holders is that they are designed to work with an uncased iPhone, and I tend to leave mine in the case all the time. I use an OtterBox case (It’s this one.) It’s grippy and rubbery, and since I wanted a tripod mount that would work with the case, I made my own. (Here’s a post that mentions an early version.)

iPhone Tripod Mount

This mount would probably work with almost any phone that uses a rubbery case, since it uses the grip of the rubber to its advantage to stay in place. You just gently tighten the wing nuts to hold the phone in place. There are nuts under the top piece of wood to prevent you from over-tightening.

iPhone Tripod Mount

Yeah, it’s basically two pieces of wood, two bolts, a few washers, nuts, and wing nuts. I may consider printing some knobs like I did here to replace the wing nuts. (And yeah, you’ll notice it’s the same screw method I used for my DIY Mouthpiece Puller.)

iPhone Tripod Mount

The bottom piece of wood has two small pilot holes to accommodate the two buttons on the side of the iPhone, so the buttons do not get depressed when in the mount.

iPhone Tripod Mount

The other tricky thing is how I mount the tripod plate to the bottom. I ended up getting a nut coupler, and then drilling a hole into the bottom piece of wood, and pretty much hammering in the nut coupler. It was too long so I had to hack saw it off to be flush with the bottom. Not pretty, but it does work.

Now that I’ve got this done, I should probably go back and do those test shots comparing the iPhone 4S camera to other cameras. :)

Categories
Uncategorized

Hot Shoe Audio Mount

Since I’ve got the RepRap I can start on some projects I’ve been meaning to tackle, one of which is printing some camera accessories.

Hot Shoe Audio Mount

Thingiverse is full of weird combos of objects smashed together, such as the Lepus Colberus (The Colberabbit), but you can also combine individual objects in other ways.

I grabbed this 1/4-20 Thumb Screw and this Nikon DIY GPS Holder and combined them into a new thing.

Hot Shoe Audio Mount

The nice thing about the “Nikon DIY GPS Holder” I printed was that I can see it being a generic part I can modify in the future. I can easily import the STL file into Google Sketchup and built on top of it. (I did find this camera mount accessory, but the assembly was a little more complex than I wanted to deal with.) It did take a little bit of work with a file to get the part to fit the hot shoe on my Nikon, but that’s probably a good thing. I got it to fit just as snug as I wanted after minimal filing and sanding.

Hot Shoe Audio Mount

I’m still calling this one a prototype. I ended up drilling out the hole for the bolt, and I cut the head off the bolt to be able to make it all fit together. It works, but I can see some improvements for next time. (I’m also expecting better quality from the RepRap as I get better at calibrating and operating it.)

Hot Shoe Audio Mount

Here’s the mount on the hot shoe of my camera. I haven’t done a ton of video shooting with the Nikon D3200 yet, but I know that most DSLR microphones are not very good, and secondary audio is pretty standard, so by mounting the Zoom H2 on the camera I can get better audio, and I can also monitor the audio, which you can’t do with the Nikon D3200. (The Nikon D800 does allow you to monitor audio from the camera, but we still haven’t received ours.)

So besides two nuts and a bold, there’s probably 10 cents worth of plastic. I think this shows the power of 3D printing in making things you need. I wouldn’t have been able to make this out of wood or metal very easily, but a 3D printer and a hardware store made this a pretty trivial project.

Categories
Uncategorized

Nikon D3200 – Start!

Hey, we got a Nikon D3200 in the studio… how does it work? Just fine. I mean, there hasn’t been a ton of evaluation time with it yet, but I’ll mention one thing.

When we got in a Nikon D3x a few years back the biggest pain point was that we could not open the NEF files without using Nikon’s ViewNX software. (At least not until some software updates.) My workflow is built around using the Adobe Camera RAW converter in Photoshop, so that sort of sucked. Things got solved over time, but right now with the NEF files created by the Nikon D3200, I’m out of my simple NEF -> Photoshop workflow.

DNG 7.1 Converter

The solution for now is to grab the Adobe DNG Converter “Release Candidate” software, which lets you convert NEF files to DNG files so you can open as RAW in Photoshop. (And yeah, I’m still running Photoshop CS 5, btw.)

The version I got says “7.1.0.342 beta” and when you launch it you see that it will expire in June. (We assume a new release, or worse-case a new beta, will be out by then.)

DNG Expires

The Camera Raw plugin you see listed on that page? It didn’t work for me. In fact, before I could install it I had to install the Adobe Application Manager, and then it told me it couldn’t install again. I dug through the install files, and while I did find support files for the Nikon D800 (which we’ll get in soon… I hope!) there are no files for the Nikon D3200.

DNG UI

So for now I’ll just stick with converting NEF files to DNG files, and then opening those in Photoshop. It’s another step, and it’s a PITA, but it could be worse. And while Nikon’s new ViewNX2 is a big improvement to the crash-worthy ViewNX, I still don’t care for it as part of my preferred workflow.

So here’s hoping Adobe gets that RAW plugin updated soon, and that it’ll work with Photoshop CS 5.

Categories
Uncategorized

Vivitar Foot Repair

Vivitar

So I got this Vivitar 285 flash last year, and it’s been working great, except for one thing… the little plastic foot is no match for the weight of this thing. Eventually, it broke. Argh… To be expected though.

I found a replacement metal foot on ebay for $6.99, and I watched some YouTube video that explained replacing it. Here’s the thing though… after I watched a damn advertisement, and then a 9 minute video showing how to do the replacement, I decided that I’d help people of the future by presenting the same info in a good old no-nonsense way, with words and pictures!

Broken Foot

So here is our broken foot. Thin, old, cheap plastic. No good! Grab a tiny screwdriver and remove the foot. Don’t lose the screws, they are tiny! (Also, you will need them later!)

Remove Foot

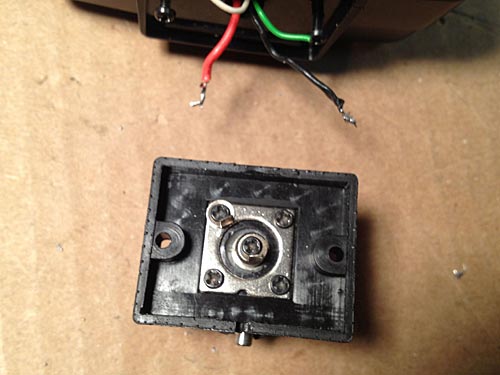
Here is the broken one still attached, next to the new one. On the original unit, there are 4 wires. Two of them (white and green) go to the test button. You don’t need these! You just need the black and red wires. The button on the new one will work just fine with only the black and red attached.

New Foot

The black and red wires are short, so don’t cut them, you need to desolder them. If you don’t have a good soldering iron, and some soldering wick and a solder sucker, find someone who does. (Maybe your local hackerspace?) I did cut the white and green ones, and put a tiny amount of tape over the ends, just to be totally safe.

Soldered

Solder the black and red wires in place securely. It appears I put the black on in the center. I’m not sure that it matters, but YMMV and I make no guarantees. (See where I put the screws? Right where they belong, because they are so damn small I was afraid of losing them!) Also, don’t put the foot on backwards, as that would be stupid. (Disclaimer: I’m not even sure you can put it on backwards. I just like disclaimers.)

New Foot

With the soldering done, put the foot in place, put the screws in, and put the batteries back in (you did take them out before you started, right!?) and test it!

OK, there’s your short guide to replacing the hotshoe foot for a Vivitar 285 camera flash. Hopefully you read this in less time than it took me to watch that 9 minute long YouTube video.

(And yeah, the fact that this is a post about photography that has terrible photos is not lost on me. Apologies…)