I recently built two custom controllers. The first was a joystick that sends key commands depending on the position. It was a simple electronic build, just incorporating a SparkFun Arcade Joystick into an enclosure.
The person I built it for asked for the enclosure to be as small as possible, so the joystick is in there tight. I also painted the ball white and the screws holding things together black.
The bottom piece of the enclosure does not use finger joints, as it’s held in place with screws. I ended up drilling holes for the screws later after I cut down some scrap wood into corner pieces that helped hold the enclosure together when gluing, and provided a place to screw the screws into.
The other controller was created using Neoprene. I did not laser cut the Neoprene, but did cut a template from wood that I used to lay on top of the Neoprene and then carefully cut with an X-ACTO knife, which worked well enough.
There are two round laser cut pieces of plastic as well, that are covered with metallic tape, and then the two wires got taped down to the discs. The wires are attached to a Teensy LC on the other end, which has built-in capacitive touch capabilities.
Some gaff tape holds together the sandwich of Neoprene to keep it all together. It’s pretty much impossible to pull it apart without destroying the Neoprene (I left that photo out) so hopefully it just works and no maintenance is ever needed.
This controller also sends keystrokes depending on which pad you touch. Oh, I also used a laser cut template to spray paint the two large white target areas. I wasn’t too pleased with the look of spray paint on Neoprene, but it’s the best I could do with a short timeline.
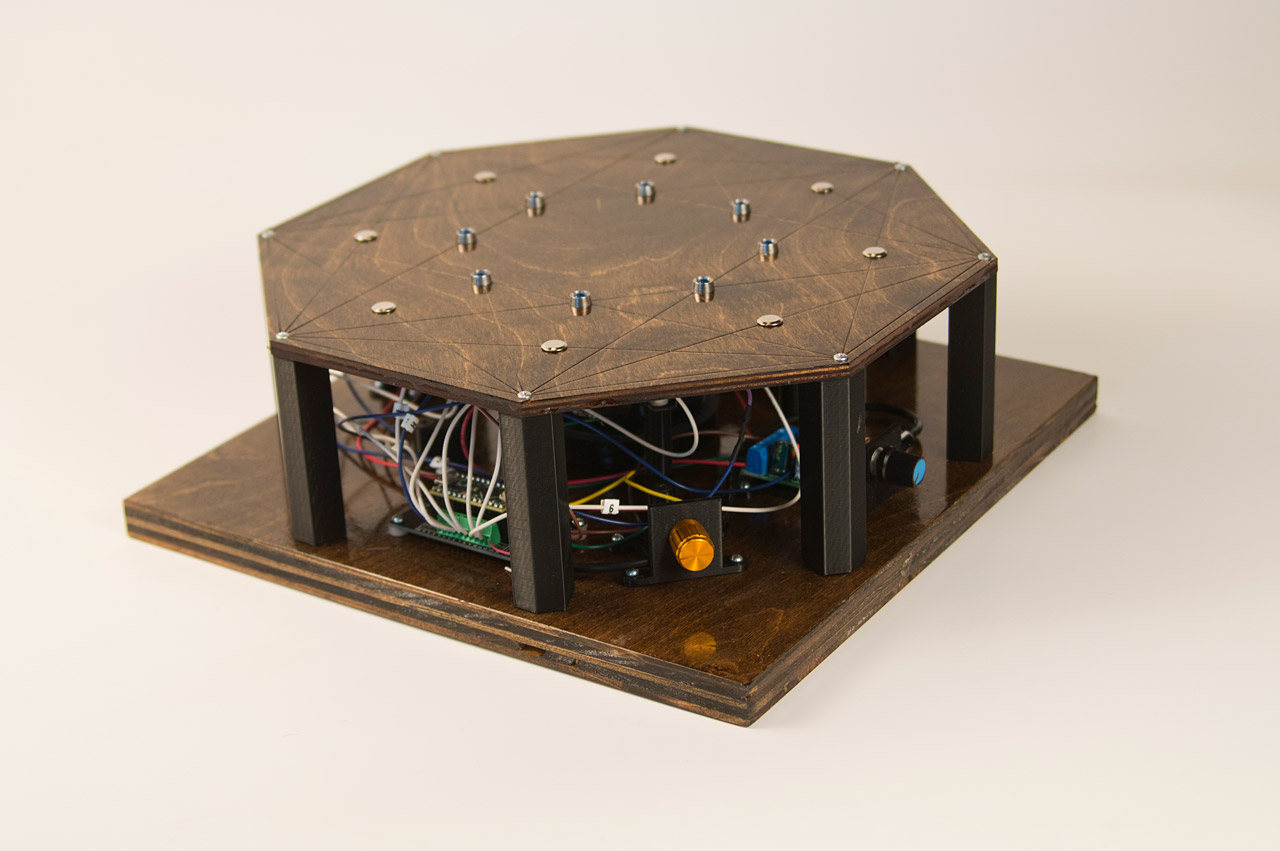
For this year’s WMSE Art & Music event, I created a new board I call OctoNoise. It’s an eight note piano featuring capacitive touch pads, LEDs, a Teensy LC microcontroller, and some fine woodworking. This is somewhat similar to last year’s piece.
You may know me for my work with decagons, but I also work with octagons, and this pattern is known as a 16 cell and it worked well for my design which utilizes 8 touch pads and 8 LEDs.
I’m not an amazing woodworker, but after laser cutting wood I can typically sand it, stain it, and add some polyurethane. At least it looks (somewhat) nice. I didn’t alter the bottom piece, and I just left it as a square, the way I received it from WMSE. My original design for this piece (over a year ago) was a bit different, but I wanted this to match the style of last year’s WMSE piece (and I was a bit rushed getting this done.)
The OctoNoise features and on/off switch, which is handy because it runs on batteries. I can’t tell you how many times I’ve made electronic things for myself and not included and on/off switch. It’s nice to have one! When you turn it on the touch pads calibrate for about 5 seconds. There’s a startup sound that happens during calibration. (I added a note about that on the back of the piece.)
There’s a “somewhat” hidden control knob on the side that ajusts the delay between notes. The way the code is written, it plays one note at a time, but you can alter that to very quickly (or slowly) oscillate between multiple notes. You can get some interesting variances in sound by turning the knob.
Note that it is difficult to turn the knob while also touching the pads to make sound. This is by design, as it’s also difficult (if not damn near impossible without using various parts of your body) to play all the notes at once. This was done to encourage collaboration and playfulness.
Here’s a side view. The height was determined by the speaker that was chosen. Once again we’ve put the electronics on display as part of the piece rather than hide them inside an enclosure. They are mean to be celebrated! (Each wire has a label showing what it connects to, if needed.)
Here’s the Teensy LC, which runs the code. The board has built-in capacitive touch pins, which make writing the code fairly easy. The notes used are C5, D5, E5, F5, G5, A5, B5, C6. This is real piano, and you can play actual songs. I based the code on a project I did for Brown Dog Gadgets a while back. You can check out their Touch Piano on Github.
This device also contains a built-in amp with a volume control. Again, a sometimes rare feature in the things I build. Often amps require 12 volts and that’s not always fun to deal with, but I’ve found some that work on variable voltages from 3 to 12 volts, so running them at the same voltage as a microcontroller becomes very easy.
Besides all the wood and electronics, there are some 3D printed parts that pull it all together. The on/off switch, delay control, amp, and battery holder all have their own 3D printed part that they attach to and then easily attach to the wood with some #4 screws. Once again, things are left “open” to celebrate rather than hide the electronics.
The other 3D printed pieces are the custom standoffs that raise the top piece above the bottom piece to (partially) enclose the electronics. I created a 2D profile from the original artwork used to laser etch & cut the piece to create the correct angle. I then extruded that design to make the tall standoffs and printed 8 of them.
Oh, one thing I forgot to mention. I liked this piece so much, I made another one so I could keep one for myself. As the old saying goes “If you’re gonna make one, make two!” So I did.
Finally, here are some videos, including one showing me playing both of them at once, which might never happen again!
Here’s a longer video I made in 2021. (Jump to 03:00 if you don’t want to hear me ramble and just want some sound.)
Once again we’ve got a noisemaker to tell you about. As you may know, there’s a whole series of these things, and they were all at Maker Faire Milwaukee in 2017, and each one is getting a blog post. (More links are at the bottom of this post.)
This one features a really nice (looking) speaker that was donated to the cause when I posted about needing unused speakers. This one was in a cabinet that was probably 25 years old, and had what I assume was fiberglass insulation inside of it. I ripped the cabinet apart at Milwaukee Makerspace one day and trashed everything but the sweet speakers which have “Muscle Magnet” power!
We’ve got a Teensy LC in this one, along with a Teensy Prop Shield (Low Cost version). I made the mistake of soldering a Teensy LC onto it instead of a Teensy 3.x and then realized it wouldn’t play the sounds I wanted to play, but it can do some speech synthesis stuff, so I embraced that. (You’ll hear what it sounds like spouting random phrases in the video below.)
One of the weird things I did with this one was make the wood look like plastic, and the plastic look like wood. Sort of. I mean, the wood is really MDF, but I gave it a glossy coat of paint, to move away from the stained wood I used in other noisemakers, and I sort of thought it looked more like a plastic surface. (Except for the sides, because MDF is stupid.)
For the “spools” I 3D printed them with wood filament, so they sort of are wood, but still plastic. Sort of. It’s confusing. Everything about this one is confusing I guess.
Here’s the spools I modeled to serve as standoff between the top and bottom pieces. The spools came about after I modeled the feet. What feet?
These feet! While the wood (uh, MDF) and plastic were on the controller part, I made bright green plastic feet, which are actually modeled as tiny speakers, to attach to the large blue speaker so it could “stand” face down on the table.
Because the Prop Shield has a built-in amp, it was much louder than most of the other noisemakers, so this was a good way to dampen the sound a bit. Hear this noisemaker in all its glory!
This is just one post in a series about noisemakers. Check out the other posts as well:
A large part of the Power Racing Series is Moxie. Moxie is best described as, being awesome. The crowd gets to vote for your car using the Moxie Board. Each button press equals a vote. Being fast is one way to get points, but another way is by being awesome… so, Moxie.
Above you’ll see a photo of the official Moxie Board used by the series. Since we also had a PPPRS race during Maker Faire Milwaukee, which overlapped the race in New York, we had to build our own Moxie Board, so here’s what we did…
It looks fairly similar, but it’s a bit smaller and lighter than the original, and it’s got 24 buttons instead of 30 (though I believe the original was recently expanded to have that 30 buttons. Who knew there’d ever be that many cars in a race!)
I got some Coroplast from Midland Plastics for super cheap, and they didn’t have any wide enough, so the black strip running down the center is gaff tape used to hold two pieces together to be wide enough. I then found some scrap wood in the shop at work which was long enough, but too skinny to be used for anything else, and built a simple frame with some small blocks of HDPE in the corners to hold it all together. (I was told the reduced weight of this Moxie Board was a big plus.)
The front is screwed into the wood frame, and the back is held in place with some VELCRO® hook and loop so we could open it to get to the electronics…
As for the inside and the electronics, while the original uses an Arduino Mega with a Bluetooth module to send real-time updates to Patrick’s Android phone which is running some special app, I chose to do it differently.
I’m using a Teensy 3.5 which has plenty of input pins and a built-in MicroSD card slot. The way it works is simple, each button represents a number from 1 to 24, and when pressed, the Teensy gets the value of every button, with the ones not being pressed equal to 0 and the one being pressed equal to 1, and then writes it to a file called MOXIE.csv. When the race is over you just put the MicroSD card in a card reader and import the CSV file into a spreadsheet and grab the last row. (Hopefully your spreadsheet is set up with the names of the cars in the corresponding columns.)
In testing, this all worked fine, but obviously the real world had to come along and crush my hopes and dreams…
Failure #1: Because the Teensy is a low power device, it doesn’t draw much power from the USB battery pack we were using. I’ve seen this before, so I use a battery pack with a built-in LED “flashlight” that stays on, as long as you press and hold the button when turning it on. I told this to two people, but forgot to write instructions to put inside the Moxie Board, so there’s a chance this was not done properly and power was lost. (There is an indicator LED that lights up when a button is pressed, but not a “POWER ON” LED which would have helped… maybe.
Maybe Failure #2: It could be that my code isn’t quite right. I do not have the most recent code that the official Moxie Board is running, but I have an older version that may be close. My code is a little different, but should yield the same results… I think. This is worth checking on.
I also do not have a good way to attach Moxie Labels, so they are just attached with tape or Hook and Loop for now. Ran out of time for anything better. :/
One more note! In the photo there’s a bunch of green wire and LEDs attached to the front of the Moxie Board. Those were added for the night race. All the actual wiring for the Moxie Board is located on the inside.
I’ve heard of one other group working on a Moxie Board that will use a Raspberry Pi, which I thought about doing as well, but ended up choosing a Teensy instead. As we add more races, we’re going to need more boards, so I’m hoping we see more ideas and eventually come up with even better ideas. (Note that I wanted to stay simple because simple gets done while over-complex builds, while fun, don’t always get finished, or work properly. But then, who am I to talk!?)
You may remember version 1.3 of my Teensy Breakout Board, and some of the planned improvements I mentioned. Well, it’s a year later, so I should probably get around to actually talking about it.
I finished v1.4 last year, and I even had a bunch of them made via Seeed Studio’s Fusion PCB service, and they turned out great. We’ve been using them for numerous projects, and just recently I finally got around to the protective fix I added in v1.4.
I modeled this tiny part and 3D printed it. It’s got a hole for a screw, and two slots for zip ties. The photos below show the rest.
Okay then, the chance of the Micro USB connection getting ripped loose from the Teensy has been reduced quite a bit! The zip ties hold the cable end in place to the plastic piece which attaches to the fifth hole on the PCB. I’m looking forward to never have to see another Micro USB jack ripped loose.
Oh, and one more thing… I ran into Jasmine during Maker Faire and we talked about Tindie, and somehow she convinced me to start putting things up there, so now the Teensy BOB v1.4 is available on Tindie in case you want or need one.